Sunday, May 29, 2016

Work shop for the 18th June

5 seats still available!


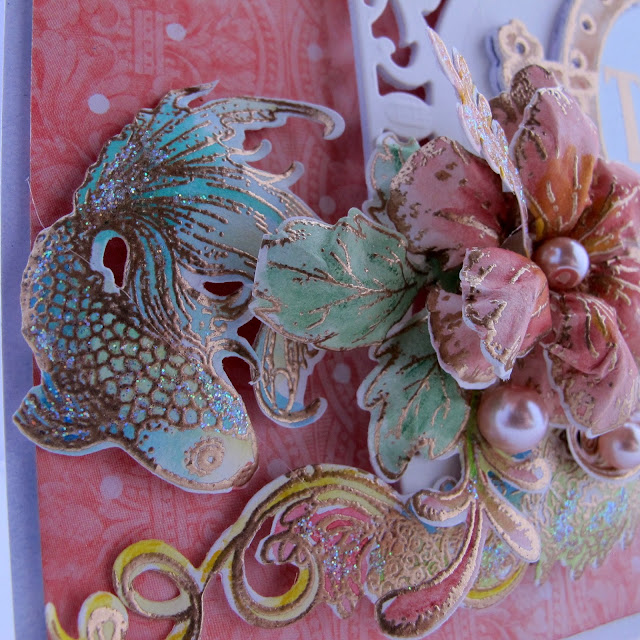
Here are a few close ups...so you can see what I will be doing on the 18th


We will be working with the paper line "Scrap-berry's"
Held over at the Handmade hobby store in Nieuw-Vennep....0252-769133....sorry foe all you gals over the water...it's a store in Holland, but you will be more than welcome to come on over....lol


Click on the link to get more info....

Wednesday, May 25, 2016

Heartfelt Creations, Under The Sea....Fish Bowl card......

'There is only one like you'
           #Heartfelt Creations Products and Products Carried by Heartfelt Creations:
DDOTS -Double Dots/3d foam squares
GBCC1212-Clear cardstock
159723- Art Institute Glue
24125- Crystal Lacquer
359760-Gold Embossing powder
ANC818-Prills, Go man go
ANC845-Prills, Flower out age
359848- Spellbinders Tool N’ one
173842-Scor-pal
SMP001- stamp Pad Mat
#Other Products Used:
Doobadoo: Fish bowl 470713.504
Ranger products: Stickles: Star dust, Water mister, Water coloring brush, Heat gun. Distress inks: Tumbled glass, Evergreen bough. Derwent Ink-tense pencils72: see instructions
Cardstock/paper: Crafters Companion-centura pearl-snow white hint of gold 300gm, Aquarelle paper, Other products used: Versa-mark, Inking foam tool, Glue gun, Heat gun, Tonic paper cutter, Tonic die cutting machine
Click HERE for the flower making tool kit
Click HERE to see the introduction of this collection
INSTRUCTIONS:
Please note: All stamping is done with the gold embossing powder. For the Derwent pencil colors used, I have made a color list for each image, because it was so many and long, you will find this listed on my blog. Look to the end of the posting. sussipoppins.blogspot.com
Instructions:
This project measures 17 cm x 17 cm when finished. The bowl measures15.2 cm x 13.7 cm. The top of the bowl is 1.7 cm x 11.6 cm. The base, 3.5 cm x 11.6 cm. 

Take the fish bowl pattern, the crafters companion card stock and trace and cut the fish bowl. For the fish bowl front, cut out the front circle using the line on the pattern. To form a clear window front, cut from the clear cardstock the same size as the bowl front. Before adhering the window, use the distress inks to bring color to the fish bowl. Now you can adhere the clear sheet to the back of the bowl hole. From the paper pad cut two strips for the foot of the bowl front. 

Find the paper with the sentiment ‘There is only one like you’, cut this to form the background of the bowl. Ink the edges then adhere in place. Stamp, color, then die cut all the embellishments.


Bring shape to the stamped images with the flower shaping tool kit. Apply stickles to the elements and back ground then put aside to dry. Make your flowers and leaves. 

To make the valley and hill support for the elements, cut from the paper pad12 cm x 10 cm. Make the folds at 1.5 cm. Ink the folds. Adhere this to the back foot of the fish bowl. Arrange the elements to the background and in the folds of the base, so each fold has sea grass, swirls, fishes and it is all in balance.

Please note: the sea grass is from the jellyfish tentacles, the swirls are cut from the flower swirl. Once you are pleased with the results and all is secure and dry, adhere this base to the fish bowl front. To finish the project, adhere the coral boarder, flowers and leaves to the front top and foot.


Well thats it for my inky love this week...so love this collection and am sure every one else does too.


Don't forget to go on back to the Heartfelt Creations blog to see the rest of the zero calorie yum thats over there....and yes you can go back for second, third helpings.....lol
Have a stampy inky week...hugs from SussiP


OXO 

Wednesday, May 18, 2016

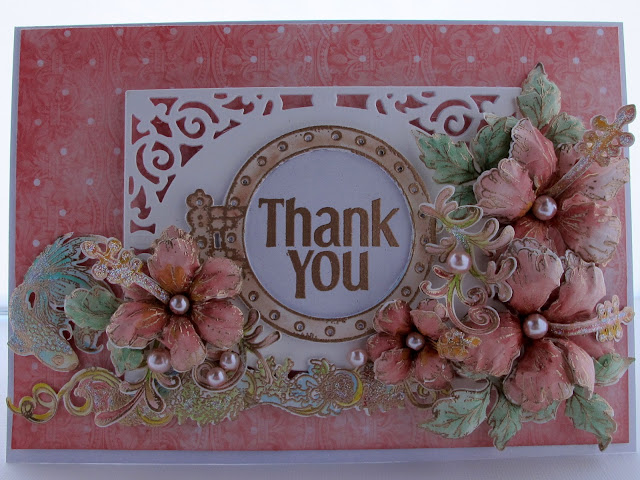
HEARTFELT CREATOINS....Thank You card

Hi...another yum Under the Sea card crafted for this week....enjoy the journey....


PRODUCT LIST
Heartfelt Creations Products and Products Carried by Heartfelt Creation.
DDOTS -Double Dots/3d foam squares
159723- Art Institute Glue
359760-Gold Embossing powder
359848- Spellbinders Tool N’ one
173842-Scor-pal
SMP001- stamp Pad Mat

Other Products Used:
Cardstock/Papers: Crafters Companion Pearl Centura-snow white hint of gold 300gm, Aquarelle paper block, Cream card stock. Ranger products: Victorian velvet distress ink, Foam inking tool, Diamond stickles, Paper distressing tool, Water mister, Water coloring brush. Other: Heat gun. Derwent Ink-tense pencils72: Go to my blog for the list of colors used. Spellbinders S5-177 A2 Filigree Delight, Pink pearl beads

Click here to see how to use the Flower shaping kit 
Click here to see the introduction of this collection


Instructions:
         The finished tent fold card measures 21 cm x 14. 6 cm.
Note: All the stamping is done on the Aquarelle paper and with the gold embossing powder. Taking the A4 Crafters Companion card stock, fold this in half. This will become your card base. Find the pink polka dotted design paper in the paper pad and cut to fit the card base front, 21 cm x 14.6 cm. less, 2mm smaller each side. Ink the edges with the distress ink. Adhere to the card front. 

Taking the cream card stock and the spellbinders die cut, 4 frames. Adhere the 4 layers together then adhere to the card base. 


Stamp, color and die cut all the images-flowers coral swirl leaves, coral corner boarder and fish. Ball and shape these with the flower shaping kit. 


Stamp color and die cut the porthole. Cutting a few extra to make a chipboard embellishment, adhere the porthole layers together. 


Stamp the sentiment then die cut using the porthole die. Adhere the porthole to the card base then slip the sentiment into place. 


Arrange the shaped die cuts in their place and adhere using the glue gun and foam dots cut to size.


Adhere the pearl beads in place with the clear drying glue. Add stickles to the flowers, fish, swirls and coral to finish the card.


See this collection is the best ever! I am so addicted to it.....so much you can do with it....you must get back to the Heartfelt Creations blog to see what else the other DT members have created this week....month!
wishing you all scrappy inky hugs as I am running back to my cave to create more fun under the sea yummies....
xox's

Friday, May 13, 2016

FRIDAY EXTRA!.....'You Are Fintastic'..... tags

Hi, wlecome to my place


‘YOU ARE FINTASTIC’
Heartfelt Creations Products and Products Carried by Heartfelt Creations:


DDOTS -Double Dots/3d foam squares
159723- Art Institute Glue
359760-Gold Embossing powder

Other Products Used:
Ranger products: Icicles’ stickles, Distressing tool, Water mister, Water coloring brush Heat gun. Tonic: Paper cutter, Die cutting machine. White A4 foam sheet. Water Aquarelle paper, Yellow ribbon. Pearl beads. Cardboard box. Gesso. Crop-a-dile. Foam tape. White A4 foam sheets, Hot glue gun
Derwent Ink-tense pencils72:  Cadmium yellow- 0210, Red oxide- 1910, Vivid green- 1330, Dark aquamarine- 1210, Sherbet lemon- 0100, Scarlet pink -1320, Deep violet 0880, Hot red 0410, Red violet 0610, Apple green 1400, Dark aquamarine- 1210, Apple green 1400, Beech green 1510, Chilli red 0500, Iris blue 0900, Sea blue 1200, Field green 1500, Tangerine 0300, Deep violet- 0760, Violet 0800, Mauve 0740, Carmine pink 0520, Med vermilion 0310, Lagoon 0810, Teal green 1300, Cherry 0510

Instructions:
Click HERE to see the flower shaping tool kit in use
Click HERE to see the introduction of this collection.

Please note: All the stamping is done with gold embossing powder. 
The size of the photos used, 2 x 6.5 cm x 4.9 cm and 2 x 3.8 cm circles. 


#Step 1: Make the 3 tags from the cardboard box. Cut to 26.3 cm x 13.2 cm. Tear away a little of the top layer. 


I use the Tonic guillotine to cut my cardboard...this works for me.


 You can see the measurements of the tag. I used the Dutch Doobadoo tag as a base for this tag.


Cut x3

#Step 2: Apply gesso and leave to dry. 
You can see I have taken away some of the cardboard top. I used a small knife with a pointed tip to tear the layer away.


I cut a cleaning sponge in 1/2 to apply the gesso...it's a throw away...


#Step 3: Cut the 2 matting paper layers to 1 cm smaller than the tag base. Distress the edges. 


Below is what it will look like when you put it all together. But first do step 4 


#Step 4: Taking the top matting layer, gold emboss in places with the coral boarder stamp.


#Step 5: Adhere all layers to the tag base with foam glue dots or tape. 


Backing all the layers with the foam tape before adhering to the cardboard tag base.


#Step 6: Cut the photos to size and back with smaller sized cardboard to give them height when gluing down. 


Make the porthole by cutting extras from the foam sheet. I used 2 layers. If you do not have foam sheet, you can cut extra shapes from cardstock (you need to cut at least 4-6 extra layers) Adhere together.


#Step 7: Stamp, color and die cut all the flowers and elements. Note: the pink sea urchins on the bottom left tag have been made using the jellyfish stamp and die set. The tentacles have been trimmed off and used upside down., these can be used as sea grass else where or on another project. The same die has been used to cut the sentiment, cutting away the tentacles. Use the flower shaping kit to bring shape to all the elements.


#Step 8: Make 2 holes in the side of the tags for the ribbon. Adhere first the porthole then the photos to the tags. Then you can begin to have fun arranging all the elements already made. All has been adhered with foam dots or the hot glue gun.


To finish add the pearls to the flower centers and here and there where needed. When all is secure and dry, tie together with the ribbon and add stickles to the flowers and the elements.


See hoe the flowers are arranged between and under the porthole...so you must m,ale this high enough to carry this.Use extra cardboard pieces to give the flowers hight if needed.


Use the jellyfish die to cut the sentiment / title, just cut away the tentacle port of the die cut.


***UNDER THE SEA***
Derwent Ink-tense pencils used
 Cadmium yellow- 0210, Red oxide- 1910, Vivid green- 1330, Dark aquamarine- 1210, Sherbet lemon- 0100, Scarlet pink -1320, Deep violet 0880, Hot red 0410, Red violet 0610, Apple green 1400,
Dark aquamarine- 1210, Apple green 1400, Beech green 1510, Chilli red 0500, Iris blue 0900, Sea blue 1200, Field green 1500, Tangerine 0300, Deep violet- 0760, Violet 0800, Mauve 0740, Carmine pink 0520, Med vermilion 0310, Lagoon 0810, Teal green 1300, Cherry 0510


I am so happy you took the time to visit....
Inky hugs and scrappy times to all. 


Wednesday, May 11, 2016

Heartfelt Creations collection release Wednesday! 'UNDER THE SEA'

This introduction so describes this must have it all collection.....
read on and have fun.
Take a walk along the edge of the deep blue sea, feel the warm sand between your toes and breathe in the salty air.  Balmy breezes tousle your hair and toy with the exotic hibiscus flower behind your ear as you stoop to snatch a lustrous seashell that has been swept onto the beach with the incoming tide. Cares and worries melt away because life really is better at the seaside.  The cool, crystal clear water lapping at the shoreline beckons you and you cannot resist the sudden urge to dive right in.  Before you know it you have been submerged into a magical underwater world where you find yourself settling on a jagged reef surrounded with burnished coral, glassy seashells and mystical sea creatures more beautiful than your imagination could ever conjure.  A peek behind the coral and waltzing seaweed finds you nose to nose with a school of fish gliding every so gently with their long, graceful flowing tails and glistening scales decorated with an abundance of shimmering and alluring colors.  Delicate sea horses and magnificent jelly fish dart and flit among the dancing aquatic plant life as to entertain you with a glorious underwater show being performed just for you.  Welcome to “Under the Sea”, the newest collection by Heartfelt Creations.  This water themed assembling of magnificent papers, stamps and dies will have you creating ravishing underwater scenes perfect for documenting your seaside vacations, ocean themed altered art pieces or salt water card creations.   The tranquil color palette of calming blues, greens and teals, paired with golden yellows, subtle shades of pinks, purples, corals and reds are sure to soothe your soul.  Creating projects with a tropical flair that will “make a splash” has been made simple with decorative papers boasting mesmerising patterns of sea shells, florals, delicate swirls and alluring hibiscus blossoms.  The intricate, detailed stamp illustrations of underwater sea creatures, glistening seashells, and exotic hibiscus flowers are sublime for shaping and creating dimensional elements adding a realistic touch to any underwater themed paper craft design.  We invite you to take the plunge and come along with us on an underwater adventure as we explore Under the Sea.

'YOU INSPIRE ME'


Heartfelt Creations Products and Products Carried by Heartfelt Creations:
STAMPS
HCDP1-266 Under The Sea Paper Pad Collection
HCPC-3736 Tropical Hibiscus cling stamp set
HCPC-3737 Under The Sea Coral cling stamp set
HCPC-3738 Coral Reef Collage cling stamp set
HCPC-3739 Under The Sea cling stamp set
HCPC-3740 Heartfelt Wishes cling stamp set
DIES
HCD1-796 Tropical Hibiscus
HCD1-797 Under the Sea Coral
HCD1-798 Coral Reef Collage
HCD1-799 Under the Sea
HCD1-776 Eyelet Oval
HCD1-762 Decorative Oval
THE ON LINE STORE
HCST1-401 Deluxe Flower Shaping Kit
DDOTS -Double Dots/3d foam squares
159723- Art Institute Glue
359760-Gold Embossing powder
359848- Spellbinders Tool N’ one
173842-Scor-pal
SMP001- stamp Pad Mat
HCCE1–611 Under the Sea Creative Essentials collection

Other Products Used:
Ranger products: Stickles: Diamond, Distressing tool, Water mister, Water coloring brush, Heat gun
Derwent Ink-tense pencils72: Cadmium yellow- 0210, Red oxide- 1910, Vivid green- 1330, Dark aquamarine- 1210, Sherbet lemon- 0100, Scarlet pink -1320, Deep violet 0880, Hot red 0410, Red violet 0610, Apple green 1400, Dark aquamarine- 1210, Apple green 1400, Beech green 1510, Chilli red 0500, Iris blue 0900, Sea blue 1200, Field green 1500, Tangerine 0300, Deep violet- 0760, Violet 0800, Mauve 0740, Carmine pink 0520, Med vermilion 0310, Lagoon 0810, Teal green 1300, Cherry 0510. Cardstock / Papers: Crafters Companion Pearl Centura-snow white hint of gold 300gm, Aquarelle paper block, White A4 foam sheet

Click here to see how to use the Flower shaping kit- htt://www.youtube.com/watch?v=rdsIOVMXjI
Click here to see the introduction of this collection- htt://www.youtube.com/watch?v=84Rel-gaqlo

Instructions:
The finished tent fold card measures 21 cm x 14. 6 cm.
Note: All the stamping is done on the Aquarelle paper and with the gold embossing powder.
Taking the A4 Crafters Companion card stock, fold this in half. This will become your card base. Find the green design paper in the paper pad and cut to fit the card base front, 21 cm x 14.6 cm. less, 2mm smaller each side. Distress the edges with the distressing tool. Adhere to the card front. Taking the A4 foam sheet, (used instead of cutting x 4-5 extra paper to make the die cut into a chipboard) the Crafters Companion card stock and the Eyelet die, cut out. Cut also the decorative die shape from the card stock. Adhere together then place and adhere to the card front. Apply a little colour to the frame front. Stamp, colour, die cut and shape the images. Note the jellyfish tail has been cut off and used as sea grass and the jellyfish head has been used as sea urchins. All is adhered with the aid of the foam dots cut to size needed. The sentiment is first stamped then the jellyfish die is used to get the oval shape…of course cutting the tentacles off and edging with the gold embossing powder. Add the finishing touch of the stickles on the fish scales, flowers and shells.


 A close up of the is beautiful shell. I had such fun colouring and shaping this shell.


Below you see the Jelly fish stamp used to make a few under the sea urchins. Trim the tentacles off and use them as sea grass. The gold embossing truly gives a mystical intrigue to the card.This same die is used to cut the sentiment....so handy.


You can see the tentacles used as the sea grass. The flowers and swirls are so wonderful to use...great fillers for any arrangement.


Love this fish stamp. When coloured, add stickler to the scales, this gives it a great finishing touch.


Another peek at the card to show the layering.


I hope you have had fun visiting me today....don't you just love this new collection?
Have fun with it....see you next time..
Inky hugs, 
Sussipoppins