Wednesday, March 30, 2022

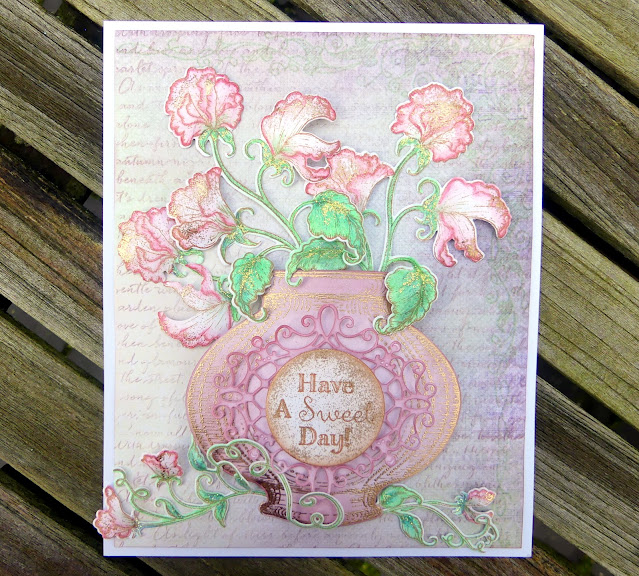
Have a Sweet Day with this adorable card.

 ..this card was so simple and fun to make....enjoy. 


A few detailed photos to enjoy.


Products Used From the Heartfelt Creations Web Store:- HCDP1-2137 Sweet Pea Paper Collection, HCPC-3901 Vining Sweet Pea cling, HCD1-7392 Vining Sweet Pea die, Card stock white, Ranger archival Inks: Sepia, Red Geranium, Gold embossing powder, Water brush,, Scor-pal, Clear drying adhesive, Heat It Tool, DDOTS

Other Products Used:- Inks: Spectrum Noir Aqua Pencils:  Soft Red, Lagoon, Bright Green, Cypress. Other: Inking brush, 3D double sided foam tape, Misti stamping tool, Diamond stickles, SUP embossing folder-scripty, Tweezers, Inking brush, Versa mark ink pad, Scrap cardboard.

INSTRUCTIONS:- This is card measures 7  7 / 8 “ X 6  3 / 8 “ when completed. Taking the white card stock make a tent fold card to the completed measurements. Taking the sheet 6 A from the paper collection and cut this to 6 “ X  7  1 / 2 “. Make the script imprint in the paper by using the embossing folder. To enhance the script, lightly brush over the surface using the inking brush and red geranium ink. Adhere this to the card base by using the 3 D double sided foam tape.

Stamp the vase by using the lager vase in the classic floral vase set, white card stock, versa-mark, gold embossing powder and the heat it tool. Bring colour to the vase by using the ink brush and the red geranium ink. Use the flower shaping tools to bring a rounded shape to the vase. Apply 3 D foam dots or scrap card board to support the rounded shape when adhered to the card front. Adhere the vase to the card front, 3  1 / 2 “ from the top of the card.

Make the lace frame by using the die from the classic floral frame die set and the white card stock. Colour the lace frame with the inking brush and the red geranium ink. Adhere to the vase on the card.

Make the sentiment by stamping the sentiment from the classic floral vase stamp set with sepia ink onto white card stock. Using the circle die that the sentiment fits into from the small circle die set then die cut. Sprinkle a little gold embossing powder around the edges of the circle, secure the powder by using the heat it tool and apply the heat from under the circle so the powder will not get blowen away. Hold the circle by using the tweezers so you wont get burnt from the heat. Adhere the sentiment to the lacy frame with 3 D foam dot or scrap cardboard.

Make the sweet pea vines by stamping on white card stock with sepia ink, three large and one small sized images from the vining sweet pea stamp set. Die cut these with the matching die set after they have been coloured with the soft red, lagoon, bright green and cypress aqua pencils. Bring shape to the image by using the deluxe flower shaping tools. Sprinkle a little gold embossing powder on each flower then secure the powder as was done with the sentiment circle. Adhere the vining sweet peas in place as seen in the project photo. To finish, apply the diamond stickles to the leaves. 


Till next time....have a great day.

XOX


https://www.heartfeltcreations.us/gallery/golden-sweet-day

Share this link on your blog & social media! Link goes live on March 30th, 2022


Please do not reply to this email.

Wednesday, March 23, 2022

Here we are again with the inspiration Wednesday..

Sweet Peas for my sweet friend


A few detailed close ups for you to enjoy.


Products used that are sold on the Heartfelt Creations web store:-HCDP1-2137 Sweet Pea Paper Collection, HCPC-3901 Vining Sweet Pea cling, HCD1-7392 Vining Sweet Pea die, HCD1-7393 Classic Floral Vase die, HCPC-3935- Fancy Special Day cling, HCD1-7320 Fancy Special Day die.Deluxe flower shaping tools,, Deluxe card stock white, Gold card stock, Daubers, Ranger archival Ink Sepia and Leaf green., Water brush,, Scor-pal, Clear drying adhesive, DDOTS. 

OtherProducts Used:-  Distress Inks: Chipped Sapphire, Peeled Paint. Other: 3D double sided foam tape, Double sided tape, Misti stamping tool, Diamond stickles, Hot glue gun, Scrap card board.

INSRUCTIONS:

This slim line card measures 8  1 / 4 “  X 4 “ when completed. Taking a slimline card base that measures the above and cut a mating from the white card stock that measures 8 “ X 3  1 / 4 “. Adhere this to the card base using the 3 D  foam tape or foam dots. Taking the sheet 1 B cut a mating  for the card front that is a little smaller than the first mating from the card stock. Adhere this to the card front by using the double sided tape or clear drying adhesive.

To make the sweet pea vines for the card:  Using the white card stock, sepia ink and the vining sweet pea stamp set, stamp two large and four small sized images. Color these with the chipped sapphire and the peeled paint destress inks. Use also the water brush and water to soften the colors. Bring shape to the images by using the deluxe flower shaping tool kit.

To make the gold lace frames: Take the lace frame die from the classic floral vase die set and the gold card stock, cut four lace frames.

To make the sentiment: using the Fancy Special Day stamp and die sets, stamp onto the white card stock with the sepia ink. Color this with the leaf green ink and the aid of the dauber. Die cut the sentiment with the matching die. Apply the diamond stickles to the writing and swirls in the sentiment, put this aside to dry.

Putting the embellishments together:  For both ends of the card front, taking a small sweet pea vine and using the hot glue gun adhere to the card front so the end flower falls just over the edge of the card edge. Taking a  gold lace frame and place on top of the vine so it will come to an 1 “ from the edge of the card, adhering at the end that falls towards the centre of the card.

Adhere a large vine on top of this so the tip of the flower will be about 1 / 2 “ from the edge of the card. Taking the remaining small vine, trim away the vine runners of the image so you have the three flowers still attached, adhere this  on top of the large vine so you will still clearly the large flower. The cut away runners can be placed as fillers to the card right and left of the flower clusters. See the project photo.

Using a scrap of cardboard or 3D foam dots to raise the next layer, trim away any stems that will be in the way of the placement, when the hight is right, adhere to the centre of the card between the frames and vines. Adhere now the remaining two gold lace frames to the card centre so they will peak out under the sentiment. See the project photo. Using a scrap of cardboard or 3D foam dots to give hight also to the sentiment, adhere the sentiment to the gold lace frames. 


Till next time...have a happy scrappy day
XOX


Wednesday, March 16, 2022

My little sweet Pea...Wednesdays inspiration


Grandpops little sweet pea moments all wrapped up in a folder


 The folder without the Belly Band


Details of the belly Band


Details of the inside of the folder


Till next time...inky hugs
XOX

Heartfelt Creations Products and products sold on their web site: Click HERE to visit the store

HCFB1-5010 Sweet Pea Shaping Mold, HCDP1-2137 Sweet Pea Paper Collection, HCPC-3980 Sweet Pea Cling, HCD1-7391 Sweet Pea die, HCPC-3901 Vining Sweet Pea cling, HCD1-7392 Vining Sweet Pea die, HCPC-3982 Classic Floral Vase cling, HCD1-7393 Classic Floral Vase die, HCD2-7340 Eyelet Gateway Frame, HCCB1-495 5” x 7” Gateway Fold Card- White, Deluxe flower shaping tools,, Deluxe card stock white, Daubers, Ranger archival Inks: Sepia, Library Green, Fern Green. Water brush, Scor-pal, Clear drying adhesive, DDOTS, Bonefolder

OTHER PRODUCTS USED:Inks: Distress Inks: Chipped Sapphire, Warn Lipstick, Peeled Paint. Other: 1” round punch, Crop-a-dial hole puncher, Double sided tape, Hot Glue Gun, Diamond stickles, Misti stamping tool, Inking brush, Organza ribbon, Scissors, Fussy cutting scissors, Pencil, Photo.


INSTRUCTIONS: Visit HERE to get a print out of the instructions 

This Folder bundle with a belly band measures   6 “ X 5  1 / 4 “  when completed. The elements needed for this project are to be stamped with the collection sets, Sweet Pea, Vining Sweet Pea, Classic Floral Vase and are stamped onto white card stock with the sepia and or library green inks: Small sweet pea vines X 4 blue, X 3 pink. Large sweet pea vines X 3 blue, X 5 pink. 3D leaves X 8. Small 3D sweet pea flowers, blue X 4. Inks used for the colouring: The blue Chipped Sapphire, for the pink warn lipstick. For the leaves Peeled Paint. A water brush is used to bring the ink onto the elements.Taking the ready made gateway fold card make a fold line at 2 “ . Cut with the scissors into this fold to the base, making a gusset so the folds will not be too bulky. Fold the pocket up so the pocket will be across the card. Sharpen all the folds with the bone folder.To make the journaling tags for the pockets: Cut from the white card stock three to four different sized frames for each pocket. Ink the edges with the green ink with the aid of a dauber or a inking brush. Adhere a pink or blue sweet pea vining image to each frame, trimming the image when needed to fit the frame. Use the back of the frames for journaling or adhere a photo. Insert the frames into the pockets.To decorate the front page: Taking the photo chosen then fussy cut around the top of the photo as seen in the project photo. Arrange the lacy frame, the pink and blue sweet pea vines around the photo and adhere in place by using the hot glue gun and the clear drying adhesive. Apply the diamond stickles to the leaves and runners then set aside to dry.To decorate the page without the pocket:Taking the sheet 10B and the Eyelet Gateway Frame die set, die cut the eyelet edged frame that fits the inside of the card. Cut the bottom of the frame so you can flip the cut piece so the eyelet edge comes across the page to look like it is a pocket. With the sepia ink stamp the sentiment found in the Classic Floral Vase cling set. Insert pink and blue small sweet pea vines into the pocket then adhere the pocket closed. Apply diamond stickles to the leaves and vines.To make the belly band: Taking the white card stock cut two pieces at 5  1 / 2 “ X 2  3 / 4 “ for the belly band base. Taking the design paper sheet 10B and the Eyelet Gateway Frames die set, die cut two frames with the eyelet edge that fits into the width of the card stock pieces. Adhere to the belly band base’s and make a hole for the ribbon with the crop-a-dial tool.To find the measurements for the belly band length, this depends on how thick your folder is when completed. Therefore all the photos, journaling and all that will be in the pockets needs to be inserted then place the right belly band part on top of the folder to make a pencil mark to where the fold will be. Now measure how thick the folder is, add a little more so the band will have a little room and this is your next fold line. Repeat for the other side using the remaining belly band. Sharpen the folds with the bone folder. Now both the belly band pieces will be joined together by using double sided tape and a little clear drying adhesive to the band ends, wrap it around the folder allowing room for the ribbon bow and join together.To decorate the band use one large blue sweet pea vine and two small pink sweet pea vines, eight leaves and four 3D sweet pea flowers. Arrange in place then secure the elements with the hot glue gun and the clear drying adhesive. Apply the diamond stickles to the leaves and flowers. When dry then the ribbon can be threaded through the holes and the bow tied.


Wednesday, March 9, 2022

Introducing the SWEET PEA collection by Heartfelt Creations...


A girlfriends son grew his hair to donate it to make wigs for cancer patients. He made some people very happy also his Proud mum, the investment of bring up children with values always pays off in the end.
Enjoy a few details of this 12"x 12"(30 x 30 cm) lay out.


PRODUCT LIST:

Heartfelt Creations Products And Product Sold On Their Web Store: HCFB1-5010 Sweet Pea Shaping Mold, HCDP1-2137 Sweet Pea Paper Collection, HCPC-3980 Sweet Pea Cling, HCD1-7391 Sweet Pea die, HCPC-3901 Vining Sweet Pea cling, HCD1-7392 Vining Sweet Pea die, HCD1-7393 Classic Floral Vase die, HCD2-7371 Letters and Numbers die, HCD1-7202 Album Tags and Accents die, Deluxe flower shaping tools, Deluxe card stock white, Hydra sponge, Glitter, Daubers, Ranger archival Inks: Sepia, Fern Green, Leaf green,Water brush,Clear drying adhesive, DDOTS, Quickstik. Other Products Used: Inks: Spectrum Noir Aqua Pencils: Bright Green, Cypress, Blueberry. Other: Sanding paper, Inking brush, 3D double sided foam tape, Double sided tape, Misti stamping tool, Ranger crackle accents, Pizza box lid, Scrap card board, Pencil and ruler, Water spritzer

 INSTRUCTIONS:

This is a 12” x  12” Layout. Taking the pizza box lid, cut this to 12  “ x  12 ”. Make mark with a pencil and ruler at  6 “  on two opposite edges.  Now taking both the sheets 1B found the Sweet Pea collection pad and cut these to the purple lace edge just shy of the green line as seen in the project photo. Adhere the pale coloured paper to the pizza base opposite edges where the 6 “ marks are not made. Once the flowers and leaves are made arranged and adhered in place, the two remaining paper strips will be adhered in place, until then prepare these by applying double sided tape or double sided 3D foam dots to these papers ready to adhere later.

To make the photo frame component: The photo used for this layout is 3  3 / 4 “  X 5  3 / 4 “. Adhere scrap cardboard to the back of the photo to strengthen and trim to size. Taking the fern green ink and a dauber to ink the edges of the photo then taking the sand paper sand all the edges of the photo. Using a paper from the collection that matches the layout back ground and the  Album Tags and Accents die, die cut two tag tops 2 “ using the outer die of the large tag. Only 1 1 /4 “ of this tag will be seen when done. Taking the white card stock, die cut four lace frames from the Classic Floral Vase die set. Adhere glitter to the frames, by using the clear drying adhesive and the hydra sponges. Sandwich a tag between two frames so the lace peaks just over and under the tag top. Adhere together with the clear drying adhesive. Make one more with the remaining tag and frames. Adhere the tags to the underside of the photo, the right side lower than the left as seen in the project photo.

Keeping two of the lager sweet pea vines apart for the next layer, you can now arrange the sweet pea vines and adhere in place using the photo frame and the two paper strips already prepared with 3D foam dots / tape as a guide as to the placements. Adhere the vines in place once you are happy with the placements then adhere the two paper strips in place using the 6 “ marks to align the  placement. The remaining vines can now be adhered to each side of the layout so they will peak out from under the frame. Adhere the photo frame in place.

Make the sentiment for the layout: Die cut the lager letter font from the Letters and Numbers die set. There are 5 layers white card stock used and inked with the fern green ink and a dauber. Once adhered in place on the layout apply the crackle accents.

Adhere the 3D sweet pea flowers in place as seen in the project photo.

To make the flowers: Using the white card stock, the stamping sets Sweet Pea and Vining Sweet Pea, the sepia ink and the misti stamping tool. Stamp both the sweet pea vining images five times each and the small sized sweet pea images also five times, this will give you enough to make 5 3D sweet peas. Bring colour to the stamped images by using the Bright Green, Cypress, Blueberry pencils and the water brush. Bring shape to the 3D sweet pea flowers by using the matching mold and the deluxe flower shaping tools. Bring shape to the vining sweet peas by using the also the deluxe flower shaping tools.

 You can get a printout of this by visiting:-https://www.heartfeltcreations.us/gallery/sweet-and-caring

Have a great day.

Inky hugs


Wednesday, March 2, 2022

Hi, today the inspiration Wednesday is featuring a golden Regal Mosaic with color


INSTRUCTIONS:

This card measures 6 “ x 6 “ when completed. Make a tent fold card to 6 “ x 6 “ from the white card stock.

From the Mosaic paper pad collection, take the sheet number 10 a and cut a mating a little smaller than the card front. Adhere this to the card front using the 3D foam tape or 3D foam dots.

Taking the Valium, the versa-mark ink, the gold embossing powder and the Floral Mosaic stamp set then stamp the image five times. Use the heat it tool to secure the gold embossing powder.

Die cut with the die set that matches the stamp, the flowers from all the mosaic circles.

Taking  two of the gold embossed mosaic circles and the die that cuts the circle with the leaves, align this to the pattern then die cut these then by using the fussy cutting scissors you can cut away each leaf, the leaves will be used for each corner of the card later.

Use the zig clean color brushes to bring color to all the sections on the flowers, leaves  and the mosaic circles. The colors used on this card are 020 Red, 001 Fl Yellow, 031 Cobalt Blue, 082 Purple, 004 Fl Green.

Shape the flowers and leaves a little with the deluxe  flower shaping tool kit. Adhere these to each of the card corners with the clear drying adhesive as seen in the project photo. Apply the clear drying glue to the flower centers then add the prills. When dry tap away the excess.

For the card center, taking a mosaic circle, adhere to the card center with the clear drying adhesive. Using the remaining circle and the scor-pal make folds in the circle using the points in the pattern as your guide. Point to point. Fold the score lines in to hill and valley folds. Apply the adhesive along the folded valley lines then place on top of the mosaic already adhered about 1 / 2 “ from the edge. You will need to hold each line in place till the adhesive dries then begin with the next fold line. Two fold lines can be done at once. When all is secured in place adhere the last flower in place.

To make the sentiment, take the sentiment ‘For My Friend’ from the Just For You Sentiments cling set and the Valium. Stamp this using the gold embossing powder. Trim to the size wanted for a banner across the card between the flowers. Adhere with clear drying adhesive under the flowers and leaves.

To finish the card apply a generous amount of clear drying adhesive to the flower center then add the prills. When dry tap away the excess.

 HEARTFELT CREATIONS PRODUCTS AND OTHER PRODUCT SOLD ON THEIR WEBSITE:

HCDP1- 2136 Elegant Mosaic paper pad collection

HCPC-3978 Floral Mosaic cling

HCD1-7389 Floral Mosaic die

HCPC-3845 Just For You Sentiments cling

Deluxe Flower Shaping Card Stock- White

Deluxe flower shaping Tool Kit

Valium , Gold embossing powder, Designer Adhesive, Metal tips for the Designer Adhesive Bottles, Scor-Pal, Quickstik, Zig Clean Clear Real Brush, Heat It Tool, Scor-pal, Prills Go-Man-Go, DDOTS Double sided foam dot.s

 OTHER PRODUCTS USED: 3D double sided foam tape, Fussy cutting scissors, Ruler, Misti stamping tool, Versa-mark, Hot glue gun.


 Thinking out of the box with using this velium to make the flowers and center piece for this card. I think the gold embossing clinched the deal.

Till next time have a happy scrappy week.

Inky hugs