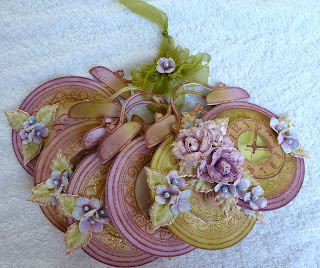
a classic clock card...read further on how to make this.

To get a print out of this go to: https://www.heartfeltcreations.us/gallery/what-time-is-it
INSTRUCTIONS:
This tent fold shaker card measures 6 “ x 7 “ when completed.
Using the
Simply Classic Oval Frame die set, taking the outer die and the white card
stock die cut two shapes. Taking the scor-pal, make a 3 / 4 “ fold across the
top of one of the shapes. Apply double side tape and adhesive to this then
adhere the two shapes together to form a tent fold card base. Using the thistle
ink and a dauber, ink the outside of the card front.
Using the
second die in from the same die set to make a card front using the collection
paper pad sheet 1 B. Using the Sapp Green ink and a dauber, ink the outside of
this shape. Adhere to the card front by using the clear drying adhesive.
To make all
the embellishments for this card:
Using the
sepia ink and the white card stock stamp and die cut with the matching die set-
The Hydrangea petals, you will need 16 of the smaller size. -The roses, you
will need 9 rose petal layers of the medium size ( each rose is made with 3
petal layers ) -The leafy accents, you will need 4 of these
Bring color
to the images by using a dauber and the inks, Magenta Hue and French
Ultramarine for the Hydrangea petals, Thistle ink for the roses and sap green
for the leaves and the leafy accents color with the sap green and the leaf
green inks. Once the elements are colored, use the matching 3D shaping molds to
bring shape to them. Also use the flower shaping tool kit to do extra shaping
when needed. Add the blue stamens to the hydrangea petals and make the roses
ready for use.
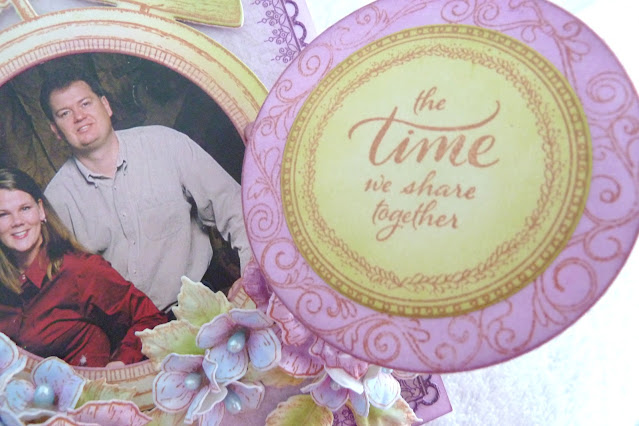
For the
sentiments use the sepia ink to stamp on the white card stock and the Timepiece
Sentiments set. Using the circle die that is found in the Elegant Moments
Timepiece die set that fits the clock face, use also the circle die found in
the Small Circle & Basics die set 3 rd out from the centre of the set.
Place this so you will get the outer sentiment in a ring. When you have done
this, bring color to the sentiments by using the daubers and the sap green, the
thistle inks.
To make the
clock:
You will first
need to use the Elegant Moments Timepiece cling and die sets, with the sepia
ink and white card stock, taking the
clock stamp and stamp one image. Die cut this, this will be your clock base.
Color this with the thistle ink using the dauber.
Using the
same sets but this time using the versa-mark and the gold embossing powder onto
the white card stock. Stamp the image twice. ( The second image, only the clock
face is needed. ) Die cut the clock image, then die cut the next part of the
clock with the matching die. ( this will become the clock front ) Using now the
second clock, die cut the clock face by using the smaller circle die. Now align
the die to the clock hands then die cut.
Bring color
to the clock pieces by using a dauber with the sap green and the thistle inks
as seen in the project photo.
Adhere with
the clear drying adhesive the die cut clock bases together first the sepia stamped
clock then the gold stamped clock.
Adhere the
clock cut out front from the gold embossed clock back in place using the 3D
foam dots or 3D foam tape.
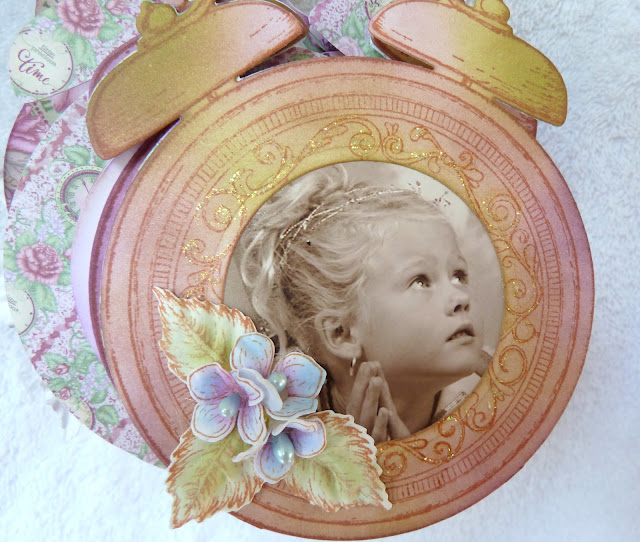
To make the
clock face shaker part: Using the die cut clock face
Using the
same die circle used for the clock face and the circle die from the Small
Circle & Basics die set ( the die 3 rd out from the centre of the die set )
Align these together with tape then die cut three rings from the 3 D foam card
stock. Taking the clear card stock make
a circle using the circle die used for the clock face. Adhere all the foam card
stock layers together then the clear card stock layer and last the gold
embossed clock face. Place a few sequins on the main clock face so they fall
into the foam circles, adhere the foam circle clock face to the main clock
base. Adhere a green sequin to the clock hand join as seen in the project
photo.
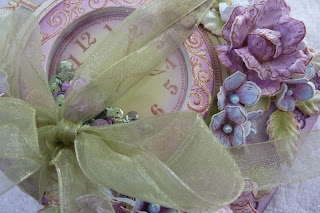
Putting the
card together: Arrange the leaves on the card front, placing the clock to check
the leaves are placed correctly, then adhere the leaves in place. Adhere the
sentiments in place also placing the clock to see the placement is correct. Now
you can adhere the clock in its place by using the 3d dots or 3d foam tape.
This should be 1 / 4 “ high.
Place the
roses and hydrangea petals on the card as seen in the project photo. Add a few
sequins and apply the diamond stickles as seen in the project photo.
https://www.youtube.com/watch?v=faBoB2s49RI
Hydrangea petals
https://www.youtube.com/watch?v=FSdPL7nXvQE
Classic rose
https://www.youtube.com/watch?v=YaDMrVikE44
Leafy accents


HCFB1-462 3D Rose Shaping Mold, HCFB1-467 Leafy Accents Shaping Mold, HCFB1-489 Hydrangea 3D Shaping Mold, HCDP1-2134 Moments In Time paper pad collection, HCPC-3971 Elegant Moments Timepiece cling, HCD1-7379 Elegant Moments Timepiece die, HCPC-3973 Timepiece Sentiments cling, HCPC-3835 Leafy Accents cling, HCD1- 7193 Leafy Accents cling, HCPC 3752 Classic Rose cling, HCD1-7110 Classic Rose die, HCPC-3900 Cottage Garden Hydrangea cling, HCD1-7278 Cottage Garden Hydrangea die, HCS1457-2 Pastel Pearl Stamens -medium, HCD2-7382 Simply Classic Oval Frame die, HCD1- 7154 Small Circle & Basics die, HCST1-401 Deluxe Flower Shaping Kit, HCPP1-475 Deluxe Flower Shaping paper pad-pack of 50, HCDA1-449 Stack and Store Daubers-pack of 6, GBCC1212 Clear Cardstock 12x12, 359760 Gold embossing powder, RAHT Heat It Tool, 352854 Metal Tip For Adhesive Bottles, 159723 Designer Dries Clear Adhesive, RACP500 Ranger Archival ink Sepia,, RACP614 Ranger Archival ink Magenta Hue, RACP436 Ranger Archival ink Leaf Green,, RACP607 Ranger Archival ink French Ultramarine, 173842 -Scor-pal Measuring & Scoring Board, 359848 Spellbinders Tool N’ One
OTHER PRODUCTS USED: Inks used: Ranger Archival ink Sap Green and Thistle. Other: Double sided tape, Thistle and Green Sequins, Versa-Mark, Diamond Stickles, Fussy cutting scissors, Misti, 3D foam card stock, Hot Glue Gun, 3D double sided foam tape