Wednesday, February 16, 2022

Anther inspiration Wednesday with the Elegant Mosaic collection


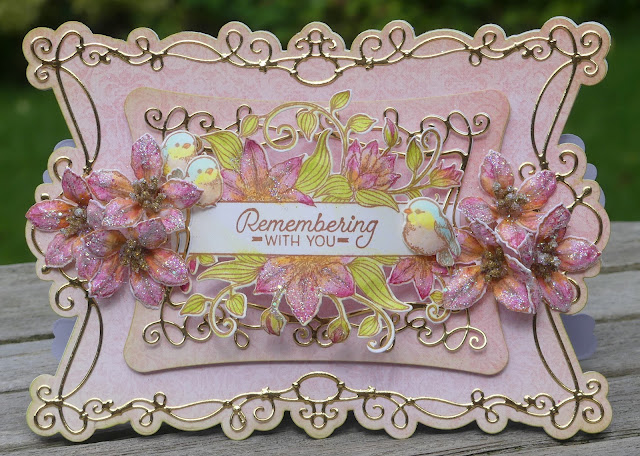
Today I have for you a card using stamps and dies with a touch of gold in the sentiment..
have fun.

HEARTFELT CREATIONS PRODUCTS AND OTHER PRODUCT SOLD ON THEIR WEBSITE:

HCDP1- 2136 Elegant Mosaic paper pad collection

HCPC-3977 Elegant Mosaic cling

HCD1-7388 Elegant Mosaic die

HCD2-7371 Letters & Numbers

HCD1-7155 Large circle die

Gold card stock, Deluxe flower shaping paper, Designer Adhesive, Metal tips for the Designer Adhesive Bottles, Scor-Pal, Quickstik, Ranger Archival Sepia ink / black ink

 OTHER PRODUCTS USED: Inks: Strawberry, Verdant Green, Parakeet, Carrot, Sunshine, Aqua. Other : Double sided tape, 3D double sided foam tape, Fussy cutting scissors, Ruler, Misti stamping tool, Versa-mark, Diamond stickles.

INSTRUCTIONS: This card measures 6 “ x 6 “ when completed. Make a tent fold card to 6 “ x 6 “ from the white card stock.From the Mosaic paper pad collection sheet number 6 A , cut a matting for this card about 5  3 / 4 “ x 5  3 / 4 “. Cut the paper so you have the printed house in the paper. Adhere this to the card front using the 3D foam tape. Taking the white card stock the sepia ink, the misti stamping tool and the ‘ Elegant Mosaic ‘ cling stamp set then stamp the boarder four times and the Mosaic circle twice. Die cut the boarders and the mosaic circles. Using the Large circle die set, choose the circle die that fits the circle in the print in the paper design. Die cut the circle out from one of the mosaic circles. Choose the die from the Elegant Mosaic set so you can cut out the pattern on the top layer as seen in the project photo. Bring color to all the elements using the Strawberry, Verdant Green, Aqua, Parakeet, Carrot, Sunshine, aqua coloring pencils and the water brush. Make the HUGS word by die cutting five layers for each letter from the white card stock and adhering the layers together. Die cut one layer for each letter from the gold card stock and adhere to the top of the letters. To put all together: Adhere with the 3 d foam tape the boarder across the card front following the print in the paper. Do this in a offset layer as seen in the project photo. Trim away the excess boarder and use this for the other side of the boarder print. Adhere the prepared mosaic circle to the printed mosaic circle using the 3 d foam tape. Adhere the remaining mosaic circle to the top of the first mosaic circle. Using the clear drying adhesive to adhere the HUGS letters to the boarder. To finish the card apply the diamond stickles to the boarder and mosaic circle as seen in the project photo.
For a printout of the instructions, click HERE

I hope you enjoyed visiting my blog today. Till next time...happy crafting.
Inky hugs and keep on keeping safe


Have you ever wondered?
Will life ever be the same and get back to the way it was after this Covid epidemic? Will we ever feel safe again? What does the future hold for us? Where can we find the real answers to these questions?
Well, I find my answers in Gods word the bible. Perhaps if you take the time to look to a few scriptures and think about it, you too might find hope and a safer brighter future for yourself and yours.
1. Revelations 21:3&4
:4 And he will wipe out every tear from their eyes, and death will be no more, neither will mourning nor outcry no pain be anymore. The former things have passed away.
Isaaih 25:8;33:24 and Psalm 37:11,29
Have a great day.

Wednesday, February 9, 2022

Inspiration Wednesday is introducing the new collection

 Elegant Mosaics,,,,


HEARTFELT CREATIONS PRODUCTS AND OTHER PRODUCT SOLD ON THEIR WEBSITE:

HCDP1- 2136 Elegant Mosaic paper pad collection

HCPC-3990 Bursting Bloom Mosaics cling

HCD1-7390 Bursting Bloom Mosaics die

HCD1-7285 Courtyard Elegance die set

HCPC-3973 Time Piece Sentiments

HCD1-7155 Large Circle die set

Deluxe flower shaping paper, Deluxe flower shaping Tool Kit, Designer Adhesive, Metal tips for the Designer Adhesive Bottles, Scor-Pal, Quickstik, Ranger Archival Sepia ink, Water pen brush. OTHER PRODUCTS USED: Inks: Strawberry, Verdant Green, Parakeet, Carrot, Sunshine, Aqua, Cobalt, Royal Blue,Bright Green Persimmon. Other: Diamond Stickles, 3D double sided foam tape, Fussy cutting scissors, Misti stamping tool,

INSTRUCTIONS: Make a tent fold card base measuring 6 “ x 6 “ from the white card stock.

From the Mosaic paper pad collection sheet number 6A and using the outer die from the Courtyard Elegance die set, cut a matting for this card. Adhere this to the card front using the 3D foam tape. From the same die set use the lace patterned die and die cut into a piece of white card stock. Adhere this to the card front applying the adhesive in the circle.

Using white card stock, sepia ink, the misti stamping tool and the ‘Bursting Bloom Mosaic ‘ cling stamp set, stamp t the Mosaic circle four times. Using the matching die set, die cut all the elements used. Die cut the small flower and the leafy layer from the mosaic circle used for the base. The rest of the layers are cut from the remaining mosaic circles. Color all the elements using the aqua water pens and the water brush-Strawberry, Verdant Green, Parakeet, Carrot, Sunshine, Aqua, Cobalt, Royal Blue, Bright Green Persimmon. Bring shape to all by using the deluxe flower shaping tools. Adhere to the card front using the double sided 3d foam tape.

For the sentiment, using the sentiment from the Time Piece Sentiments stamp set and the large circle die set. Choose the die that matches the sentiment to cut the words out in a ring. Die cut 4-5 extra rings from the white card stock. Adhere all the layers together

Trim the flowers away from the ring and adhere to the top and bottom of the mosaic adhered to the card front.

To finish the card apply the diamond stickles to the card front and mosaic as seen in the project photo.


Wednesday, February 2, 2022

A card "Remembering with you" is the Wednesday inspiration this week.


Birds perching on a sentiment label frame....adorable!


Go here for a printout:- https://www.heartfeltcreations.us/gallery/remembering-7794


Heartfelt Creations Products and Product Sold On Their Web Site:

HCDP1-2133  Floral Banner Paper Pad collection

HCD2-7383 Simply Classic Rectangle Fancy Frame die

HCPC-3969 Vining Clematis Banner cling

HCD1-7377 Vining Clematis Banner die

HCPC-3954 Clematis cling

HCD1-7355 Clematis die

HCPC-3956  Clematis Birdhouse

HCD1-7357 Clematis Birdhouse die

HCFB1-5006 3D climbing Clematis  Shaping Mold

HCPC-3848 Cheerful Note Sentiments cling

HCST1-401  -Deluxe Flower Shaping Kit

HCPP1-475 -Deluxe Flower Shaping Card Stock Paper Pad- White- 50

HCDA1-449 Stack and Store Daubers- Packet of 6

HCGP1-488 Deluxe Gold  Card Stock

HCS1-459-4 Rock Candy Stamens-small

159723-Designer Dries Clear Adhesive, 352954 Metal tip for Adhesive Bottles, RLHS100- Hydra Sponges, 173842-Score-pal Measuring and scoring Board, AM7454-Quick stick Tool, 85glitter-Ultra Fine, 409311-Color In Water color brush-fine , DDOTS- Double sided 3D Foam Dots , 359848 Spellbinders Tool ‘N One, RACP505 Ranger Archival Ink Sepia  , RACP436  Ranger Archival Ink Leaf Green.

OTHER PRODUCTS USED: Ink: Spectrum Nior Aqua Pencils: Pesto Green,  Carrot,  , Claret,  Apricot, Aqua, Mango. Other: Fussy cutting Scissors, Ruler, Misti Stamping Tool, Double Sided 3D Foam Tape, Double Sided Tape, Hot Glue Gun.

INSTRUCTIONS:

 This tent fold card measures  7“ X 5“  when completed. Using the outer die from the Simply Classic Rectangle Fancy Frame die set and the white card stock, die cut two of these shapes. Die cut also one shape from the design paper from the collection paper pad sheet 10. Adhere this to one of the white card stock shapes. Score  1 “ across the top of the other white card stock shape, apply double sided tape and adhesive to the 1 “ scored part. When placed together with the other card base shape this will form the tent fold card base. Using a dauber and the Leaf Green ink, ink the edges of the card front.

Using the same die set make the gold frame using the 2nd  die in. Die cut a frame from the gold card stock. Do the same with the die that is 4th in from the outside. Adhere the 1 st  die cut in to the card front using the clear drying adhesive. The other will be used later.

Again from the same die set take the 3 rd die in and the design paper in the paper pad collection (sheet 10 B) and the white card stock, die cut the shape. Adhere both together. Apply the leaf green ink to the edges of this frame the same as the card base.  Adhere this to the card front with the 3D foam dots.

Taking the white card stock, the sepia ink and the Veining Clematis banner stamp, stamp the image. Stamp also the sentiment. Bring color to the banner flowers and leaves by using the water color brush and the aqua pencils. The colors used are: Pesto Green for the leaves and Claret, Carrot for the flowers. Bring a little shape to the flowers and leaves by using the flower shaping tools.

Adhere the banner to the card front with clear drying adhesive, using now the remaining small frame to align the banner so it has a high curve and the ends of the frame can be adhered to the banner ends. The banner will need to have a curve to fit. Do this by rolling the banner over your fingers to curl the card stock. Adhere this now to the card front at the banner ends and at the middle of the frame sides.

Make the Clematis flowers by: Stamping, coloring and die cutting six large petals, one for each flower. Bring shape to the petals by using the collections 3D shaping mold. Use the pricking tool from the flower shaping set and make a hole in the petal centre, big enough to be able to get three folded stamens through it. Adhere the stamens in place by using the hot glue gun. Apply glitter to the flower tips by using the hydra sponge to bring the adhesive to the petal tips then dip the petals into the glitter or sprinkle the glitter. When the adhesive is dry tap the excess away, then you can trim away the excess stamen stems so they are ready for use. Adhere the flowers in a cluster with the hot glue gun, three flowers at each end of the banner.

For the birds, use the matching stamp and die sets Clematis Birdhouse. Stamp onto card stock two sets of birds using the sepia ink, three birds will be used. The color aqua pencils used for the birds are:  Aqua, mango and Apricot. Bring a little shape to the birds by using the flower shaping tools. Fussy cut the birds feet away and adhere to the card banner as seen in the project photo. Using the hot glue gun.