Wednesday, January 15, 2020

' Tweet Thoughts'

Hi, today I have a cute card for you, "I'm thinkung of you"
Have fun....


HEARTFELT CREATIONS PRODUCTS AND PRODUCT ON THEIR WEBSITE:
HCDP1-2110 Cottage Garden paper collection
HCFB1-489 3D Hydrangea Shaping Mold
HCD1-7278 Cottage Garden Hydrangea die set
HCD1-7279 Fresh Cut Hydrangea cling stamp
HCPC-3902 Cottage Window and Hydrangea cling stamp
HCD1-7280 Cottage Window and Hydrangea die set
HCPC-3844 For My Friend Sentiments cling stamp set
HCD1-7271 Rounded Window Frame die set
159723 Designer Dries Clear Adhesive
DDOTS Double Dots100pc 3D Foam Circles
RACP500 Ranger Archival Ink Sepia
RACP475 Ranger Archival Library Green
409311 Color In Water Brush - fine
173842 Score-Pal Measuring And Scoring Board
85-glitter Crystal Ultrafine Transparent Glitter
HCST1-401 Deluxe Flower Shaping Tool Kit
HCDA1-449 Stack And Store Daubers pack of 6
3D1844 Crystal Lacquer
NU802 Indian Gold Nuvo Mousse
NU822 Pacific Teal Nuvo Mousse

OTHER PRODUCTS:
Nuvo Embellishment Mousse: Burnished Bronze, Coral Calypso, Old Navy, Aquamarine, Orange Blush, Persian Red, Powder Blue, Spring Green. Spectrum Noir Harmony Inks: Sand Storm, Hot glue gun, Double sided tape, Double sided 3D foam tape, Sheena Douglas White  Stamping Card, Diamond stickles, Foam inking too, Blue organza ribbon,

INSTRUCTIONS:

This card measures 8 ¼”x 6 1/3 (21cm x 17cm) when completed.
Make a hinged tent fold  card to the above measurements. From the paper collection find the background paper with the blue and yellow hydrangeas in it, cut this a little smaller than the card base. Ink the edges of the card base and the printed paper with the sandstorm ink and inking tool. Adhere the printed paper to the card front. Die cut the fancy outer circle from the Round Window Frame die set, using the outside die and the white card. Ink the edges of this also with the sandstorm ink. Taking the fancy lace die and the printed paper cut a circle. Apply glue to the out side of the circle and dip this into the glitter. Put aside to dry. When dry, adhere both circles to the card base using a thin 3D foam tape.
Prepare all the embellishments: Taking the white card, the stamps, dies and the Nuvo mouss. ( the mousse will be used as a water colo). Stamp and die cut; x1 window and shutters, x1 bird on the branch boarder, x1 curved hydrangea boarder, x3 straight hydrangea boarder. Bring color to the embellishments and using the balling tools bring shape to the leaves, flowers and birds. Using the 3D foam dots adhere the window and shutters to the circle. The curved boarder, adhere above the window following the curve. Adhere the straight boarders under the window, about ¼” below. Adhere  two boarders first next to each other, the remaining  boarder adhere on top in the center. Place the birds on the branch at the foot of the window so you will not see a gap.
Make the sentiment by stamping I’m Thinking Of You on to the white card with the sepia ink, cut this to a banner. Apply glue to the edges then dip this into the glitter and set aside to dry. Make a triple bow from the organza ribbon. Adhere both the ribbon and the banner to the card front under the boarders.
To finish the card, apply the diamond stickles to the leaves and swirls. Apply the crystal lacquer to the birds.


Thursday, January 9, 2020

Garden of Dreams

"Youre One In A Million"
A card made using the new release....called 'Cottage Garden'....wjhat is this going to be a dreamy month.


Heartfelt Creations Products and Products Carried On Our Website:

HCDP1-2110 Cottage Garden paper collection (x2)
HCFB1-489 3D Hydrangea Shaping Mold
HCD1-7278 Cottage Garden Hydrangea die set
HCD1-7279 Fresh Cut Hydrangea cling stamp
HCPC-3902 Cottage Window and Hydrangea cling stamp
HCD1-7280 Cottage Window and Hydrangea die set
HCD1-7272 Circle Sunlight Window die set
HCD1-7155 Circle Basics Large
HCCB1-480 6”x 6” Shutter Fold Card-white
ANC814 Prills-Lettuce Entertain You
31510 Funnel Tray
159723 Designer Dries Clear Adhesive
DDOTS Double Dots 3D foam circles
RACP500 Ranger Archival Ink Sepia
RACP475 Ranger Archival Library Green
409311 Color In Water Brush - fine
173842 Score-Pal Measuring And Scoring Board
85-Glitter Crystal Ultrafine Transparent Glitter
HCST1-401 Deluxe Flower Shaping Tool Kit Balling
HCDA1-449 Stack And Store Daubers pack of 6
NU822 Pacific Teal Nuvo Mousse

OTHER PRODUCTS USED:
 Spectruim Noir Harmony Inks: Ocean blue, Grass hopper. Nuvo Mousse: Sea spray green, Spring green, Powder blue, Persian red, Orange blush, Other:  Inking foam tool,
Double sided tape, Double sided 3D foam tape, White card stock, Hot glue gun, Diamond stickles.


INSTRUCTIONS:
This card measures 6 ¼” X 6 ¼ “/ 16.5cm x 16.5cm. Taking the shutter card base and the Cottage Garden paper collection. Ink the edges of the card base that will be covered with the printed paper. Find the paper with 4 printed scenes. You will need 4 prints with the blue hydrangea’s in the opposite corners. (you will need two paper pads to get four) All the papers for the card base will be inked on the edges with the Grasshopper green ink when cut to size. Taking one of these prints and trim this to a little smaller than the card base. Adhere this square to the inside of the card base. Taking the three remaining paper prints, trace the ½ circle from the shutter card base with a pencil on the back side of the prints. Fussy cut the ½ circles a little smaller than the ½ circle so as the square. Adhere the ½ circles to the inside of the card base ½ circles. Also adhere to the second outer ½ circle on the outside as you will see this when the card is standing open.
Make all the embellishments for the card as so: Stamp and die cut  using the white stamping card and the listed stamp and die sets. x3 large hydrangea’s, 1x med hydrangea, x6 curved boarder, x1 bird on the branch boarder, x21 large hydrangea petals, x40 small hydrangea petals and die cut a circle using the larges size from the circle basics die set.
Color all the hydrangea’s using the Nuvo mousse- powder blue as water color and the Spectrum Noir- ocean blue ink for the petal edges. The leaves, use the Nuvo mousse-spring green as water color. For the birds use Nuvo mousse- Sea spray, pacific teal, sea spray green, Persian red, orange blush as water color.
To decorate the card: First take the sentiment stamp and the sepia ink, stamp the sentiment to the inside square of the card to the center right. Stamp about ¾  of the sentiment to the prepared circle. Aline the circle so the sentiments match and adhere with a thin 3D tape to the card base. Taking the prepared large hydrangea, adhere this to the circle. When the petals have been shaped with the 3D shaping mold and have the prills in the petal centers, adhere a double hydrangea petal next to the million word in the sentiment. Adhere the birds on the branch boarder to the card above the circle once the birds and leaves have been shaped with the balling tools.
Taking the prepared curved boarder and adhere to the ½ circles in the card base at the curved edge. For the two ½ circles on the front of the card, adhere two boarders to each ½ circle.
Make the hydrangea petals by using the 3D hydrangea mold. Using the tray apply glue to the petal centers and sprinkle the prills over the petals, put aside to dry. When dry adhere with the hot glue gun to the two large hydrangea’s and the medium hydrangea. Arrange the hydrangeas on the front ½ circles, trim away excess leaves  and adhere using the hot glue gun.To finish the card apply the diamond stickles to the petal edges, the swirls, the birds wings, tail  and head.


The collection is adorable. There is so much one can do with this.
Have fun and till next week with another card.
Inky hugs.

Wednesday, January 1, 2020

Setting the right foot forward in this new year......

....with a card....."YOU ARE SO THOUGHTFUL"


Heartfelt Creations Products And Products Carried On Their Website:
Calla Lilly paper collection HCDP1-2110
Calla Lilly 3D shaping mold HCFB1- 484
Calla Lilly cling stamp set HCPC-3897
Calla Lilly die set HCD1-7275
Swan Lake cling stamp set HCPC-3899
Swan Lake die set HCD1-7277
Rounded Window Frames HCD1-7271
Pastel Pollen Stamens Medium HCS1-485
Just For You sentiments (You Are So Thoughtful) HCPC-3845
Stack and Store Daubers pack of 6 HCDA1-449
Deluxe Flower Shaping Kit HCST1-401
Luxe Gold Card Stock HCGP1-488
Stack and Store Daubers pack of 6 HCDA1-449
3D Crystal Lacquer 3D1844
RAHT Heat It Craft tool
359760 Gold embossing powder
DDOTS Double Dots-3d foam circles
159723 Designer Dries Clear Adhesive
173842 Score-Pal Measuring and Scoring Board
359848 Spellbinders Tool N’ one
31510 Funnel tray
85-glitter Crystal Ultrafine Transparent Glitter
RACP475 Library Green Archival Ink

Other Products Used:
Spectrum Noir Harmony inks: Orange, Pine tree, Grasshopper, Pale Fig, Crushed Velvet,. Foam Inking tool, Diamond stickles, Hot glue Gun, Fussy cutting Scissors, Double sided Tape, 3D Double Sided Foam Tape, Misti Stamping Tool, Versa-Mark, White organza ribbon. Sheena Douglas White Stamping Card.


INSTRUCTIONS:
The finished size of this card is 6” x 6” / 15cm x 15cm
Taking the white card stock make a tent fold card measuring 6 ¼ ” x 6 ¼ ” / 16cm x 16cm. Taking the paper collection find the paper with the 4, 6” x 6” prints in the one sheet. Trim this into 4 pieces. Choose the print with the Calla Lilly boarder that goes all around the square. Ink both the card front and the paper with the Pale Fig ink and the inking tool or daubers. Adhere this paper to the card front.

Using the rounded window frames die set and the gold card stock, die cut the two larger frames from gold. From the same die set, cut the smallest and the middle die using the white card stock. Use the Pale fig and the Crushed Velvet to bring color to the white card stock die cut fancy circles. The smallest fancy circle, apply clear drying glue to the outer edge the dip into the glitter set aside to dry. Adhere the larger fancy circle to the card front with foam tape or dots. Adhere the two middle sized fancy circles together with double sided tape so the gold is on top and the Pale Fig shows through the gold. Adhere this also to the card front with the foam dots or tape. Adhere the smallest fancy circle to the card front also with the foam dots or tape, taking into account where the flowers will later be adhered so you wont see the foam dots.

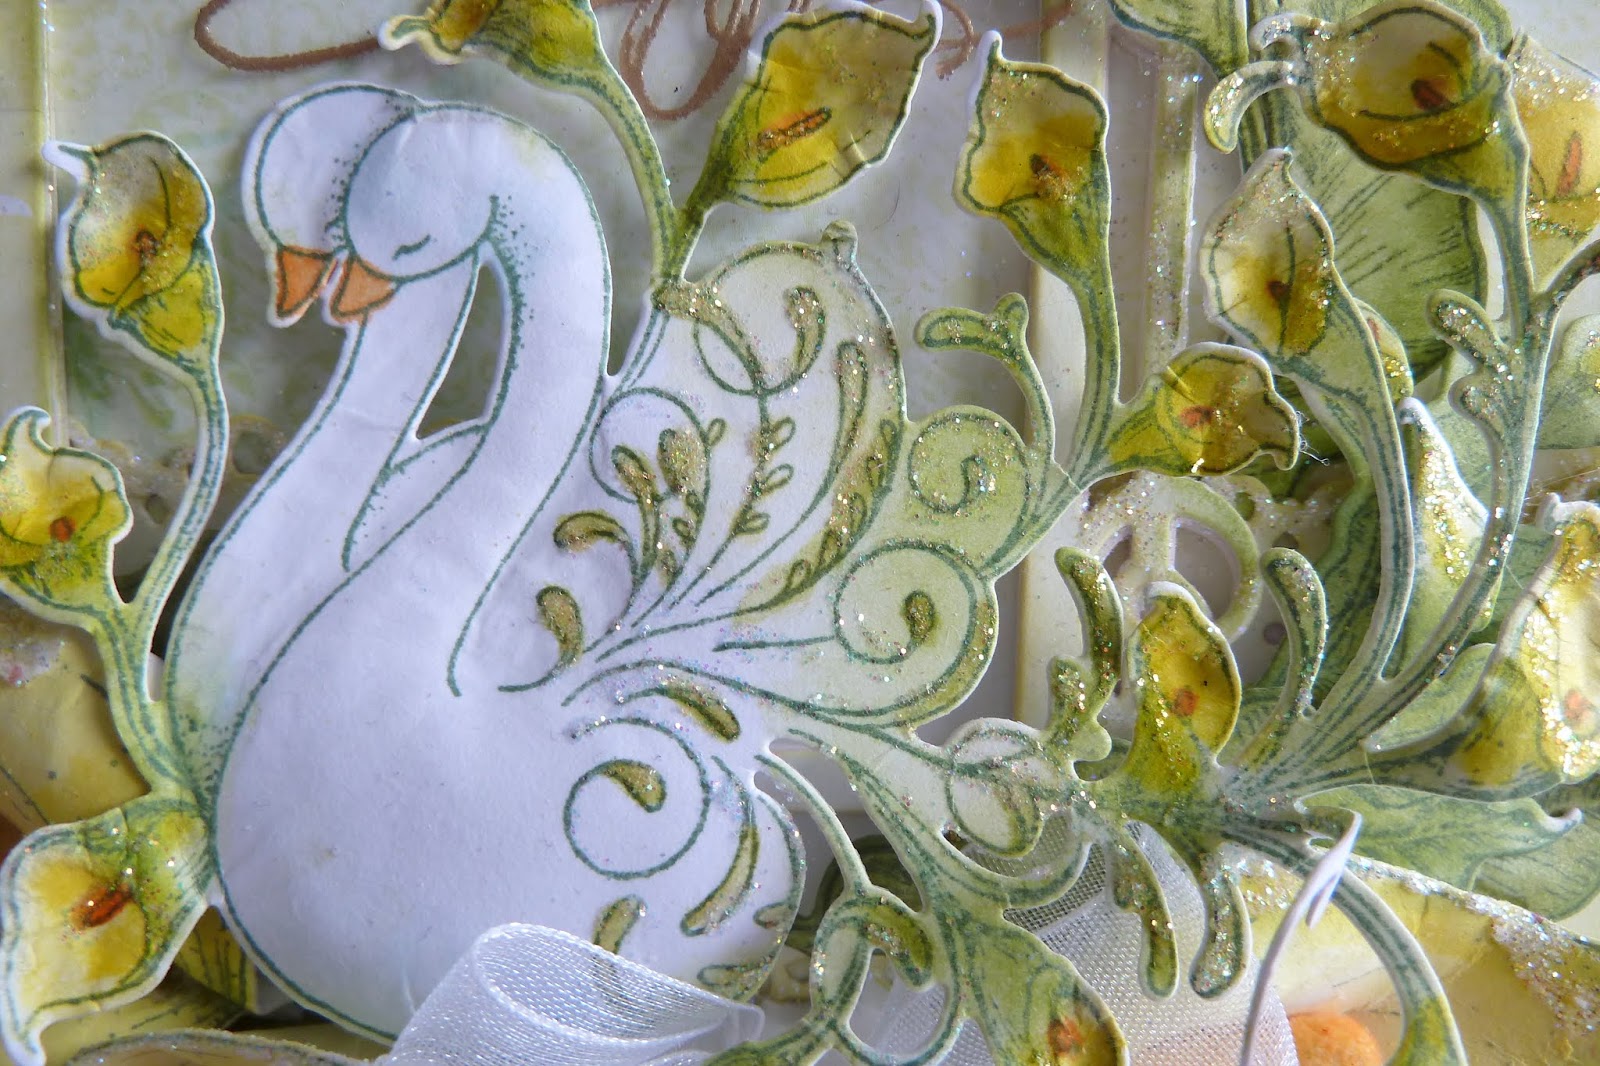
Prepare the swan and the ducklings then adhere to the fancy circle with 3D tape or dots.
Arrange the Calla Lilly sprays around the swan. Fussy cut the extra ducklings out and adhere in place using the hot glue gun. Add one of the ducklings into the raised feathers of the swan.
Making the Calla Lilly’s and sentiment, first the sentiment is stamped with gold embossing powder then the card is trimmed to 1 ½” x 5 ¼” /2cm x 13cm. Fussy cut the banner ends then ink the edges with the Pale Fig ink. Curl the ends and center with your fingers to give it a rounded shape. Adhere to the foot of the swan so the duckling heads will be coming from under the banner.
To make the Calla Lilly’s: The cream and yellow colored stamens are used for each Calla lily. Bring color to the leaves and the Calla lily’s using the Harmony inks and the inking tool. When this is done bring shape to them by using the 3D Calla Lilly mold that comes with the collection, using the shaping tools when needed. Adhere the stamen to the lily center using the hot glue gun and then folding both the lily edges over to the front to cover the beginning of the stamen. When the hot glue is dry and cold, trim the wire away ready for use in this card. Arrange the leaves a lot the foot of the card as a base for the flowers. Arrange the Calla Lilly’s, three on the right and one on the left. Add a triple double bow made with the organza ribbon.

To finish the card, apply Straw Bale ink to the ducklings then the crystal lacquer. Diamond stickles to all the beaks, the Calla Lilly sprays and dots to the small fancy frame.


Don't you just love these adorable baby swans. A beautiful collection to finish the last years collections.
The comming year Heartfelt CReations have more fun crafty goodies coming our way....can't wait to share it all with you.
Hugs, till the new years new collection...lol...next Wednesday...lol
Inky hugs,Sussi

Wednesday, December 25, 2019

DEC 25th FOR THE BRIDE AND GROOM


FOR THE BRIDE AND GROOM


Heartfelt Creations Products And Products Carried On Their Website:
Calla Lilly paper collection HCDP1-2110
Calla Lilly 3D shaping mold HCFB1- 484
Calla Lilly cling stamp set HCPC-3897
Calla Lilly die set HCD1-7275
Feathery Swan cling stamp set HCPC-3898
Feathery Swan die set HCD1-7276
Swan Lake cling stamp set HCPC-3899
Swan Lake die set HCD1-7277
Botanic Window (Limited Edition) HCD1-7100
Album Tags and Accents die HCD1-7202
Pastel Pollen Stamens Medium HCS1-485
Classic Wedding Wishes cling stamp set HCPC-3790
Stack and Store Daubers Pack of 6 HCDA1-449
Deluxe Flower Shaping Kit HCST1-401
RAHT Heat It Craft Tool
359760 Gold Embossing Powder
DDOTS Double Dots-3d foam circles
159723 Designer Dries Clear Adhesive
173842 Score-Pal Measuring and Scoring Board
359848 Spellbinders Tool N’ one
31510 Funnel Tray
85-glitter Crystal Ultrafine Transparent Glitter
RACP475 Library Green Archival Ink

Other Products Used:
Spectrum Noir Harmony inks: Orange, Pine tree, Grasshopper, Lemon Tonic.
Diamond stickles, Hot glue Gun, Fussy cutting Scissors, Double sided Tape, Double Sided Foam Tape, Misti Stamping Tool, Versa-Mark, White organza ribbon, A4 Sheena Douglas White Stamping Card. Crafters Companion Heat Resistant acetate. White card.


INSTRUCTIONS:
The finished size of this card is 8 ¼” x 6 ¼” / 21cm x 16cm
Taking the white card stock make a hinged tent fold card measuring 8 ¼” x 6 ¼” / 21cm x 16cm. To do this, cut x2 of the above measurements from the white card stock. From one of the cards make a
 ½ “ / 1.5cm fold line across the smaller edge. Apply the double-sided tape between the edge of the card and fold line. Remove the protection tape about 1” / 2-2.5cm on both ends, fold these back on an angle so you will be able to remove it when adhered. Once both the cards are aligned remove the protection tape. Your card base is made. When the card is completed, the back card can be folded out so the card will stand.

Cutting list: 
The Arch: 3x white card, 1x white stamping card. The swans:1x  Calla Lilly: 3x large,3x medium, 2x small. Calla Lilly large sprays: 3x pairs Calla Lilly sprays small: 2x spray pairs. Leaves; 3x large leaf, 3x small leaf. All the stamping is done with the Library Green ink.

Ink the card front edge with the Yellow Tonic ink using the dauber or foam-inking tool.
Find from the collection the pale green background paper with the swan in the arch on it, cut this to size. Ink also the outer edges of the papers with the Yellow Tonic ink. Adhere the papers to the card front leaving the space to between the two papers for the paper eyelet lace die cut. The paper lace trim is inked with the Yellow Tonic ink then dipped into the glitter. Set aside to dry, when dry trim to size then adhere across the card.
Make the arch by adhering all the die cuts together, making sure you have the stamping card on the top for inking with the Yellow Tonic and Grasshopper inks. When the arch is inked apply glitter to the outer edge, when this is dry adhere the arch to the card front so the tip of the arch is about ½” / 1.3cm from the top of the card.

To make the Calla Lilly’s: 
The cream colored stamens are used for each Calla lily; apply a little orange ink to the stamens before use. Bring color to the leaves and the Calla lily’s using the Harmony inks and the inking tool. When this is done bring shape to them by using the 3D Calla Lilly mold that comes with the collection, using the shaping tools when needed. Adhere the stamen to the lily center using the hot glue gun and then folding both the lily edges over to the front to cover the beginning of the stamen. The wire is inked with the grasshopper ink. For these flowers the wire is not cut away until they are twisted around each other to keep the flower spray in place.

Once the Calla Lilly’s, leaves and all the elements are made adhere first the leaves and the Calla Lilly’s the foot of the card front. Make a double bow and adhere this in place. The swans, then the sentiment above the swan’s heads, adhere the sentiment made with the acetate using the hot glue gun or clear drying glue to the edges of the arch. Adhere the Calla Lilly sprays where needed as fillers for the arrangement making sure the glue used for the sentiment is covered. Also adhering the Calla Lilly sprays on both sides of the arch.
To finish the card, apply the diamond stickles to highlight the stamens in the Calla Lilly sprays and to the swans leaves and lilies.


I love love  this collection...the lilly's and swans make a great marriage...well done Heartfelt Creations!
Till next week...inky scrapping,
Hugs Sussi

Wednesday, December 18, 2019

DEC 18th (Candlelit collection)

Hello to you, a winter card for someone more than just a friend....


"YOU ARE...SO MUCH MORE THAN A FRIEND"

Heartfelt Creations Products And Products Carried On Our Website:
HCDP1-2104 Candlelit Christmas paper collection
HCPC-3881 Christmas Poinsettia & Holly cling stamp set
HCD1-7249 Christmas Poinsettia & Holly die set
HCPC-3882 Candlelit Poinsettia cling stamp set
HCD1-7250 Candlelit Poinsettia die set
HCPC- 3883 Glow of Christmas cling stamp set
HCD1-7251 Glow of Christmas cling stamp set
HCFB1- 478 Christmas Poinsettia 3D Shaping Mold
HCPC-3844 For My Friend Sentiments cling stamp set
HCDA1-449 Stack and Store Daubers pack of 6
HCST1-401 Deluxe Flower Shaping Kit
DDOTS  Double Dots-3d foam circles
159723 Designer Dries Clear Adhesive
173842 Score-Pal Measuring and Scoring Board
359848 Spellbinders Tool N’ one
31510 Funnel tray
85-glitter Crystal Ultrafine Transparent Glitter
359848 Spellbinders Tool N One
478455 Zig Clean Color Real Brush Makers
RACP475 Ranger Archival Ink-Library Green

RACP454 Ranger Archival Ink-Manganese Blue
RACP962 Ranger Archival Ink- Fern green

ANC 804 Heart Of Gold Prills

Other Products Used:
Diamond stickles, Sheena Douglas white stamping card, Hot glue Gun, Fussy cutting Scissors, Double sided Tape, Double Sided Foam Tape, Misti Stamping tool, Inks: Spectrum Noir Harmony inks- Grasshopper, Lemon Tonic, Paper distressing tool. Ranger Archival Ink-Saffron, Round foam-inking tool.


INSTRUCTIONS:
This completed card measures 6” X 6” (15cm X 15cm)
Taking the white card stock make a tent fold card measuring 6” x 6” / 15cm x 15cm. 
Taking the Grasshopper ink and inking foam tool and ink the edges of the card base.
 Find the printed-paper used from the Candlelit Christmas paper collection. Cut the green paper, 6.10” X 6.10” (15.5cm X 15.5cm) and the blue paper to 5.70” X 5.70” (14.5cm X 14.5cm) Taking the paper distressing tool and distress all sides of both matting papers.  Stamp the sentiment from the ‘For My Friend’ sentiment stamp set or a chosen sentiment on the front matting paper. Taking the round shaped inking tool and make a yellow glow for behind the candle when the element will be adhered to the card front later, using the Lemon Tonic ink. Adhere both the matting papers to the card base using the double-sided foam tape.
Now make all the elements for this card: To make the Poinsettia flowers and Holly leaves- stamp the Candlelit Poinsettia’s and Holly leaves in the Library Green ink onto the white stamping card. Bring the color onto the images using the daubers and Archival inks, Manganese Blue and leaf green. When the coloring is finished, die cut all then bring shape to the flowers and leaves by using the 3D flower mold. Use the flower shaping tools to bring further shape if needed.  Stack three layers together and adhere together by using the hot glue gun. Apply clear drying glue to the petal points with a brush then dip into the glitter. Put aside to dry on the funnel tray. When dry, tap the flower on the side of the tray to eliminate any excess glitter. Apply clear drying glue to the poinsettia flower centers then pour the prills onto the flower. Taking a shaping tool press lightly on the prills, this will push the prills into the glue. Put aside to dry on the tray, when dry they are ready to use on your card.
Taking the Candlelit Poinsettia stamp and die set for the candle and cluster base. Using the largest stamp for the main element and the smaller for the top right corner for the cluster base. The smaller, trim away the candle and adhere this upside down to the card top right corner. Using the ‘Glow of Christmas’ sets for the holly border branch, stamp, color and die cut. Once the elements are shaped a little with the flower-shaping tool, adhere to the card front corners in clusters, using the hot glue gun and the 3D foam dots or squares.
Adhere the flowers and leaves in place.


To finish the card, apply the diamond stickles to the sentiment and the elements so they will be highlighted where wanted.


Till next time, hugs and love...
Sussi


Wednesday, December 11, 2019

DEC 11th brings you a new collection from Heartfelt Creations

Hi, what do you think of this? One word...ADORABLE!
A de-lish-e-mo collection called....'Calla Lilly'


“HAPPY ANNIVERSARY”

Heartfelt Creations Products And Products Carried On Their Website:
Calla Lilly paper collection HCDP1-2110
Calla Lilly 3D shaping mold HCFB1- 484
Calla Lilly cling stamp set HCPC-3897
Calla Lilly die set HCD1-7275
Feathery Swan cling stamp set HCPC-3898
Feathery Swan die set HCD1-7276
Pastel Pollen Stamens Medium HCS1-485
Eyelet Lace Frame HCD2-7192
Circle Basics Large HCD1-7155
Celebrate Love sentiments (Happy Anniversary) HCPC-3847
Moments With You (Limited Edition) HCPC-3568
Stack and Store Daubers pack of 6 HCDA1-449
Deluxe Flower Shaping Kit HCST1-401
RAHT Heat It Craft tool
359760 Gold embossing powder
DDOTS Double Dots-3d foam circles
159723 Designer Dries Clear Adhesive
173842 Score-Pal Measuring and Scoring Board
359848 Spellbinders Tool N’ one
31510 Funnel tray
85-glitter Crystal Ultrafine Transparent Glitter
RACP475 Library Green Archival Ink

Other Products Used:
Spectrum Noir Harmony inks: Orange, Pine tree, Grasshopper, Pink Tulip.
Diamond stickles, Hot glue Gun, Fussy cutting Scissors, Double sided Tape, Double Sided Foam Tape, Misti Stamping Tool, Versa-Mark, White organza ribbon, Zutter Bow maker, Foam inking tools. Sheena Douglas White Stamping Card.  Crafters Companion Heat Resistant Acetate.

INSTRUCTIONS:
The finished size of this card is 8 ¼” x 6 ¼” / 21cm x 16cm
All the stamping for this card is done using the gold embossing powder and the white stamping card. Here is the stamping and die cutting list: x1 circle sentiment, x1 Lace frame, x1 Swan pair, x9 Calla Lilly’s small, x4 pairs of Calla Lilly sprays, x4 Large leaves and x4 small leaves. From the acetate stamp with the gold embossing powder the Happy Anniversary sentiment.
Taking the white card stock make a tent fold card measuring 8 ¼” x 6 ¼” / 21cm x 16cm
Using the Pink Tulip ink and a dauber or a foam-inking tool, ink the edges of the card front base. Finding in the paper collection the paper with the pink print. Cut this a little smaller than the card base. Ink the edges of this paper also with the Pink Tulip ink then adhere this to the card front.
Taking the lace frame, the inking tool, the Grasshopper and the Pink Tulip ink then ink the lace frame to give a pink color on the outside and the green on the inside of the frame. Adhere this to the card front using the 3D foam dots.

To make the Calla Lilly’s:
The cream colored stamens are used for each Calla lily; apply a little orange ink to the stamens before use.
Bring color to the leaves and the Calla lily’s using the Harmony inks and the inking tool. When this is done bring shape to them by using the 3D Calla Lilly mold that comes with the collection, using the shaping tools when needed. Adhere the stamen to the lily center using the hot glue gun and then folding both the lily edges over to the front to cover the beginning of the stamen. The wire is inked with the grasshopper ink. For these flowers the wire is not cut away until they are twisted around each other to keep the flower spray in place.
Arrange the Calla lily’s and leaves at the foot of the lace frame as seen in the photo. Making a half circle for the swans to sit in. Leaving enough room for a triple and double bow made with the zutter bow maker at the center of the arrangement.  Using as needed, the Calla Lilly sprays as fillers for this flower arrangement.

To make the swans:
Apply a little Pink Tulip ink to the head and body of the swan on the left. Apply diamond stickles or glitter to the swans feathers and crown on the right swan. Put aside to dry. Make two double bows and fold them on half. Adhere the bow so they will stay folded in half with the hot glue gun. Adhere the bows to the back of the swans at the tail so they will look like an extension of the feathery tail.

To make the circle above the swan’s heads:
 This is made from the circle sentiment. Taking the circle dies that will cut the outer circle ring from the stamped sentiment, Apply a little Pink Tulip ink to the out side of the circle ring. Apply the glitter to the ring buy first applying clear drying glue to the surface then dipping or sprinkling glitter to the circle ring. Set aside to dry. When it is dry adhere the circle ring to the back of the swans between the swan and the ribbon bows.
Adhere the swans in place to the flower arrangement center and the acetate sentiment at the foot of the card. To finish this card apply a little diamond stickles or glitter to all the stamens in the Calla Lilly sprays.


Told you so...ADORABLE...
Can't wait to share the rest of the collection with you.
Till then inky love, Sussi


Wednesday, December 4, 2019

DEC 4th....is......"THINKING OF YOU TODAY"


Hi, I love this card, hope you do too.
 Enjoy.


Heartfelt Creations Products And Products Carried On Their Website:
Window Scenes paper collection HCDP1- 2109
Round Bi-fold Card-White HCCB1-481
Rounded Sunlight Window HCD1-7272
Rounded Eyelet Window HCD1-7273
Window Hinges HCD1-7285
3D Cherry Blossom Shaping Mold HCFB1-474
Tweet Cherry Blossoms HCPC-3866
Tweet Cherry Blossoms HCD1-7230
Cherry Blossom Retreat HCPC-3867
Cherry Blossom Retreat HCD1-7231
Assorted Pearl medium (pink)- HCS1-458-2
Stack and Store Daubers pack of 6- HCDA1-449
Deluxe Flower Shaping Kit- HCST1-401
Double Dots-3d foam circles- DDOTS
Designer Dries Clear Adhesive-159723
Spellbinders Tool N’ one-359848
Crystal Ultrafine Transparent Glitter 85-glitter
Crystal Lacquer-3D1844
Zigg Clean Color Real Brush Makers-478455
Coffee Archival Ink- RACP451

OTHER PRODUCTS USED:
Hot glue Gun, Fussy cutting Scissors, Double sided Tape, Double Sided Foam Tape, Misti Stamping Tool, Sheena Douglas White Stamping Card, Spectrum Noir Harmony inks: Grasshopper, Chinese Red, Winter Rose.


INSTRUCTIONS:
The finished size of this round card is 6” x 6” 
Using the readymade round Bi-fold card as the card base, fold in half the middle circle to form the card stand. Place double sided tape to the folded side that folds to the back of the card front and adhere to the card front back. This will form the flip hinge and stand of the card.
Taking the white cardstock and the Rounded Eyelet Window dies, the one with the boarder in it and the outer scalloped edge die cut x 1 with one half of the lace circle and the 2nd with the half circle cut twice in the circle so you will get a boarder across the center of the circle. Bring color to the circles using the Chinese Red, the Grasshopper and the Winter Rose inks. Look to the card photo.
The stamping and die cutting list for the rest of the embellishments used in this card as follows:
The birdhouse x 1, the hanging sentiment x 1, The small keys x 2, the lager key x 1, the birds on the branch x 1, the extra birds x 6, the branches x 7, the small flowers x 36, the middle sized flowers x 22, the lager sized flowers x 13,
Bring color to the elements using the zigg markers. Bring shape to the flowers, birds and leaves by using the matching mold and the shaping tools.


THE FLOWERS AER MADE AS FOLLOWS:
Stamp the flowers and leaves needed for the project. Colour with the inks or Zigg markers. The Zigg markers used for these flowers are: 230 Pale Rose and 046 Mid Green for the flower centre and leaves. Once the flowers and leaves have colour, bring the shaping to them by using the 3D Cherry Blossom Shaping Mold. Make a whole in the flower centre for the stamens. On the smaller flowers thread 1 stamen and on the larger flowers thread 3 stamens into the whole. Use the hot glue gun to secure the stamens. When the hot glue has cooled and dried, apply a little clear drying glue to the petal edges with an old fine brush. Holding the stamen threads at the back of the flower, dip the petals into the glitter. Set aside on a try or sheet of paper to dry. When dry tap away the excess glitter then cut away the stamen threads at the back of the flower. These are now ready to use on your project.


THE BIRDS ARE MADE AS FOLLOWS:
Stamp and die cut the birds. Bring colour to the birds using 037 Cornflower Blue, 026 Light Pink, 051 Lemon Yellow and 023 Scarlet Red. Then bring shape to them by running them through the cutting machine with the 3D shaping mold for this collection.
The Zigg marker colours used for the bird’s house: 026 Light Pink, 037 Cornflower Blue, 046 mid Green. The hanging sentiment: 046 Mid Green and a Light Brown


Adhere the blossoms and branches to the center of the card base. Add the extra shaped birds to the birds on the branch..  Adding small blossoms as needed to fill the gaps. Making sure this can be used as a stopper for the card front. Arrange the elements to the card front: First adhere the branches with the leaves to the top and the foot of the card front then adhere the flowers in place by using the hot glue gun or clear drying glue. Adhere with foam dots and the clear drying glue the birdhouse and the sentiment hanger in their place, falling under the flowers. Adhere the keys in their place to the card front and the card base.
To finish the card, apply the Crystal Lacquer to the birds, the birdhouse, the sentiment hanger and the keys. Lay flat and set aside to dry.


These premade card bases makes our craft time even more fun!...and what about those window dies?
Till next time have a wonderful scrappy inky day.
Hugs from Sussi