is called.....'Young At Heart'....
To start this months crafting yummy goodness off at my fun place...
I have done 2 postings for all the 'Beetle car Lovers'...lol
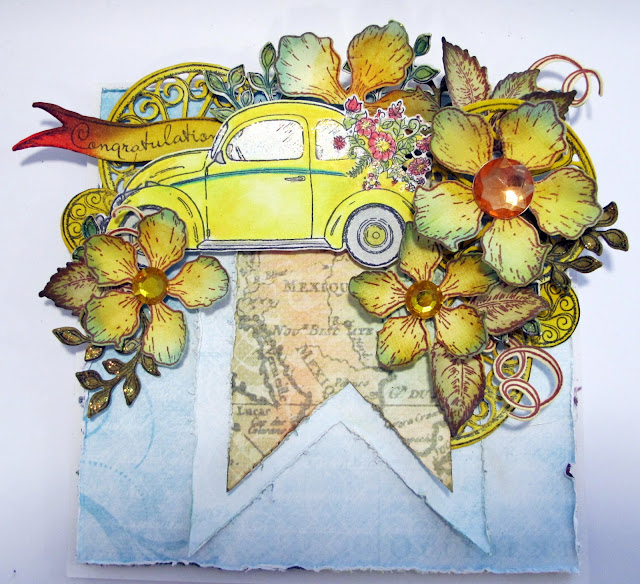
My 1st posting (this one) is a easy peasy tent fold card with the sentiment 'Congratulations'
A teaser....
This month, later in the month, has a 'to die for' special launch, full of yum and no calorie goodness, so hold onto your seats because the ride is well worth waiting for.
Below is a description of whats to come with this collection.Hit
the open road with the new Young at Heart Collection by Heartfelt Creations!
Retro in style, this fun and playful transportation themed assembling of
designer papers, cling stamp sets and coordinating dies will have you
reminiscing and reliving past road trips with family, taking in a flick at the
local drive in, sitting at the late night hamburger joint with friends in your
classic automobile, or soaring the open skies in a vintage airplane! The
classic style paper collection is filled with far out transportation graphics
from an era in time where life was carefree and the journey was wherever the
open road would take you! Diamond checkered patterns, retro themed signs, beach
scenes and late night diner script mixed with vintage vehicle graphics are enveloped
in a groovy colour palette of bright stoplight reds, yellows, and greens, with a
hint of electric pinks, flashy teals and glowing orange tones. Two sets of
nifty cling stamp sets with coordinating dies reveal high wheeled bicycles, old
fashioned airplanes, classic coupes, vintage pick-up trucks as well as several
nostalgic banners and signs! A third fun filled cling stamp set flaunts hip and
amusing sentiments sporting 50’s era style script perfect for completing the
styling of days gone by on all of your retro themed creations! So grab your
main squeeze, make sure you’re the first one to call shotgun and travel along
with us as we cruise back in time where we will always be forever young!
Warning: use of this collection may cause feelings of youthfulness, feeling
carefree or a desire for adventure
“Congratulations” tent fold card
Heartfelt Creations Products And Products Carried On Our Website:
Other Products Used:
Pale Yellow card stock , Diamond Stickles, Water Mister, Inking tool, Bone folder, Paper distressing tool, Scissors, Ruler, Black Archival Ink. Distress Inks: Forest Moss, Barn Door, Broken China, Mustard Seed. Spectrum Noir Blending colour pencils: Dove Grey C670, Sea Green C380, Deep Red C130, Yellow Green C450, Lemon Yellow C030, Deep Cadmium C040, Windsor & Newton Oil colour low oder solvent, Blending stumps. Other: Double sided Tape, Double Sided Foam tape, Misti, 3 x crystal buttons (for flower centres )
Instructions:
The finished size of this tent fold card is 5 1/4” x 5 1/4” (13.5 cm x 13.5 cm )
Taking the white card stock make the tent fold card base. Find the design paper with the blue in it, also the paper with the world map print. Cut the blue paper a little smaller than the base for the matting. Distress the edges. Adhere to the card base with 3d foam squares. Using the blue paper cut a banner, being 3” ( 7.5 cm ) wide. Taking the world map printed paper cut a banner a little smaller for a matting layer. Distress the edges of both papers. Adhere both papers to the centre of the card front with glue, leaving the edges free so you can curl them up a little. Taking the white card stock stamp, die cut and colour the car, vintage bike, sentiment and branches of leaves.
Trim away the wheels from the vintage bike and colour these with the yellow ink. From the pale yellow card stock, stamp colour and die cut the flowers and leaf clusters from the Classic Rose collection. Spraying these with the water mister then bring a little shape to the leaves and flowers. Arrange the embellishments made as seen in the card photo. First placing the car in it’s place then tuck behind it the flower, wheels, sentiments and leaves. Place also the flowers so they are a little over the car wheels.
Adhere the crystal buttons to the flower centres. To finish, apply the diamond stickles to the car windows, leaves and the flower centres on the car.
For more tips on creating with this collection watch the tutorial at https://youtu.be/kmqAVM6ibfM.
Of course you can always change a sentiment to fit whatever suits the occasion, there is enough sentiments to chose from in the stamp sets.
Just when you think you have seen the cutest and best collection ever....something cute like this comes along.....and there is so much more to come! Yes this week a double posting, so don't forget to go to the next post post to see #2...I think it will be well worth it the effort.
sussipoppins inky hugs.
OXO


Gorgeous!
ReplyDeleteAbsolutely gorgeous!!!
ReplyDeleteGorgeous creation Susan! Love how you used the wheels on the bicycle as decorative accents...so clever!
ReplyDeleteThis card is super darling Susan! I love all the jewels you added to it and your flowers and colors are so pretty!
ReplyDelete