Heartfelt Creations Products And Products Carried On Their Website:
Other Products Used:
Inks: Lindy’s Stamp Gang Sprays: Grab-a-Guy Gold, Hydrangea
Blue, Ponderosa Pines Olive. Distress Inks: Forest moss, Fired brick, Victorian
velvet, Wild honey. Archival ink:
Venetian Orange. Other: Matching orange card-stock, Golden
Rod stickles, Hole pricking tool, Scissors, Ruler, Hot glue gun, Fussy Cutting
Scissors, Double sided Tape, Double Sided Foam Tape, Misti stamping tool, Crop-a-dial,
Golden Rod stickles. Water mister.
Click HERE to see the video on using the Deluxe Flower
Shaping Tool Kit
Click HERE to see the video on this collection
Click HERE to see the video on using the flower shaping
molds
Instructions:
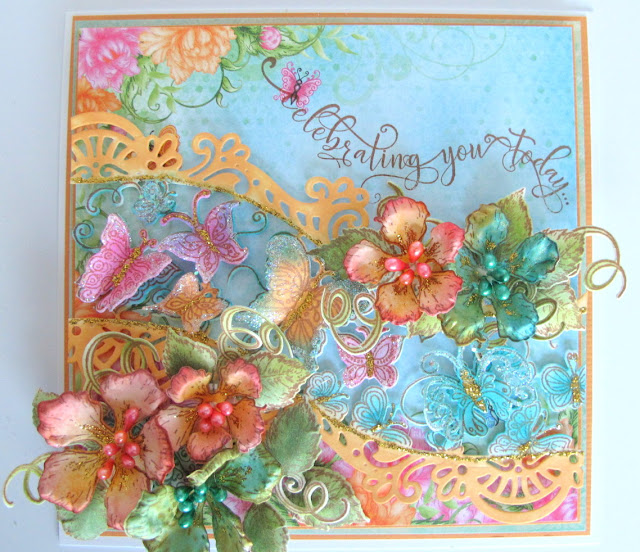
The finished size of this square tent fold card is 6.299”
x 6.299” (16 cm x 16 cm)
To make the card base:
Taking the white card-stock, cut the card base to 6.299” x 6.299” (16 cm x 16 cm) x2. In one of the cards make a 0.59” (1.5 cm) fold in the top, add double sided tape to the fold. Placing both pieces together this will form the tent fold card base. Taking the orange card-stock cut matting (15 cm x 15 cm) And (14.5 cm x 14.5 cm). Find from the paper collection the design paper used and cut this a little smaller than the card-stock mattings. Adhere together the matting and matching design paper using double sided tape or clear drying glue Adhere the two layers together using the 3d foam tape or dots.
To make the flowers:
Taking the design paper scraps from the collection use the
classic rose stamp and die set to make the rose petals. Use the distress inks
to bring color to the leaves, rose petal tips and centers. Spray the petals and
leaves with the water mister place in the rose mold then put the mold through
the die cutting machine twice to get a good press. (Do not make the paper or
card-stock too wet as the paper will break in the mold when you put it through
the die cutting machine. If you do make it too wet, leave to dry until they are
just moist just as you would when balling to bring shape to the petals with the
tools. ) For the blue / green colored
flowers, these are sprayed with the Lindy’s stamp gang sprays- Grab a Guy Gold,
Hydrangea Blue, Ponderosa Pines Olive Spray also the cut away inner part of the
eyelet frame that was put aside. Leave to dry a little, as the petals will
still be too wet. When ready put these through the machine in the rose mold.
Take the petals out of the molds with the aid of the piercer tool found in the
flower shaping tool kit. Leave the shaped petals to dry completely. When dry,
shape the centers so the petals cup up. Prick a hole in the petal center to you
can thread the stamens through the opening.
The stamen colors used are the pink and the green fond in the bright
pearl assortment bundle. Take three stamens, fold in half then thread the stems
through the whole. Secure with at the back with the hot glue gun. The glue is
cooled off, trim the excess stems away.
The card front:
Taking the Elegant Border Basics die set and chose the
border used. Cut the lace boarders from the white card-stock to fit the
butterfly border. Trim to fit the card front then apply colour with the Venation
Orange archival ink and daubers. Taking the white card-stock, the Butterfly
Border stamp, matching die and inks, stamp, colour then die cut the image twice.
Trim one of the borders to fit across the card front. Bring colour to the
butterflies of this border with the Garden Patina ink. Before adhering to the
card front this border with the border lace together using 3d dots, align and
stamp the sentiment taken from the Butterfly Kisses stamp set. For the 2nd
butterfly border that was cut, apply colour to the butterflies using pinks blues
and oranges listed in the product list that match. Fussy cut the butterflies
away from the frame. Apply clear drying glue to the wings then dip in the
glitter. When dry, make a fold at the wing base to give shape then adhere to
the same shaped butterfly in the border with the hot glue gun or clear drying
glue. Arrange the flowers and leaves at the base of the card and along the lace
border. Adhere in place using the hot glue gun. To finish the card apply the
golden rod stickles to the butterfly bodies, at the join of the borders and to
the flower petal bases.
Close ups of the layered butterfly's and flowers.
Well ... that was fun.
I hope to see you back next week....Heartfelt Creations has for you a surprise!
A special launch!
Goodies you must have!
....and what I have for you, is a triple posting! 2 cards and a mixed media tag.
...till next week, here's the sneak peak...
....scrappy inky Sussipoppins hugs
OXO


Beautiful!
ReplyDeleteAbsolutely beautiful Susan, love the colors!
ReplyDeleteOh your card is so gorgeous!! I love the combo of colors and dies you used to makes this gorgeous elegant fluttery card! Love it!
ReplyDelete