
COTTAGE GARDEN COLLECTION
BEST WISHES
Heartfelt Creations Products And Products Carried On Our
Website:
HCDP1-2110 Cottage Garden paper collection
HCFB1-489 3D Hydrangea Shaping
Mold
HCPC- 3900 Cottage Garden Hydrangea cling
stamp
HCD1-7278 Cottage Garden Hydrangea die set
HCPC-3901 Fresh Cut Hydrangea cling
stamp
HCD1-7279 Fresh Cut Hydrangea die set
HCPC-3902 Cottage Window and Hydrangea cling stamp
HCD1-7280 Cottage Window and Hydrangea die set
HCD1-7285 Courtyard Elegance die set
HCD1-7203 Ornamental Tags die set.
HCD1-7281 Stairway Gardens die set
HCST1-401 Dluxe Flower Shaping Kit
HCDA1-449 Stack And Store Daubers
ANC818 Prills Go-Man-Go
31510 Funnel Tray
159723 Designer Dries Clear Adhesive
DDOTS Double Sided 3D Foam Dots
RACP475 Ranger Archival Library Green
409311 Color In Water Brush-fine
RLHS100 Hydra Sponges
173842 Score-pal Measuring And Scoring Board
85-glitter Crystal Ultrafine Transparent Glitter
3D1844 Crystal Lacquer
NU822 Pacific Teal Nuvo Mousse
NU802 Indian Gold Nuvo Mousse
OTHER PRODUCTS:
Hot glue gun, Double sided tape, Double sided 3D foam tape,
Sheena Douglas White Stamping Card, Foam
inking tool, Diamond tickles, Ranger Archival Ink Maroon. Nuvo Embellishment
Mousse: Orange Blush, Persian Red, Powder Blue, Spring Green, Burnished Bronze,
Coral Calypso.
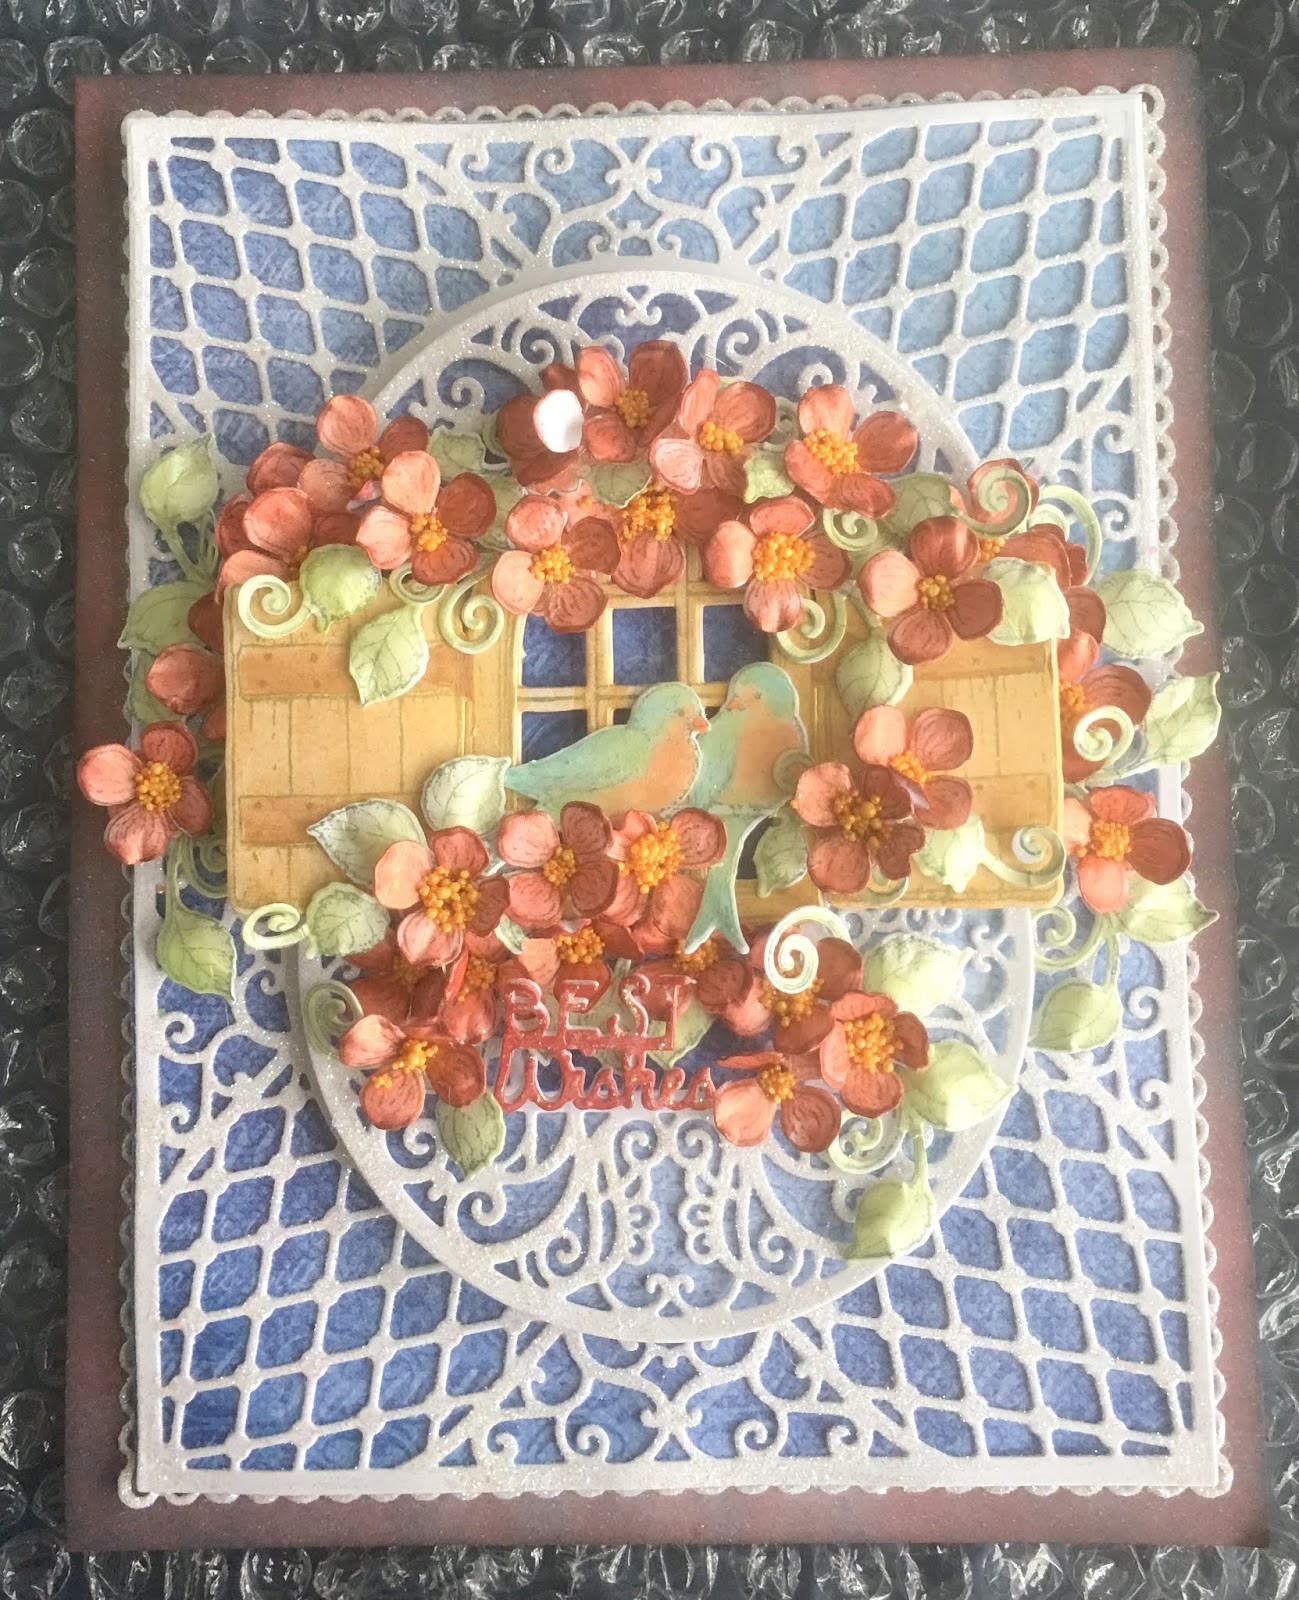
INSTRUCTIONS:
The measurements for this complete tent fold hinged card is
6 ½”x 8 ¼” (16cm x21cm) All the embellishments are colored with the mousse as
water color using the water pen.
Taking the white card make the hinged card to the above
measurements. Apply the Maroon ink to the card base front edges. Find the outer
die from the Stairway Gardens die set. Die cut this twice from the white card, trim
so when adhered together this will measure 7 ¼” in the length, making an oblong
shape. Apply glitter to the outer edges and when dry adhere to the card front
with double sided tape. Find the blue printed background paper in the Cottage
Garden collection, cut this to measure the same as the oblong above. Adhere
this to the card front using the 3D foam dots. Die cut also the circle
backgrounds and two small squares found
in the die set from the same blue paper. Taking the white card and the
Courtyard Elegance die set, die cut the lace square twice. Trim the squares so
they will fit to the blue background paper oblong. Apply glitter to the two die
cuts. When dry adhere to the blue background. Taking the white card and the
lace circle from the same die set, die cut two circles .Also cut two background
circle from the blue paper. Trim the circles so they will fit into the now oval
shape in the card font. Apply the glitter to the white die cuts. When dry
adhere both the lace and blue paper pieces to the card front oval with 3D foam
dots.
Make all the embellishments for the decoration of this card
by stamping coloring and die cutting: 1x the bird on the branch, x31 petals
(prills will be added to the petal centers), x2 the curved boarder and x5 the
strait boarder (color only the leaves a this is for the extra leaves used as
fillers) 3x the window and shutters(color only one of these as the layers will
be stacked and adhered together) X4 the sentiment (fussy cut away the outside
so you have only the words then adhere all the layers together)Adhere the window to the card
front so it covers the join in the oval. Fussy cut away the birds and adhere
them to the window. Arrange the curved boarder above the window and adhere.
Fussy cut leaves and add them behind the window shutters, under the birds and
on top of the window. Adhere the sentiment to the card. To finish, apply the
crystal lacquer to the birds. To finish the card, apply the diamond stickles to
the sentiment.
No comments:
Post a Comment