Wednesday, July 29, 2020

Hi...it's inspiration Wednesday with Heartfelt Creations...


Using the Snowy pines collection, I have made a card...
"Just wanted you to know


PRODUCTS USED MADE BY HEARTFELT CREATIONS  AND PRODUCTS CARRIED IN THEIR WEB STORE:


OTHER PRODUCTS USED:
INKS: Spectrum Nior: Harmony Inks- Grass Hopper, Honey Pot, Chinese Red :- Aqua Brush Pens- Red Berry, Smoked Quarts, Sun Gold, Olive, Moon Light, Sterling Silver, Aquamarine, Holly Leaf. Other- Diamond Stickles, Double sided tape, 3D double sided foam tape, Inking tools, Misty stamping tool, White card stock, Scrap card (eg. Cereal box), Gesso.


INSTRUCTIONS:
This card measures 8 ¼” x 5” (21cm x 12.6cm) when finished. Taking the white card stock make a tent fold card to the above measurements. Using the smoked quarts ink and the inking tool, ink the edges of the card base.
Taking the collection papers, find the sheet number 4b and cut this a little smaller than the card base. Using the grass hopper ink the edge of the paper then adhere this to the card base using the 3D foam tape or foam dots.
 Taking the Snowy pine cardinals and the Snowy pines cabin stamps and matching die sets, stamp once both stamps and die cut. Die cut only the wreath part of the Snowy pine cabin part. Using the scrap card, die cut the cardinals and the wreath  four times. Adhere together using the clear drying glue. Adhere the cardinals to the wreath trimming away the birds so you will not see them and placing the cardinal tails over the gap. Adhere the 3D dots behind the cardinals so this will support them when adhered to the card. Taking the sentiment and the coffee ink, stamp both the sentiments in their place on the card front. Once this is done adhere the wreath with the cardinals adhered in place to the card front.
Using the Deluxe Flower Shaping Paper and the Christmas Poinsettia & Holly cling stamp and die set, stamp the flowers and leaves. Each flower you will need 3 layers (9 flower petals) 5 holly leaf sets are used. Colour the holly leaves using the grass hopper ink and the flowers are coloured with both the honey pot ink and the Chinese red ink. Use the Christmas Poinsettia Shaping Mold to bring shape to the flowers. Use the prills for  the flower centres. Adhere the leaves and flowers at each side of the wreath.
 To finish the card apply a little diamond stickles to the bird wings and the gesso to the flower and leaf edges. Put aside to dry.


I love these Cardinals...we don't have them here in Holland but I do have them in my stamp and die stash so I have them all year round...lol.

Have a scrappy happy inky week, till next time, inky hugs

Wednesday, July 22, 2020

Cozy pinecones, adorable birds and glitter...


...thats what makes today an interesting winter card.


PRODUCTS USED MADE BY HEARTFELT CREATIONS  AND PRODUCTS CARRIED IN THEIR WEB STORE:

HCDP1-2117  Snowy Pines paper collection- Sheet 9a
HCPC-3917  Festive Pine Cones cling stamp set
HCD1-7302  Festive Pine Cones die set
HCPC-3919   Snowy Pines Cabin cling stamp set
HCD1-7305 Ornate Ovals die set
HCPC-3884  Candy Cane Cottage cling stamp set  (Sentiment)
RACP451 Ranger Archival Ink-Coffee
DDOTS Double Sided Foam Dots
159723 Designer Dries Clear Adhesive
HCDA1-449 Stack And Store Daubers pack of 6
HCPP1-475 Deluxe Flower Shaping Paper pack of 50-white
173842 Scor-Pal Measuring & Scoring Board

OTHER PRODUCTS USED:
INKS: Wink Of Stella- 999 GL. Clear : Spectrum Nior: Harmony Inks- Honey Pot. : Aqua Brush Pens- Red Berry, Smoked Quarts, Sun Gold, Olive, Moon Light, Serling Silver, Holly Leaf., Aquamarine. Other: Diamond Stickles, Double sided tape, 3D double sided foam tape, Inking tools, Misty stamping tool, White card stock.


INSTRUCTIONS:

This card measures  6 ½” x 6 ½” (16.5cm x 16.5cm) when finished.
Taking the white card stock make a tent fold card to the above measurements. Taking also from the paper collection the sheet number  9a Cut the checked paper a little smaller than the card base and cut the yellow paper about an  ½” smaller than the card base. Taking the Honey Pot ink and inking tool, ink the edges of the card base and the papers. Adhere the papers to the card base using 3D foam tape or double sided tape.
Taking the Oval Ornate frames die set and die cut from the white card stock both the frames used. Ink the edges of these frames with the Honey pot ink and foam inking tool. Once this is done ink again the lager frame on the very edges with the Grass Hopper ink. Adhere these frames to the card front by using the 3D dots or the double sided #D foam tape.
 Taking the white card stock make two banners. One larger than the other. Ink one with the Honey pot ink and the other with the Grass Hopper ink. Adhere the two banners together then adhere to the card front at the foot of the frames. Taking the white card stock, the Snowy Pine Cones stamp and die set and  the Snowy Pines stamp. Stamp and die cut the large pine cone and the wreath with the birds.  Colour the elements with the Aqua markers and the Wink of  Stella pen. Fussy cut the two birds and adhere them in place as seen in the card photo. Once the cone has been coloured and die cut, use the deluxe flower shaping tools to round the pine cone and bow.
The colours used: The birds-Moonlight, Stirling Silver, the bow- Moon light, Aquamarine, spun gold. The cone- Smoked quarts. The holly leaves- holly leaf, the needles-Olive, the berries- red berry.
Adhere the pine cone in place using the 3D foam dots. To finish this card, apply the diamond stickles to the berries , holly leaves and the birds. Put aside to dry.


So cute and cozy..
Till next time, happy scrappy inky days
Hugs XXX


Friday, July 10, 2020

This new coolection was released Wednesday

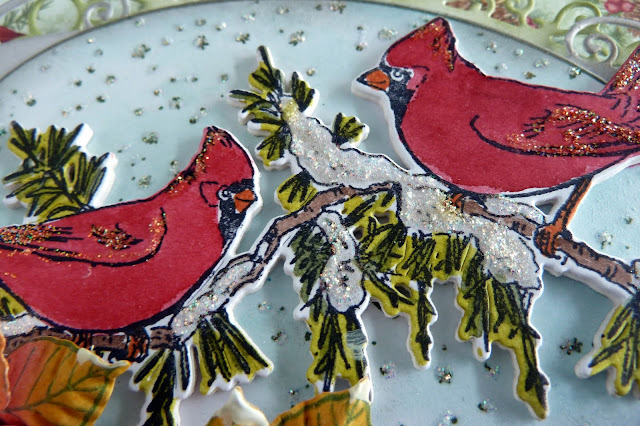
It's called the 'Snowy Pines' collection. Adorable with the Red Cardinails.
Enjoy what I did with  a first project with it.


See the product list below.

PRODUCTS MADE BY HEARTFELT CREATIONS  AND PRODUCTS CARRIED IN THEIR WEB STORE:

HCDP1-2117  Snowy Pines paper collection- Sheet
HCPC-3918  Snowy Pine Cardinals cling stamp set  
HCD1- 7303  Snowy Pine Cardinals die set
HCD1-7305 Ornate Ovals die set
HCPC-3881  Christmas Poinsettia & Holly cling stamp set
HCD1-7249  Christmas Poinsettia & Holly die set
HCFB1-478 3D Christmas Poinsettia Shaping Mold
HCPC-3844  For My Friend Sentiments cling stamp set  (I’m thinking of you)
ANC814 Lettuce Entertain You Prills
RACP451 Ranger Archival Ink-Coffee
RACP475 Ranger Archival Ink-Library Green
DDOTS Double Sided Foam Dots
159723 Designer Dries Clear Adhesive
HCDA1-449 Stack And Store Daubers pack of 6
HCPP1-475 Deluxe Flower Shaping Paper pack of 50-white
173842 Scor-Pal Measuring & Scoring Board

OTHER PRODUCTS USED:


INSTRUCTIONS:
This card measures when finished, 8 ¼ “ x 5 ¼” (21cm x 13.3cm)
Taking the white card stock make the tent fold card to the above measurements. Taking the collection paper find the sheet 4B. Trim this paper to a size a little smaller than the card base measurement. Taking the Grass hopper green ink and a foam inking tool, ink the edges of both the card front and the collection paper. Adhere both together using the double sided foam tape.
Taking the white card stock and stamp the image with from the Snowy Cardinals stamp set twice. Die cut one of the stamped images with the matching die for the Cardinals and the other using the outer oval die from the same set. Using these dies, die cut additional cuts from the card x4 each.  When the white card stock has been colored in with the inks adhere the card to the back of each image. The colours used are: the cardinals-Red Berry, and Harvest Moon. The branch and needles- Smoked Quarts, Spun Gold, Olive, The snow- Diamond stickles. The oval back ground- Aquamarine and diamond stickles. The  edge of the oval is colored with the platinum ink. Adhere the cardinals to the back ground using the 3D foam tape or dots. Apply the diamond stickles to the snow drops in the back ground oval.
Taking the white card stock die cut the lace frame from the ornate Ovals die set. Using the first and second largest dies. Bring colour to the smallest die cut frame by using the Midas platinum ink and a foam inking tool. For the largest die cut frame use the Grasshopper Green ink for the colour. Cut the smallest frame in half. Adhere  a ½ frame to both ends of the oval using glue or double sided tape. Adhere this to the green frame using 3D double sided foam tape or foam dots. Adhere this element to the card front.
 Make a sentiment banner using the sentiment and the coffee ink. Apply the grass Hopper green ink to the edges of the banner Adhere this to the card front to the left of the foot of the oval. Make the poinsettias buy using the Christmas Poinsettias stamp, die set and mold. Stamp with the Library green ink and die cutting with the matching die set x 6 to make 2 flowers. x3 petals, each flower. x4 holly leaf sets. Colour the flowers with the Honey pot  and Chinese red inks, the leaves with the grasshopper ink. Adhere with the hot glue gun in place. Apply the clear drying glue to the flower centres then sprinkle the prills on to the flower centres. Leave to dry. Apply a little gesso to the flowers and leaves for a snow effect.

 Giving you some close ups, enjoy


These birds are so cute...I am sure sorry we don't have these in our garden here in Holland....but I do have them in a stamp and I am happy with what I got...lol.
Happy scrappy hugs and still keep yourself safe 
Hugs


Wednesday, July 1, 2020

1 July..." Welcome Baby Boy"

Hi, back to normal today...lol
 with a specail card  to welcome the new baby boy to the world.


Heartfelt Creations Products and products carried by Heartfelt Creations website:

HCDP1-2116 Tender Moments paper collection
HCFB1-486 Small Wild Rose Shaping Mold
HCDC-3914 Baby’s Air ballon cling stamp set
HCD1-7299 Baby’s Air ballon die set
HCDC-3915 Welcome Baby cling stamp set
HDC1-7300 Welcome Baby cling stamp set
HCDC-3916 Baby’s Friends cling stamp set
HDC1-7301 Baby’s Friends cling stamp set
HCPC-3906 Small Wild Rose cling stamp set
HCD1-7289 Small Wild Rose die set
HCD1-7306 Decorative Circle Frames die set
Ranger Archival Ink RACP505 Sepia
Ranger Archival Ink RACP656 Sky Blue
Ranger Archival Ink RACP475 Libaray Green
Ranger Archival Ink RACP005 Sunflower
DDOTS 3D Foam Dots
159723 Designer Dries Clear Adhesive
3D1844 3-D Crystal Lacquer

OTHER PRODUCTS USED:
Inks: Ecocline Brush Pens- 738 Cold Grey Light, 666 Pastel Green, 226 Pastel Yellow, 390 Pastel Rose, 579 Pastel Violet. Other: Diamond stickles, White card stock, Hot glue gun, Fussy cutting scissors, scissors Double sided tape, 3D foam double sided tape, Card (cereal box)


INSTRUCTIONS:
This card measures 6 ¼” x 8 ¼” when finished. Taking the white cardstock and make a tent fold card to the above measurements. Taking the paper sheet 4B from the paper collection and cut this a little smaller than the card base. This will be your card front. Taking the Sky blue ink and a inking tool, bring color to the card base edges and the paper card front. Adhere the card front to the card base. Taking the white cardstock cut the lace frame  from the decorative circle die set then with the  Sky Blue ink and inking foam tool bring the color to the lace frame.
Taking the white card stock,  and the stamps and dies used for this card., make the embellishments needed. The embellishing list: x1 the sentiment tag,  x1 the basket from the air balloon stamp and die. X1 the baby boy, x4 the rose cluster with the swirl, 24 the small wild rose petals (x4 petals for each flower.  6 flowers) x1 the elephant, x1 the rabbit, x1 the fawn. From the card die cut x4 baskets, x4 the sentiment tag, x4 the baby boy words. Color all the embellishments using the list of Ecocline Brush Pens and the flowers using the archival inks. The critters are colored with the pencils.
Adhere the basket to the card front then the words baby boy. Using the glue gun adhere the flowers in place. Trim away the swirl from the rose cluster and the 2 lower leaves. Tuck and adhere the roses at the ends of the roses on the basket. The trimmed away leaves, adhere at the ends of the roses at the top of the card. Adhere the sentiment, welcome to the basket. Apply the diamond stickles to the words, the flowers on the critters and the roses petals. Lastly add a little Crystal Lacquer to the eyes of the critters.


Have fun with this collection.
Next week is a new release so keep tuned to see what it will be.
Till then happy scrappy days and inky hugs to all.
OXO