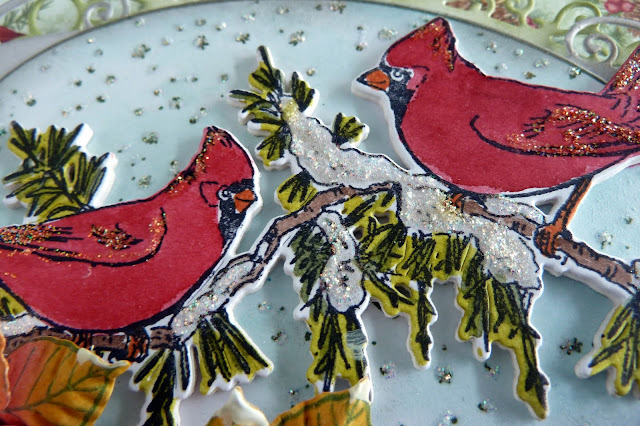
It's called the 'Snowy Pines' collection. Adorable with the Red Cardinails.
Enjoy what I did with a first project with it.
See the product list below.
PRODUCTS MADE BY HEARTFELT CREATIONS AND
PRODUCTS CARRIED IN THEIR WEB STORE:
HCDP1-2117 Snowy Pines paper collection- Sheet
HCPC-3918 Snowy Pine Cardinals cling stamp set
HCD1- 7303 Snowy Pine Cardinals die set
HCD1-7305
Ornate Ovals die set
HCPC-3881 Christmas Poinsettia & Holly cling stamp
set
HCD1-7249 Christmas Poinsettia & Holly die set
HCFB1-478
3D Christmas Poinsettia Shaping Mold
HCPC-3844 For My Friend Sentiments cling stamp set (I’m thinking of you)
ANC814
Lettuce Entertain You Prills
RACP451
Ranger Archival Ink-Coffee
RACP475
Ranger Archival Ink-Library Green
DDOTS
Double Sided Foam Dots
159723
Designer Dries Clear Adhesive
HCDA1-449
Stack And Store Daubers pack of 6
HCPP1-475
Deluxe Flower Shaping Paper pack of 50-white
173842
Scor-Pal Measuring & Scoring Board
OTHER
PRODUCTS USED:
INSTRUCTIONS:
This card
measures when finished, 8 ¼ “ x 5 ¼” (21cm x 13.3cm)
Taking the
white card stock make the tent fold card to the above measurements. Taking the
collection paper find the sheet 4B. Trim this paper to a size a little smaller
than the card base measurement. Taking the Grass hopper green ink and a foam
inking tool, ink the edges of both the card front and the collection paper.
Adhere both together using the double sided foam tape.
Taking the
white card stock and stamp the image with from the Snowy Cardinals stamp set
twice. Die cut one of the stamped images with the matching die for the
Cardinals and the other using the outer oval die from the same set. Using these
dies, die cut additional cuts from the card x4 each. When the white card stock has been colored in
with the inks adhere the card to the back of each image. The colours used are:
the cardinals-Red Berry, and Harvest Moon. The branch and needles- Smoked
Quarts, Spun Gold, Olive, The snow- Diamond stickles. The oval back ground-
Aquamarine and diamond stickles. The
edge of the oval is colored with the platinum ink. Adhere the cardinals
to the back ground using the 3D foam tape or dots. Apply the diamond stickles
to the snow drops in the back ground oval.
Taking the
white card stock die cut the lace frame from the ornate Ovals die set. Using
the first and second largest dies. Bring colour to the smallest die cut frame
by using the Midas platinum ink and a foam inking tool. For the largest die cut
frame use the Grasshopper Green ink for the colour. Cut the smallest frame in
half. Adhere a ½ frame to both ends of
the oval using glue or double sided tape. Adhere this to the green frame using
3D double sided foam tape or foam dots. Adhere this element to the card front.
Make a
sentiment banner using the sentiment and the coffee ink. Apply the grass Hopper
green ink to the edges of the banner Adhere this to the card front to the left
of the foot of the oval. Make the poinsettias buy using the Christmas Poinsettias
stamp, die set and mold. Stamp with the Library green ink and die cutting with
the matching die set x 6 to make 2 flowers. x3 petals, each flower. x4 holly
leaf sets. Colour the flowers with the Honey pot and Chinese red inks, the leaves with the
grasshopper ink. Adhere with the hot glue gun in place. Apply the clear drying
glue to the flower centres then sprinkle the prills on to the flower centres. Leave
to dry. Apply a little gesso to the flowers and leaves for a snow effect.
Giving you some close ups, enjoy
These birds are so cute...I am sure sorry we don't have these in our garden here in Holland....but I do have them in a stamp and I am happy with what I got...lol.
Happy scrappy hugs and still keep yourself safe
Hugs


No comments:
Post a Comment