
Hi, today I have for you a card for those winter cozy days...snuggle up and enjoy the snow fall and all that comes with the winter days.
“ Cozy
Wishes”
HARTFELT
CREATIONS PRODUCT AND PRODUCT CARRIED BY HEARTFELT CREATIONS WEBSITE:
HCPP-475 Deluxe flower shaping paper
pack of 50 – white
HCPP1-438-2 white paper cardstock
HCPC-3922 Woodsy Winterscapes cling
HCD1-7312 Woodsy Winterscapes die
HCPC-3921 Festive Winterscapes cling
HCD1-7311 Festive Winterscapes die
HCPC-3884 Candy Cane Cottage cling
(sentiment)
HCPC-3881 Christmas Poinsettia cling
HCD1-7249 Christmas Poinsettia die
HCFB1-4784Christmas Poinsettia 3D
shaping mold
RACP656 Ranger Archival ink Sky blue
RACP505 Ranger Archival ink Sepia
RACP482 Ranger Archival ink Olive
RACP451 Ranger Archival ink Coffee
RACP993 Ranger Archival ink Red
Geranium
RACP670 Ranger Archival ink Tiger
Lily
RACP436 Ranger Archival ink Leaf
Green
ANC814
Prills Lettus-Entertain-You
3D1844
Crystal Lacquer
DDOTS
Double sided 3D foam dots
RLH5100
Hydra Sponges
159723
Designer dries clear adhesive
173842
Scor-Pal measuring and scoring board
247027
Fantastix blending tools
85-glitter
Crystal ultrafine transparent glitter
HCDA1-449
Stack and store daubers pack of 6
OTHER
PRODUCTS USED:
Ranger
Archival ink Cornflower Blue, Hot glue gun, Double sided tape, Card board (as
in, an empty cereal box), Fussy cutting scissors, White card stock, Foam inking
tools. Silver cardstock

INSTRUCTIONS:
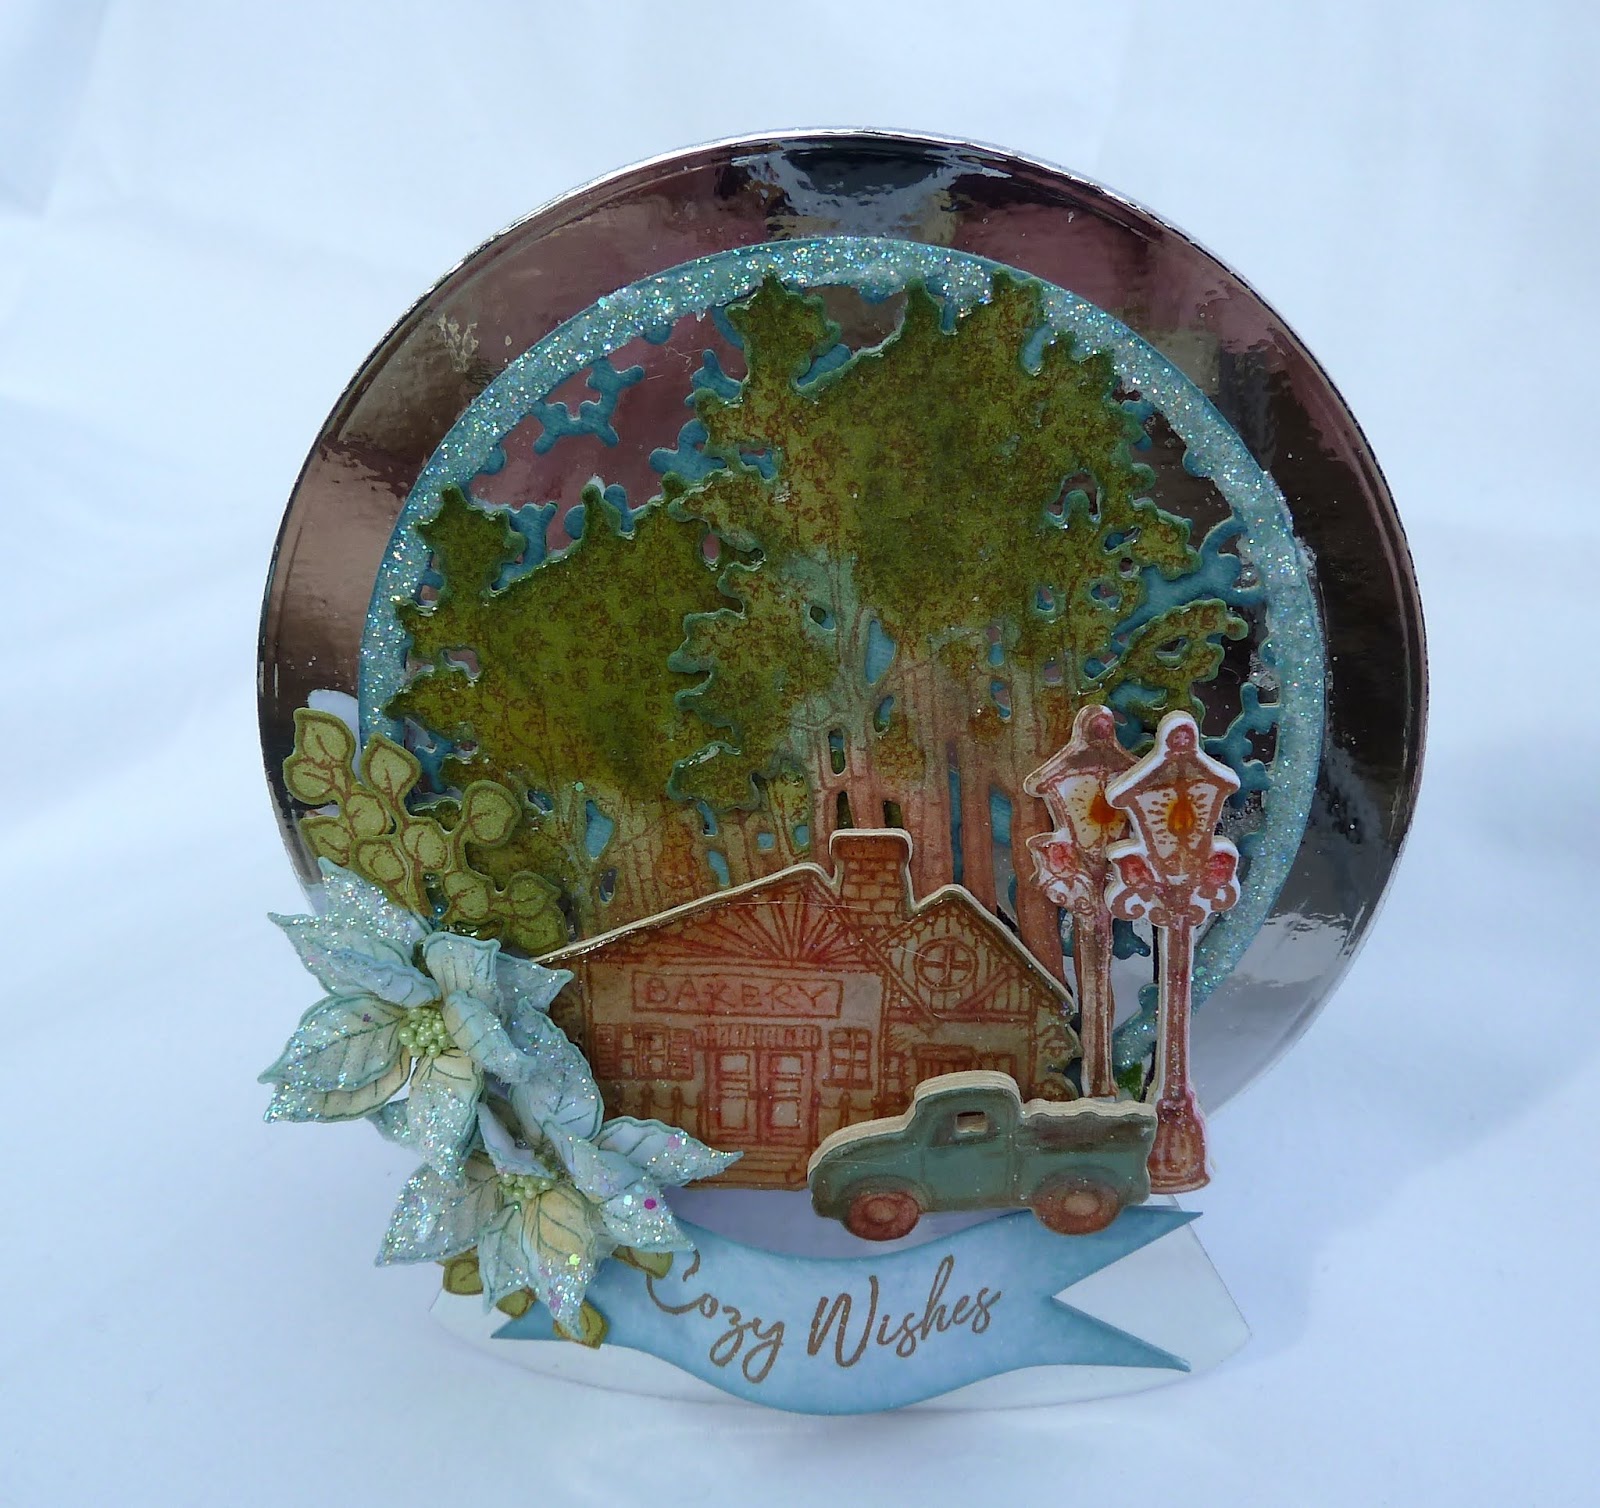
This
project measures5 ¼” x 4 ¼” (13.2cm x 11cm) when finished. To make the snow
globe card base, use the white card stock and the snow globe die cut two outer
shapes. Taking the scor-pal make a fold at the top of the globe on one of the
die cuts for the fold. Apply double sided tape to this then adhere the two die
cuts together. This will form your tent fold globe base.
Using the silver card stock die cut the snow
globe frame and adhere to the card front. Taking the centre of the snow globe,
the large snow flake shape die cut this and bring the cornflower blue colour
onto the shape. Apply clear drying glue to the outside of this frame then
glitter. Leave to dry then adhere in place to the snow globe.
Make the
embellishments for this card as follows: The trees, x2. The colours used for
the trees are leaf green, olive and sepia. The leaves in the trees are
highlighted with the crystal lacquer. The bakery house, x1 stamped and x4 from
cardboard. The colour used is sepia, red geranium and cornflower blue and
finished with the crystal lacquer. The truck x1 stamped and x4 from cardboard.
Coloured with cornflower blue, red geranium and sepia. Finished with the
crystal lacquer. The lamp posts are stamped x2 and from card board x6. The
colours are red geranium, tiger lily and sepia. The glass is finished with the
crystal lacquer. The leaves, x2, the colour used is leaf green. The
poinsettias, each flower has 3 layers. For this card, x6 smaller sized petals. The colours used are
tiger lily and bay blue. Once they have been shaped with the matching flower
mold and adhered together, clear drying glue is applied with the hydra sponge
and then dipped into the glitter. Once the glitter is dry and excess tapped
away, glue is applied to the flower centre then the prills are sprinkled onto
the glue. Once the glue has dried the flower is tapped so the excess prills
will come away. Now they can be adhered to the project.
Adhere all
the embellishments to the globe as seen in the card photo using clear drying
glue and the hot glue gun. The flowers are placed to the left side of the globe
round then the sentiment made into a banner is placed under the flower and leaf
cluster. The sentiment is stamped by masking the sentiment so you get “Cozy
Wishes” instead of “Cozy Winter Wishes”.

Till next time...happy winter scrapping and inky hugs.
OXO
No comments:
Post a Comment