Wednesday, September 22, 2021

Wednesday inspiration....something special today....

....new toys! A side release from Heartfelt Creations. 
Beautiful lace and basic frames to play with...
Today using only two of them...next week you get to see what I did with the other one.INSTRUCTIONS:
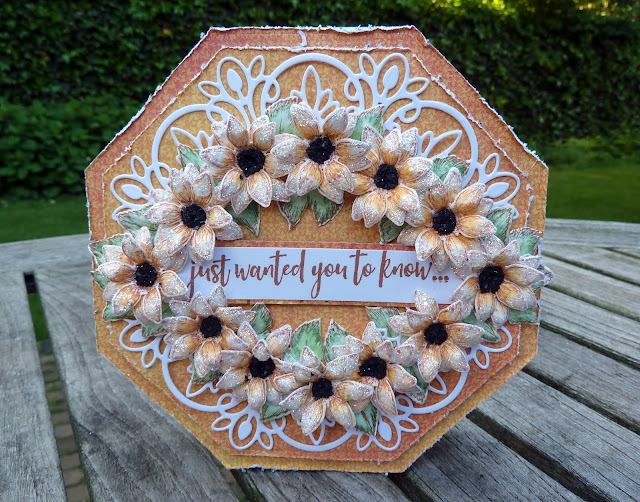
To make the card base, take the outer size die from the Simple Center Piece die set and the white cardstock, die cut twice. Make a fold line at 1 / 2 “ across the top of one of the sides. Apply double sided tape to this then join the two pieces of card together. Fold back a little, the card that has the fold line in it so the card can stand on its own.

Using the same die, the die that is one size smaller and the design paper sheet 11 B, die cut one of the large size and two of the smaller size. Take one of the smaller sized cuts and adhere this to the card inside.  With the paper distressing tool, distress all the edges of the remaining papers. Adhere to the card front using the 3D double sided tape or dots. Taking the white card stock and the lacy frame of the Simply Elegant Center Piece die set then die cut the frame once. Adhere this to the card front. Make the sentiment band by stamping with the sepia ink the sentiment onto the white card stock. Trim so it will fit across the card front then matt it with a scrap from the sheet 11 B. Adhere across the middle of the card front. Make the sunflowers and leaves for around the sentiment. Twelve small sized sunflowers are used and seven leaves that are cut into to make twenty six small leaves. Each flower has two layers so you need to stamp with the sepia ink on to the white card stock, twenty four small sized flower petals  and seven leaves. Color the sunflower with the mango and the leaves with the parakeet and spruce Aqua Blend water color pencils and the water coloring pen. When coloring is complete, die cut all with the matching dies. Use the Rustic Sunflower mold and the deluxe flower shaping tool kit to bring dimension to the flowers and leaves. For each flower layer, apply a little clear drying adhesive to the petal tips then dip them into glitter. Put aside to dry. When dry adhere two layers together to form the flower. Apply clear drying adhesive to the flower centers then sprinkle the black sand in the centers. Put aside to dry. When dry adhere all in place using the hot glue gun. Trim the leaves so you have at least four smaller leaves from each leaf. Adhere these leaves between each flower also using the hot glue gun.

Heartfelt Creations Products used and products sold on their web store:

HCDP1-2131 Rustic Sunflower paper pad

HCFB1-5009 Rustic Sunflower 3D Rustic Sunflower Shaping Mold

HCPC-3962 Rustic Sunflower cling stamp set

HCD1-7364 Rustic Sunflower die set

HCD1-7367 Simple Center Piece die stet

HCD1-7370 Simply Elegant Center Piece die set

HCPC-3844 For My Friend Sentiments cling stamp set

DDOTS, Hydra Sponge, Scor-pal, Clear drying adhesive, White card stock, Ranger Archival ink Sepia

OTHER PRODUCTS USED: Inks: Spectrum Aqua Blend Water color Pencils- Mango, Parakeet, Spruce. Other: Double sided tape, Double sided foam tape, Hot Glue Gun Black sandGlitter, Paper distressing tool.

So yum with these rustic sunflowers...just love the the new card base and frame dies Heartfelt Creations has made available for all us arty crafty inky gents and ladies.

Till next time....inky hugs

OXO
 

Wednesday, September 15, 2021

Hi...more rustic sunflower fun this inspiration Wednesday.


Buckets of OXO's


INSTRUCTIONS: The 7 “ x 5 “ Gateway fold card bases is used for this card.

To decorate the card panels, using the Gateway Eyelet Frames die set and the white card stock die cut three eyelet gateway frames, the largest size for the card base matting. From the same die set, use the next to the outside die frame, cut three mattings  from the sheet 9B. Ink all the edges of the die cuts with the leaf green ink and the dauber. Adhere all the layers to the gateway card base using double sided tape and foam tape for the card front panel. Using the Decorative circle frame die set and the white card stock die cut two fancy frames. Ink the edges of the frames with the leaf green ink and a dauber inking tool. Adhere to the card base using  foam dots to the first and third panel in the card base. Using the sheet 9B and the eyelet circle from the decorative circle frame die set, die cut two circles. Die cut also two banners using the arrows and Banner die set. Use the middle sized arrow dies. Using also the leaf green Ink , ink all the edges. Adhere the circles in place and the arrows to the card front circle.

To decorate the card front panel use six leaves, three large and two small sunflowers. To make these sunflowers stamp using the stamps and sepia ink, color the images using: Spectrum Aqua Blend color Pencils- Mango for the sunflowers and for the leaves, Parakeet, Spruce. Use the water coloring pen to blend the colors. Use the matching dies to die cut the shapes. To bring shape and emboss to the flowers and leaves, use the matching Rustic Sunflower shaping mold and use the deluxe flower shaping tools to bring further shaping needed. Next apply a little adhesive to the flower petal tips using the hydra sponge then dip them into the glitter.  When dry adhere two petal layers together for each flower using the hot glue gun. Next step is, apply the clear drying adhesive to the flower centers then you can sprinkle the black sand over the adhesive. Tap away any excess sand then put aside to dry. Three sets of the berry twigs are used as fillers. Stamp the berry image with the sepia and color using the leaf green ink. Die cut ready for use.  Arrange and adhere all the leaves flowers and fillers to the card front circle using the hot glue gun or the clear drying Adhesive.

For the middle panel, two buckets, five sunflower seeds, two large sunflowers on stems and five small sunflowers on stems are used. For the five sunflower seeds, the ginger color is used. The colors used are: The seeds, handles and bucket: Ginger and Gravel. The flower sprays: Mango, Parakeet and persimmon. The flowers: Mango. The leaves: Spruce and  Parakeet. To prepare the flat sunflowers, apply the adhesive to the petal points then apply the glitter to the petals. When dry, apply adhesive and sand to the flower centers. Do this to all the stamped clusters and all the sunflowers with stems. Put aside to dry.

For the third and last panel, first stamp the sentiment with sepia ink in the center of the eyelet circle then adhere the rustic sunflower sprays to the top and bottom of the eyelet circle. Colors used are: spruce, parakeet and mango. Three sunflower seeds are adhered to the left of the foot of the card.

To prepare the sentiment words, die cut from the white card stock using the Letters and Numbers die set. The small letter size, x 5 each letter for the words BUCKETS OF LOVE  and x 5 for the letter S. From the large  letter size x 6 each for the XXO. Die cut also one of each of the letters from the sheet 9B design paper used for the card matting. Stack and adhere all the letters ready to use. Adhere in place using the clear drying adhesive and the ruler to keep the letters in a straight line while adhering in place. When the adhesive is dry, apply the crystal glossy to each letter, to the sunflower seeds and to the details on the bucket.

Heartfelt Creations Products used and products sold on their web store: 

I hope this has helped you to make this fun card....great sunflower to play with.
Below is alot of birds eye veiw og a few details. Have fun
Till next time...inky hugs
OXO


Wednesday, September 8, 2021

Being inspired by the new release from Heartfelt Creations today

 It's all about the ....'Rustic Sunflower'


For a printout of this project, visit- https://www.heartfeltcreations.us/gallery/sunflower-family


Instructions:

This layout measures 12“ X 12“. Cut the grey board to 12“ X 12“ for the layout base. Find the sheet 6A in the paper pad to use for the background. Cut this sheet into quarters. Arrange so the flowers are in the center of the layout then adhere into place.

Using the white card stock to die cut the Decorative Frame and the eyelet circle. Then you ink the die cuts with the Sky blue and the leaf green inks with the aid of the daubers. Adhere these two die cuts to the center of the layout using foam dots or a scrap carton for each layer to lift them from the base, this will give a shadow and look like the layers are floating. Chose a photo that you can cut a circle with the small circle die set, 3rd from the outside going in. Die cut also with the same circle die two grey board circles. Adhere these two circle layers together then the photo on top then to the eyelet circle already adhered to the layout. This is the layout centerpiece that you can now embellish.

Using the deluxe flower shaping cardstock and the sepia ink for all the stamping, prepare the embellishments for this layout. Two petals for each sunflower and six flowers are made using the Rustic Sunflower cling stamp and die sets. Four of the lager Sunflower sprays and one smaller spray. Two wooden buckets with flowers. For the coloring, use for the bucket and handle, Ginger. For the steel band on bucket, Gravel. For the flowers and sprays, Iris, Mango, Parakeet and Persimmon. For the leaves, Spruce and Parakeet. Once all is colored and die cut with the matching sets, shape the flowers using the Rustic Sunflower Shaping mold also using the deluxe flower shaping tools to bring any further shaping needed. Apply a little adhesive to the petal tips then dip them into the glitter. Adhere two petal layers together for each flower using the hot glue gun. Apply clear drying adhesive to the flower centers then sprinkle the black sand over the adhesive. Also to all the stamped clusters, apply the adhesive and glitter to the petals, adhesive and sand to the flower centers. Once the adhesive has dried you can then use them for the project. For the layout title, use the Letters and Numbers die set to die cut one layer from the white card stock and four layers from the grey board for the word FAMILY. Adhere all the layers together with the white layer on top. Apply clear drying adhesive then sprinkle the black sand on top. When the glue is dry, the letters can be placed under the sunflower cluster on the right side of the photo.

Other Products: Inks: Spectrum Aqua Blend Pencils- Mango, Persimmon, Iris, Gravel, Ginger, Parakeet, Spruce. Other: Grey board (the back of the paper pad or a pizza box), Double sided tape, Double sided foam tape, Hot glue gun , Black sand, Glitter, Foam inking tool.

Here are the products used in this project found in the HEARTFELT CREATIONS web store


Rustic Sunflower paper pad

 Rustic Sunflower 3D Rustic Sunflower Shaping Mold

 Rustic Sunflower cling stamp set

Rustic Sunflower die set

Rustic Sunflower Bucket cling stamp set

Rustic Sunflower Bucket die set-

Rustic Sunflower Can and Freezer cling stamp set

 Rustic Sunflower Can and Freezer die set

Letters and Numbers die set

Decorative circle frame die set

Small Circle die set

Daubers

Deluxe Flower Shaping White card stock

 Deluxe Flower Shaping Tool Kit

Quick pick tool

Water color pen

DDOTS

Hydra Sponge

Clear drying adhesive

Glitter

Ranger Archival ink -Sky Blue, Leaf Green,Sepia

 Till next time...happy scrapping,

Inky hugs


Wednesday, September 1, 2021

This Wednesdays inspiration is with beautiful butterfly's

 Using the Floral Butterfly collection. Enjoy


Instructions:

This is a bridge fold card which measures  8  3/4" when completed.

Make the card base by using the white card stock and cutting it at 12“ x 6 1/2". Make score folds at the 12" length, 1 1/2" then 3"  turn the card and repeat. Fold the folds. Make two bands, one at 9 1/2" x 1" and one at 9" x 1/2”.

Cut mattings for the card base and the bands for the card from the paper collection pad. Cut these mattings a little smaller than the base measurements. Ink all the edges of the papers with the Garden Patina ink and a inking tool. Now, using the pattern tracing tool, ruler and a foam mat, pierce holes along the edge of the paper edges, about 1 / 4 “ from the edge or less.

You can now adhere all the matting papers to the card fronts and bands. The bands are adhered so: the card bridge band that is 1" wide, adhere at 2 1/2" from the foot of the card, fold the card flat then adhere the other side also at 2 1/2" from the foot of the card. Taking the 1/2" band and fold the sides in so it will fit into the card under the first band. Adhere in place. This card is now ready to decorate with embellishments. Make all the embellishments by stamping with the library green ink onto the white card stock.

Make first the large butterfly by stamping twice the butterfly image. Color in the under layer at the edges by using the garden patina ink and a dauber. The second butterfly color using the aqua blend pencils, Sky blue, Kiwi, Ruby, Mango, Oregano, Persimmon and the water pen.  Die cut both butterflies out using the matching die from the collection. Adhere the two butterfly layers together at the body. Adhere to the card base and across the band, using 3D foam dots to give height.

Now make the smaller butterfly. Stamp one and color using the Hyacinth, Indigo, Kiwi, Mango, Petunia pencils and water pen. Die cut using the matching dies. Adhere this to the card as shown. Make the flowers for the card by stamping then coloring with the, Ruby, Petunia, Hyacinth, Pineapple, Sky blue, Oregano, Kiwi.

The sentiment is stamped with gold embossing powder then fussy cut. See where the placement is in the card photo and adhere. To close the card so it will almost be flat for posting, this card will fold to the right due to the placement of the sentiment.

Other Products: Aqua Blends by Spectrum Noir : Ruby, Petunia, Hyacinth, Pineapple, Sky blue, Oregano, Kiwi, Ruby, Mango, Persimmon, Indigo. Other: Versa-mark, Fussy cutting scissors, double sided foam squares, Hot glue gun, White card stock, Double sided tape, inking foam tool, ruler, foam mat and pattern tracing tool.

PRODUCTS USED IN THIS CARD FOUND ON HEARTFELT CREATIONS WEB STORE:

HCDP1-2127 Floral Butterfly paper pad collection

HCPC-3951 Large Floral Butterfly cling

HCD1- 7353 Large Floral Butterfly die

HCPC-3952 Floral Butterfly Accents cling

HCD1- 7353 Floral Butterfly Accents die

HCPC-3953 Small Floral Butterfly cling

HCD1-7354 Small Floral Butterfly die

HCPC-3848 Cheerful Note Sentiments cling

HCST2-406 Flower Shaping Essentials

HCPP1-475 Deluxe Flower Shaping Pack of- 50

HCPP1-468 Deluxe Flower Shaping Pack of- 25

RACP475 Ranger Archival Inks- Library Green

RACP992 Ranger Archival Inks-Garden Patina

DDOTS- Double sided foam dots

359760 Embossing Powder-Gold

RAHT Heat It Craft Tool

159723 Designer Clear Drying Adhesive ruler, foam mat and pattern tracing tool.

352854 Metal tip for adhesive bottles

409311 Color In Water Brush-fine

359848 Spellbinders Tool-N’-One

                                            ...........................................

Have a great day, till next time,

inky hugs