


Heartfelt Creations Products and Product Sold On Their Web Site:
To visit the web store click HERE
HCDP1-2133 Floral Banner Paper Pad collection
HCPC-3970 Peony and Sunflower Banner
cling
HCD1-7378 Peony and Sunflower Banner die
HCD2-7381 Fancy Classic Oval Frame die
HCD2-7384 Fancy Classic Rectangle Frame die
HCPC- 3847
Celebrate Love Sentiments cling
HCST1-401 -Deluxe Flower
Shaping Kit
HCPP1-475 -Deluxe Flower Shaping Card Stock Paper Pad-
White- 50
HCGP1-493 Deluxe Silver Card Stock
159723-Designer Dries Clear Adhesive 352954
Metal tip for Adhesive Bottles
173842-Score-pal Measuring and scoring Board
AM7454-Quick stick Tool
409311-Color In Water color brush-fine
DDOTS-
Double sided 3D Foam Dots
359848 Spellbinders Tool ‘N One
RACP505 Ranger Archival Ink Sepia
OTHER
PRODUCTS USED:
Ink: Spectrum
Noir Aqua Pencils: Pesto Green, Bottle
Green, Parkeet, Pesto Green, Verdant Green, Verdant Green, Violet, Mango, Carrot, Banan, Claret. Other: Fussy
cutting Scissors, Ruler, Misti Stamping Tool, Double Sided 3D Foam Tape, Double
Sided Tape, Hot Glue Gun, Foam card stock.
INSTRUCTIONS:
This tent
fold card measures 7“ X 5“ when completed.
Using the outer die from the Fancy Classic Rectangle Frame
die set and the white card stock, die cut two of these shapes. Die cut also one
shape from the design paper from the collection paper pad sheet 4A . Adhere
this to one of the white card stock shapes. Score 1“ across the top of the other white card
stock shape, apply double sided tape and adhesive to the 1“ scored part. When
placed together with the other card base shape this will form the tent fold
card base.
Using the same die set make the silver frame using the 2nd die in. Die cut a frame from both the silver card stock and from the foam card
stock. Adhere together using the clear drying adhesive. Adhere this to the card
front.
From the same die set
take the 4th and 5th die in and the silver card stock and cut the shapes. Die
cut also a oval shape from the Fancy Classic Oval Frame set. Adhere the oval to
the card front using the foam 3D dots. Cut the 5 th shape in half then adhere to under the oval
ends. From the 4th die cut, trim the ends of so they can be adhered under the
banner on top of the oval later.
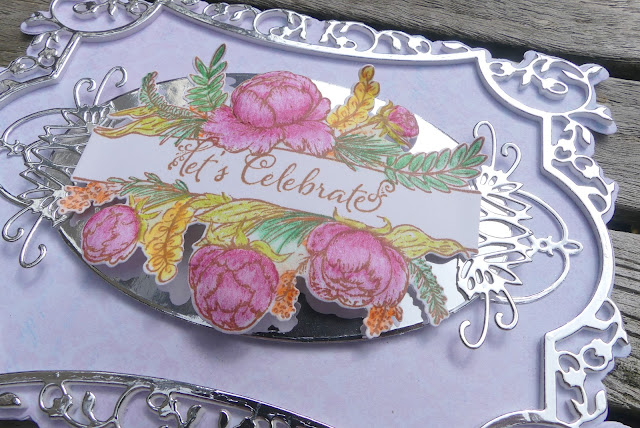
Taking the white card stock, the sepia ink and the Peony
banner stamp, stamp the image. Stamp also the sentiment then use the matching
die set to die cut the shape. Bring color to the banner flowers and leaves by
using the water color brush and the aqua pencils. The colors used are: Parakeet, Pesto Green, Verdant Green
for the leaves and Violet, Mango, Carrot, Banan and Claret for the flowers and
fillers. Bring a little shape to the flowers and leaves by using the flower
shaping tools. Give the banner a curve by rolling it over your forefinger then adhere
the banner to the silver oval on the card front with foam dots in the middle of
the banner and clear drying adhesive at the ends, this will hold its curve.
Align the silver card stock ends (pre-cut) and adhere in place.


Inky hugs OXO
Oh, this is so elegant, my friend!
ReplyDelete