Wednesday, March 25, 2020

Inspiration Wednesday with the wildrose collection from Heartfelt CReations...

Hi, today I am bringing you another card, enjoy.
 ‘YOU ARE…SO MUCH MORE...’ 


Heartfelt Creations Product and other Products carried on their website:

HCDP1-2113 Wild Rose paper collection
HCFB1-486 Wild Rose 3D Shaping Mold-small
HCFB1-487 Wild Rose 3D Shaping Mold-large
HCPC-3906 Small Wild Rose cling stamp set
HCD1-7289 Small Wild Rose die set
HCPC-3907 Large Wild Rose cling stamp set
HCD1-7290 Large Wild Rose die set
HCD1-7291 Treasured Heart Gift Box die set
HCS1-490 Assorted Rose Hip Stamens-large
HCD1-7271 Round Window Frame die set
HCPC-3844 For My Friend Sentiments cling stamp set
DMCT4185 Grove Golf Tool Set
HCFB1-464 3D Floral Basics Shaping Tool Kit
RACP475 Ranger Archival ink-Library Green
RACP984 Ranger Archival Ink-Cactus Flower
RACP436 Ranger Archival Ink-Leaf Green
RACP500 Ranger Archival ink-Sepia
85-Glitter Crystal Ultrafine Transparent Glitter
159723 Designer Dries Clear Adhesive 
HCDA1-449 Stack and Store Daubers pack of 6
HCST1-401 Deluxe Flower Shaping Kit
RLHS100 Hydra Sponges

OTHER PRODUCTS USED:
Inks: Ranger Archival ink-Venetian Orange, White card stock, Scissors, White organza ribbon, Hot glue gun, Double sided tape, 3D double sided foam tape, Score-pal

INSTRUCTIONS:
This card measures 6 ¼” x 6 ¼” (16cm x 16cm) when competed. Taking the white card stock make a tent fold card base to the above measurements. Find the pink check print and the pink and green print design paper in the Wild Rose paper collection. Trim the pink checked paper a little smaller than the card base. Trim the pink and green paper about 1” smaller than the card base.. Before  Adhering  both papers to the card base using the 3D double sided foam tape, taking the Round window frame die and die cut the frame from the checkered paper center. Ink both papers and the frame edges with the Cactus Flower ink. Apply clear drying glue with the aid of a hydra sponge to the lace part of the frame. Sprinkle glitter to this and set aside, when dry adhere to the card front.
Taking the sentiment and stamp this with  the sepia ink. Trim the banner to the size of the sentiment. Cut the right end of the sentiment to a ribbon end. Ink the edges with the Cactus Flower ink.
Taking the white card stock and the heart dies from the Treasured Heart Gift Box set. Cut the hearts twice and the heart outside twice.  Bring the Cactus Flower ink to both the heart outsides then adhere together using the clear drying glue. Cut also twice the double hearts, these are inked with the leaf green ink. Trimmed at the center ready for adhering in place later.
To make the flowers: Taking the white card stock, Library green ink, the stamps for the leaves and the med sized flowers. Stamp 5 leaves, 4 flowers. Color the leaves with the leaf green ink, use the Cactus Flower and Venetian Orange for the flowers. Taking the matching dies die cut all. Use the 3D shaping molds to bring shape to the leaves and flowers. Adhere the flowers together and make a whole in the flower center for the large stamen. Secure the stamen by using the hot glue gun. Apply clear drying glue to the petal edges with the aid of a hydra sponge then sprinkle glitter over the glue. Set aside to dry. When dry, When the glue is cold, trim the stamen stem away ready for adhering to the card front.
Make a triple bow from the organza ribbon, arrange and adhere  the flowers and leaves to the lower left of the Round Window frame. Adhere the bow, the green hearts and  both the pink hearts in place. Last adhere the sentiment banner across the front of the card.


  Don't you just love these large stemens!


       This collection makes card making a breeze. 
More eyecandy next week, till then have a scrappy day and inky hugs.
OXO

Wednesday, March 11, 2020

March 11th..Heartfelt Creations inspiration Wednesdaday with a new collection!...

...Wild Rose Collection...this is an adorable collection with a gift box and the timeless wildrose flower with a leaf. There is also a flower shaping mold to go with it...Heartfelt cReations sure know how to make our life Oh so sweet.

I am showing off today with a gift box, made with the adorable box die that comes with the collection.
                                                                'Treasured Gift Box'


Heartfelt Creations Products and Product carried By Heartfelt Creations On Their Website:

HCDP1-2113 Wild Rose paper collection
HCFB1-486 Wild Rose 3D Shaping Mold-small
HCFB1-487 Wild Rose 3D Shaping Mold-large
HCPC-3906 Small Wild Rose cling stamp set
HCD1-7289 Small Wild Rose die set
HCPC-3907 Large Wild Rose cling stamp set
HCD1-7290 Large Wild Rose die set
HCD1-7291 Treasured Heart Gift Box die set
HCS1-458-2 Stamens Bright Pearl-Med (red)
DMCT4185 Grove Golf Tool Set
HCFB1-464 3D Floral Basics Shaping Tool Kit
RACP475 Ranger Archival ink-Library Green
RACP436 Ranger Archival Ink-Leaf Green
RACP005 Ranger Archival Ink-Sunflower
85-Glitter Crystal Ultrafine Transparent Glitter
159723 Designer Dries Clear Adhesive 
HCDA1-449 Stack and Store Daubers pack of 6
RLHS100 Hydra Sponges

OTHER PRODUCTS USED:
 White card stock, Scissors, White organza ribbon, Hot glue gun, Double sided tape, Diamond dust.


INSTRUCTIONS:
To make the Wild Roses and leaves: Taking white stamping card stock, library green archival ink stamp the leaves and flowers. 3x leaves, 18x small flowers, 1x med flower. Chose the color for the flowers, here is the Sunflower used. For the stamen centers, use the red stamens, clear drying glue and diamond dust or glitter. Apply glue to the stamen heads then dip into the diamond dust or glitter set aside to dry. Make one for each flower center, when dry make a whole in the flower center so the stamen can be threaded through. Secure the stamen to the flower using the hot glue gun. When the hot glue has cooled trim away the stamen threads ready to use on your project. The leaves are colored with the Leaf green ink. The flowers and leaves are shaped using the 3D shaping molds. Use the shaping tools to ball the flower centers so the petals stand higher.
Find the green printed paper from the wild rose paper collection. Taking the dies for the basic gift box, place the dies for the gift box so you will get 6 sides from the paper and 1 under piece. Taking the square cut out die and the white card stock, cut also 6 squares. Adhere double sided tape to the join flaps on each side.
Taking the die cut squares, using the leaf green archival ink and daubers, bring ink onto the squares. Apply clear drying glue to the square using the aid of a hydra foam sponge. Dip this into the glitter and put aside to dry. When dry adhere one to each of the sides of the gift box. Taking the premade wild flowers, adhere with the hot glue gun 3 wild roses to the center of the squares. Adhere each gift box sides together leaving one side still open. Adhere the gift sides to the base then closing the last box side. Using double sided tape and clear drying glue to do this.
Taking the green printed strip from the paper pad, you will be using both paper strips. Divide both the strips into 4. Trim the edges into a point so you can adhere together with out it being too thick. Adhere  both ends together with the glue gun or clear drying glue without making a fold in the paper-so it forms a bow. Arrange each piece so you have a four sided bow then make another to so you can adhere on top of this which makes a layered bow. Adhere the leaves and wild rose to the center of this bow.  Fold the gift box top so it forms a closing lid. To the last folded top piece adhere the bow to this so it will still open.

 Showing you a few detail shots of this box, enjoy.


You can see how the box opens.


This box can be used for any occation....just change the colors and add more flowers...thats an answer to any problem...just add more flowers...LOL

Till next week...inky hugs and have a scrappy day.
OXO

Wednesday, March 4, 2020

MARCH 4th is inspriation Wednesday with Heartfelt Creations using the TEA TIME COLLECTION

Hi, today I have a out of the box card for me but still adorable....let me know what you think.


HEARTFELT CREATIONS PRODUCT AND PRODUCT SOLD ON THEIR WEBSITE:
HCDP1-2112 Tea Time Paper Collection
HCPC-3892 A Day At The Sea cling stamp
HCD1-7266 A Day At The Sea die set
HCPC-3965 Elegant Tea Pot cling stamp
HCD1-7288 Elegant Tea Pot die set
HCPC-3804 My Cup Of Tea cling stamp
HCD1-7287 My Cup Of Tea die set
HCPC-3903 Special Tea Pot cling stamp
HCDA1-1449 Stack and Store Daubers pack of 6
RACP5005 SEPIA Ranger Archival Ink
478455 Zig Clean Color Real Brush Marker 36 pack

OTHER PRODUCTS USED:
Diamond stickles, Tea die distress ink, foam inking tool. Fussy cutting scissors

  
INTRUCTIONS:

This tent fold card measures 6 ¼”x 6 ¼” / 16cm x 16cm.
Make the card base to the above measurements with the white card stock. Find the printed paper with the lace in the print, cut this a little smaller than the card front. Ink both card front and paper edges with the Victorian Velvet, the Tea die ink using the inking foam tool or daubers.  Taking the sentiment and sepia ink, stamp the sentiment to the printed paper to the right, below the center. Adhere both paper and card front together using the 3D foam dots or tape.
Using the white card stock and sepia ink, stamp the elements: 3x tea bags, 1x the tea cup boarder, 2x the flower boarder, 2x the rope frame from the, A day at the sea set.
To make the rope frame, trim the frame and adhere together to form a longer rope frame. Color with the Beige zig marker. Cut the 3d foam tape or dots to fit the rope frame and adhere to the card front once the placement is found using the flower boarders. Color the flower boarders using the  Peach pink, pale rose, mid green, olive green zig markers. Trim To make the rope frame, trim and adhere together with the clear drying adhesive, color this with the the flower boarders  as seen in the photo so they will fit at the rope frame sides. Adhere using 3D foam tape and clear drying adhesive. For the tea bags: Die cut extra tea bags from the white card stock, 4x for two bags and 6x for the center bag. Adhere the layers together. Color the tea bags by using the tea die ink. The tea bag ties are colored with the pale rose and the mid green zig markers. Adhere in place.  Prepare the tea cups and place them above the stamped teacup in the tea bag. Fussy cut the remaining flower boarder off cuts and adhere these to the foot of the card and a few flowers and leaves to the center tea bag so the peck out behind the tea bag. To finish the card apply the diamond stickles to the rope frame, the tea cups, the flowers and the tea bag ties.


I love the tea cups on the tea bag with the flowers peaking from behind.
Next week we have a new release...can't wait.
Till then inky hugs,
Sussi


Wednesday, February 26, 2020

FEB 26th brings you more of the ...

...'BEAU-TEA-FUL' TEA  TIME COLLECTION


Hi, this tea pot stamp used for this card is fantastic...it can also be used to make a mini book or a card on it's own....enjoy your visit today.

HEARTFELT CREATIONS PRODUCTS AND PRODUCTS CARRIED ON THEIR WEBSITE:
HCDP1-2112 Tea Time Paper Collection
HCPC-3903 Special Tea Pot cling stamp
HCD1-7286 Special Tea Pot die set
HCPC-3904 My Cup Of Tea cling stamp set
HCD1-7287 My Cup Of Tea die set
HCD1-7214 Ornate Pocket Accents die set
HCST1-1449 Stack and Store Daubers Pack of 6
359760 Gold embossing Powder
RACP Sepia Ranger Archival Ink
Zigg Clean Color Real Brush
173842 Scor-pal Measuring and scoring board
DDOTS 3Ddouble side  foam dots

OTHER PRODUCTS USED:
Spectrum Noir Harmony Inks: Lemon Tonic, Straw Bale and Smoked Pearl. Yellow organza ribbon, Vers-a-mark, Golden Rod Stickles, White card Stock, 3D foam tape, Foam inking tool.


INSTRUCTIONS:

This tent fold card measures 6 ¾”x 8 ½”/ 17cm x 21.5cm.
Taking the white card stock make the card base to the above measurements. Make also the lace frame by using the Ornate pocket accents, die cut the frame pieces about ½”/ 1.5cm apart from each cut to make a frame to fit the card front. Find from the paper collection the back ground that is yellow. Cut this a little smaller than the card front. Using the Tonic lemon and the Smoked pearl ink and the inking tool, ink the edges. Of all layers. Adhere together to the card base.
To make the elements used for this card: Using the gold embossing powder stamp, and die cut the tea pot twice, one for the base and the other for the lid and sentiment tag, the two tea cups and two spoons
Bring color to the elements using the zigg brushes, Vanilla, Lilac, Light green, Brick beige or other colors you might like. Adhere the tea pot to the card front then the tea pot lid and the sentiment tag using the 3D foam dots or tape. Adhere a bow across the card then add the spoons and the tea cups. To finish the card apply the golden rod stickles to the cups, tea pot and spoons.


Is this not...or is this wonderful. You can do so much with this stamp and die set.
Till next week with more eyecandy...
happy scrappy days and inky hugs from Sussi


Wednesday, February 19, 2020

FEB 19th and Heartfelt Creation bring you some more inspiration with....

 the Tea Time collection and gold embossing...love it!


' YOURE TEA-RRIFIC ' 

HEARTFELT CREATIONS PRODUCTS AND PRODUCTS CARRIED BY THEIR WEBSTORE:
HCDP1-2112 Tea Time Paper Collection
HCPC-3905 Elegant Tea Pot cling stamp set
HCD1-7288 Elegant Tea Pot die set
HCD1-7281 Stairway Gardens die set
HCD1-7285 Courtyard Elegance
HCD2-749 Cut Mat Create 1a
85-glitter Crystal Ultrafine Transparent Glitter
159951 Designer Dries Clear Adhesive
RLHS100 Hydra-Sponge
359848 Spellbinders Tool N’ One
RACP5005 Sepia Ranger Archival Ink
359760 Gold embossing Powder

OTHER PRODUCTS USED:
Inks: Spectrum Noir Tri-blend markers: Dull Green, Pale Pink, Lavender, Ice Grey. Fussy cutting scissors, Foam inking tools, Vers-a-mark, white card stock, Diamond stickles.


INSTRUCTIONS:

This tent fold card measures 61/4”x 6 ¼” / 16cm x 16cm.
Taking the white card stock make the card base using the above measurements. Make the lace frame using the outside the outer edge from the Stairway die set and the inner square die from the Courtyard Elegance die set. Cut these together. Find the paper with the sentiment on it, cut the piece with the sentiment and the above print with the teapot on it. Taking the 3.25”x .75” die from the Cut Mat Create 1a set and die cut the sentiment out of the paper. Die cut this shape x4 extra from the white card stock. Adhere the layers together to make a chippie. Find also from the paper collection, the paper with the sentiments printed on the page. Cut to the same size as the card front. Taking the Milled lavender ink and foam inking tool ink all the edges of the above. Taking the clear drying adhesive and the hydra sponge bring the adhesive to the white card stock die cut lace. When dry adhere all to the card front using the 3D foam dots or tape, except the sentiment.
To make all the embellishments for the card: Stamp using the gold embossing powder the larger teapot, x1 of the flower boarder, x4 flower clusters. Using the Tri-blend markers or other markers or pencils bring color to the elements.
Order of placement for the elements: Cut the flower boarder in half to fit the cluster. Adhere to both side of the sentiment that has been cut out on the card front. Trim two  flower clusters in half, these are to be adhered under the flower boarder pieces under the sentiment. Adhere the sentiment in place.  Adhere the teapot with foam 3D dots to the card. Taking the remaining flower clusters, these are to be adhered to the flowers on the teapot and to the foot at the left. Add diamond stickles to the flower centers for attention.


Adorable with all the cut outs you can make using this collection. We all know how I love to layer...and this card you can send in the normal mail...lol 
Till next week, inky hugs from Sussi P


Wednesday, February 12, 2020

Inspiratin Wednesday agian with Heartfelt CReations

....and what a collection! 
The 'TEA TIME ' collection...one word...adorable.


HEARTFELT CREATIONS PRODUCTS AND PRODUCTS CARRIED ON THEIR WEBSITE:
HCDP1-2111 Tea Time Paper Collection
HCPC-3903 Special Tea Pot cling stamp
HCD1-7286 Special Tea Pot die set
HCPC-3904 My Cup Of Tea cling stamp set
HCD1-7287 My Cup Of Tea die set
HCPC-3905 Elegant Tea Pot cling stamp set
HCD1-7288 Elegant tea Pot die set
HCD2-7191 Intricate Swirl Frames die set
85-glitter Crystal Ultrafine Transparent Glitter
RLHS100 Hydra Sponge
RACP 5005 Sepia Ranger Archival Ink
DDOTS  3D double sided foam Double Dots
159951 Designer Dries Clear Adhesive


OTHER PRODUCTS USED:
Distress Inks: Faded jeans, Bundled sage, Faded jeans, Milled lavender, Victorian velvet. Dimond stickles, White card stock, Foam inking tools, Fussy cutting scissors.


INSTRUCTIONS:

This tent fold card measures 8 ½”x 6 ¾”/ 21.7cm x 17.1cm.
Taking the white card stock make a card base to the above measurements. Taking the paper collection and find the paper with the blue, lavender and green in the sky. Trim this to 7 ½ “ x 5 ¾” / 19.2cm x 15cm. ink the edges with the faded jeans ink and a foam inking tool. Adhere this to the card front using 3D foam tape or dots. Taking the white card stock and the frame die from the Intricate Swirl Frame set and die cut the large frame. Ink this also with Faded jeans and the Milled lavender inks. Apply clear drying admissive to the frame lace edges using the hydra sponge. Sprinkle glitter over the edge. When the glitter is dry adhere to the card front using the 3D foam tape or dots.

To make all the embellishments for this card: Stamp using the sepia ink, x1 each of the small teapots, x3 of the flower boarders, x2 of the flower clusters, x1 of the teacup boarder, x1 of the sentiment tag and sentiment. Color the embellishments using distress inks: The teapots, teacups and sentiment tag with the Faded linen. For the flowers and leaves use the Faded jeans, Bundled sage and Victorian velvet. A dot of yellow zigg brush to the blue flower centers. Apply a dot of adhesive to the teacups, teapots and flower centers then sprinkle with the glitter. The yellow flower centers are dotted with the diamond stickles but you could also use glitter for this.

The order of adhering the embellishments to the card front. 1st the larger teapot then the two of the flower boarders. The smaller teapot and sentiment tag. The 3rd flower boarder and teacups. Trim and fussy cut the flower clusters to fit under the sentiment tag and under the boarder next to the large teapot to fill the gaps.


I told you so....adorable!


Inky hugs from me to you, till next week.
OXO


Wednesday, February 5, 2020

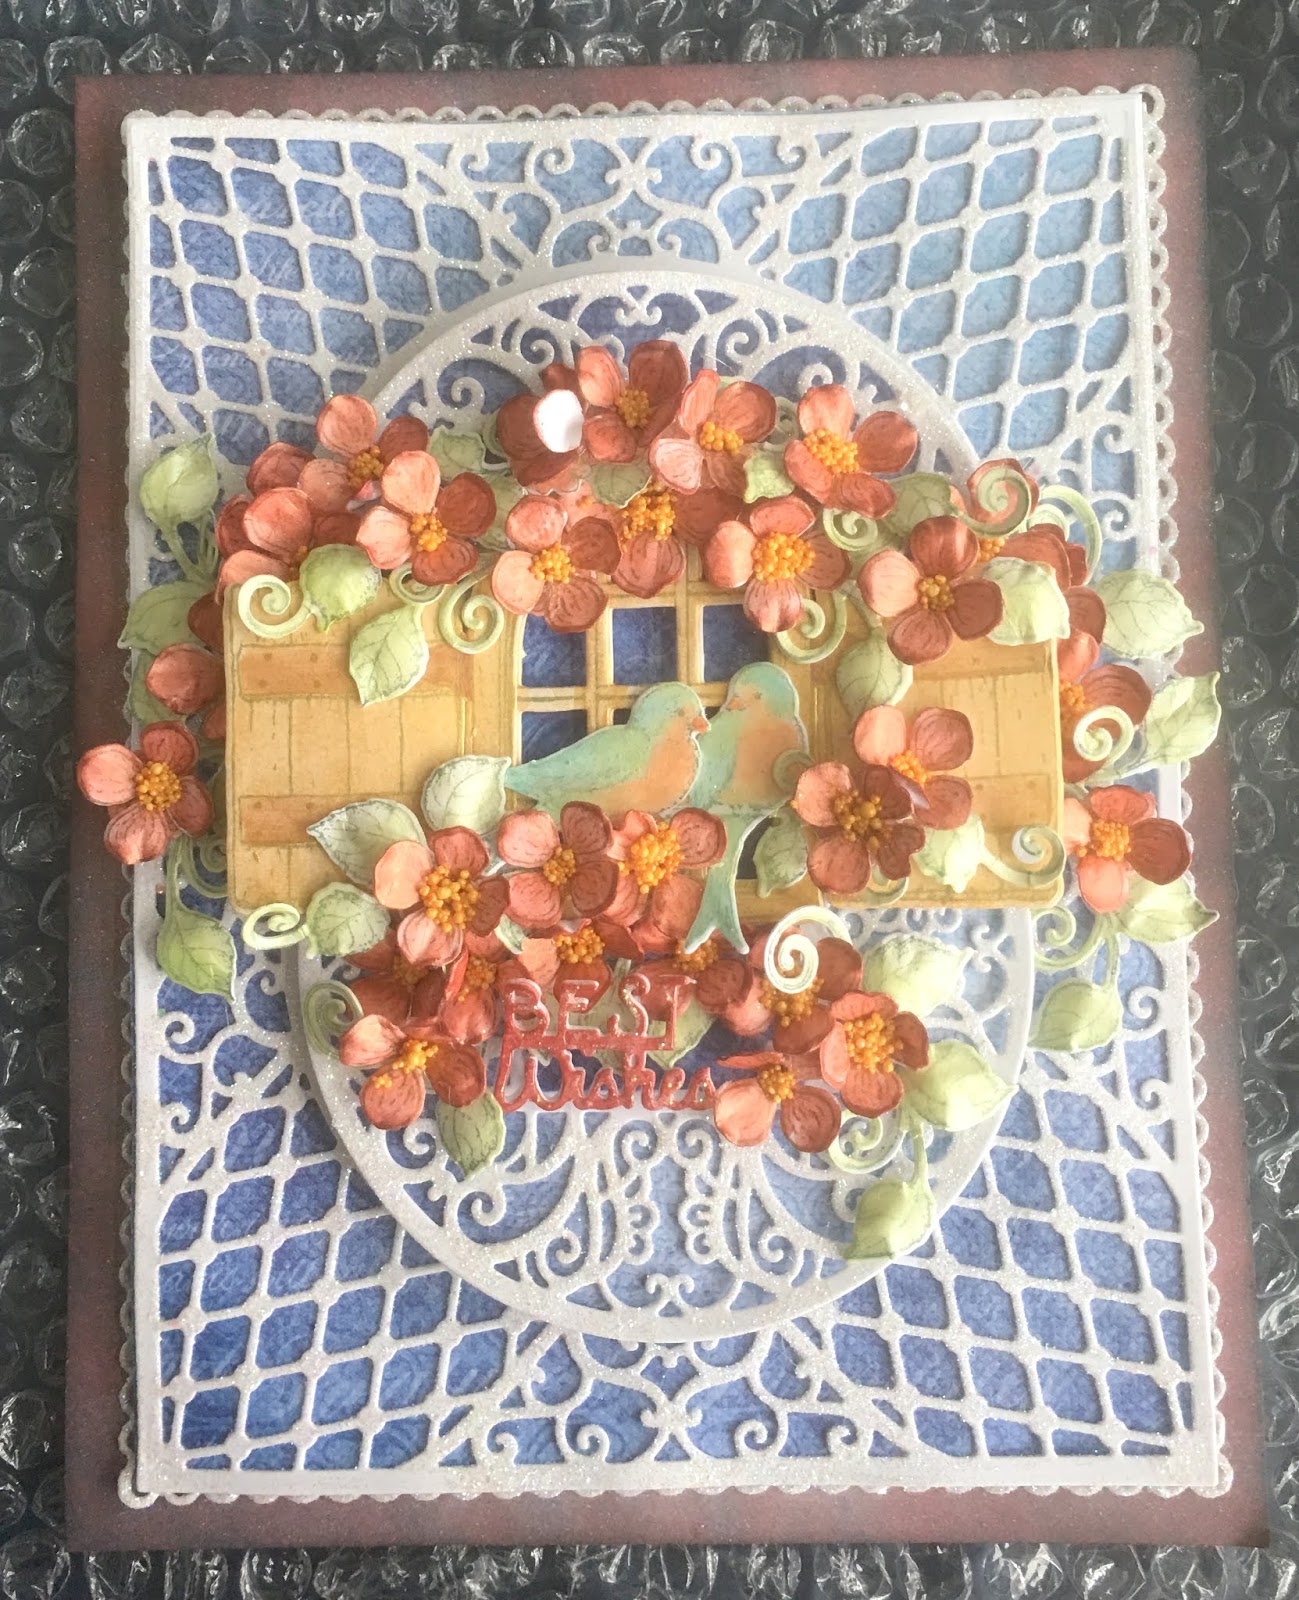
A EXTRA FOR THIS MONTH....... BACKGROUND DIE'S LAUNCH


COTTAGE GARDEN COLLECTION
BEST WISHES 


Heartfelt Creations Products And Products Carried On Our Website:
HCDP1-2110 Cottage Garden paper collection
HCFB1-489 3D Hydrangea Shaping Mold
HCD1-7278 Cottage Garden Hydrangea die set
HCD1-7279 Fresh Cut Hydrangea die set
HCPC-3902 Cottage Window and Hydrangea cling stamp
HCD1-7280 Cottage Window and Hydrangea die set
HCD1-7285 Courtyard Elegance die set
HCD1-7203 Ornamental Tags die set.
HCD1-7281 Stairway Gardens die set
HCST1-401 Dluxe Flower Shaping Kit
HCDA1-449 Stack And Store Daubers
 ANC818 Prills  Go-Man-Go
31510 Funnel Tray
159723 Designer Dries Clear Adhesive
DDOTS Double Sided 3D Foam Dots
RACP475 Ranger Archival Library Green
409311 Color In Water Brush-fine
RLHS100 Hydra Sponges
173842 Score-pal Measuring And Scoring Board
85-glitter Crystal Ultrafine Transparent Glitter
3D1844 Crystal Lacquer
NU822 Pacific Teal  Nuvo Mousse
NU802 Indian Gold Nuvo Mousse

OTHER PRODUCTS:
Hot glue gun, Double sided tape, Double sided 3D foam tape, Sheena Douglas White Stamping Card,  Foam inking tool, Diamond tickles, Ranger Archival Ink Maroon. Nuvo Embellishment Mousse: Orange Blush, Persian Red, Powder Blue, Spring Green, Burnished Bronze, Coral Calypso.


INSTRUCTIONS:

The measurements for this complete tent fold hinged card is 6 ½”x 8 ¼” (16cm x21cm) All the embellishments are colored with the mousse as water color using the water pen.
Taking the white card make the hinged card to the above measurements. Apply the Maroon ink to the card base front edges. Find the outer die from the Stairway Gardens die set. Die cut this twice from the white card, trim so when adhered together this will measure 7 ¼” in the length, making an oblong shape. Apply glitter to the outer edges and when dry adhere to the card front with double sided tape. Find the blue printed background paper in the Cottage Garden collection, cut this to measure the same as the oblong above. Adhere this to the card front using the 3D foam dots. Die cut also the circle backgrounds and two small squares  found in the die set from the same blue paper. Taking the white card and the Courtyard Elegance die set, die cut the lace square twice. Trim the squares so they will fit to the blue background paper oblong. Apply glitter to the two die cuts. When dry adhere to the blue background. Taking the white card and the lace circle from the same die set, die cut two circles .Also cut two background circle from the blue paper. Trim the circles so they will fit into the now oval shape in the card font. Apply the glitter to the white die cuts. When dry adhere both the lace and blue paper pieces to the card front oval with 3D foam dots.
Make all the embellishments for the decoration of this card by stamping coloring and die cutting: 1x the bird on the branch, x31 petals (prills will be added to the petal centers), x2 the curved boarder and x5 the strait boarder (color only the leaves a this is for the extra leaves used as fillers) 3x the window and shutters(color only one of these as the layers will be stacked and adhered together) X4 the sentiment (fussy cut away the outside so you have only the words then adhere all the layers together)Adhere the window to the card front so it covers the join in the oval. Fussy cut away the birds and adhere them to the window. Arrange the curved boarder above the window and adhere. Fussy cut leaves and add them behind the window shutters, under the birds and on top of the window. Adhere the sentiment to the card. To finish, apply the crystal lacquer to the birds. To finish the card, apply the diamond stickles to the sentiment.