Monday, September 29, 2014

Be my PRINCE every day!


This is a card you want to give to someone special.....male special....
The paper used on this card....wait for it!....
I found this in France...a Prima Marketing paper block. After finding 2 stores while on vacation in France this year...thinking to my self, how very clever, with my find....my Frans said to me 
"I shall stay in the car with the dogs, but don't take all day!" Ha! I spent a little over 1/2 hour, do you believe it! I now realize how spoiled I am! Here in the Netherlands, we have a good selection to chose from. Not so many stores as a few years ago, but there are a lot of webstores. I am sure there are a lot of hidden treasure stores in France. I have yet to find them! 
I will say though, I find  the French way of scrapping very refreshing. making something fantastic from simplicity. 
We all can learn something from those enavated creative arty divas. We can always learn from each other, that's what makes it such fun.


Love this frog stamp from MAGNOLIA. I had the paper stamped for a while, sitting in a container, waiting to be finished and used. I took a lot of my old stash with me on vacation to use up. It was fun discovering what I had in my treasure box. The coloring of the images on this card was done with the retired STAMPIN' UP crayons. I don't know why they did that! A shame it is retired, as it is a great product. Still that's life....I am just very happy I have them still.


The die cuts are all from MAGNOLIA. The dies are called DOOHICKEYS. The dies cut very well and fine. I have never had a problem with them. The die swirls give fine cuts, so they always look great springing out from behind a flower or leaf.
Embossing folders I took with me came in handy....got to use at least once very thing you take with you on vacation. The suit case was too heavy not to use everything. If you don't. How are you going to talk your way out of that one?


A bit of inking, distressing and layering always a must for me.
All tied up with brown string. (found that in France!)
One thing I did not take with me, that was bling! I was not happy about that one! Or brads. (What is worse, I did not come across it while shopping) So I used stickles in place of.....it's called.......making do with what you got!
I used a sketch for the first time while making this card. 
MOJO MONDAY.
I personally, found it harder to work with than LO sketches...but that is because there is not enough space to do all I want to do....so I have to keep saying to my self..."I shall do it on the next card"!
I think this is more of a LO persons problem. We are used to a lot more space to play around in.
But...Hey...I am happy I could play with my wonder toys while away...and it made a complete vacation. Win Win. Me happy, my Frans happy.

Till the next post....keeping my fingers and toes crossed. 
The dead line date is here for HEARTFELT CREATIONS semi finals.
I managed to get mine in last week...the waiting is killing us. A whole month to wait.....

Well its time again to sign off.
Wishing you all a happy, inky, scrappy day.
Sussipoppins 

Monday, September 8, 2014

The Trees


Yip.....posting again....I am even supprising my self!

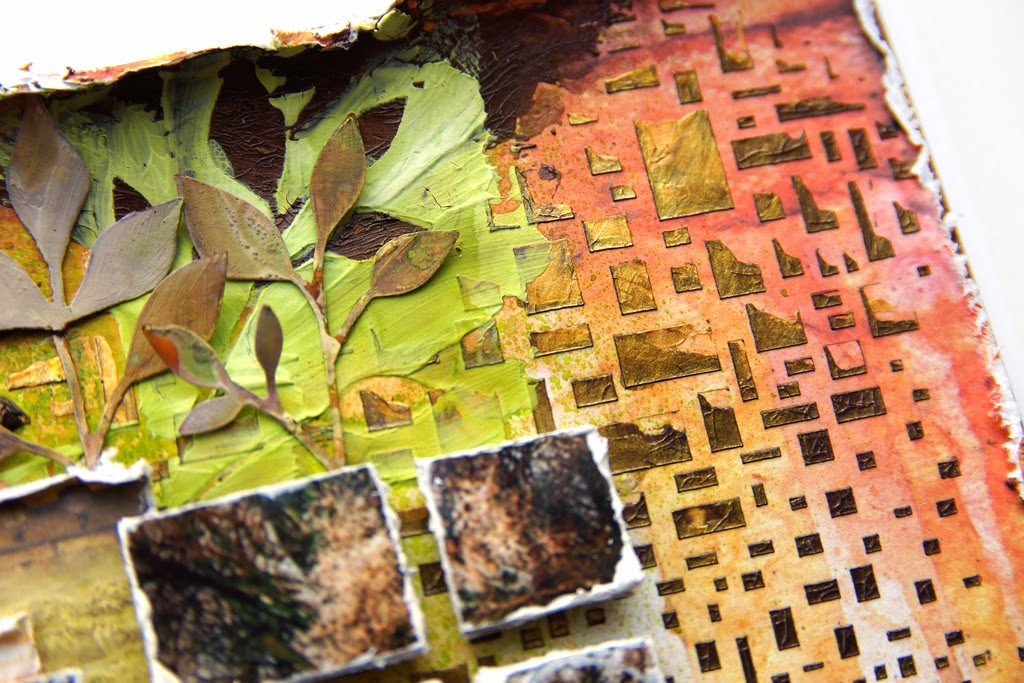
This LO is a fav of mine. I had been given these photo's from a friend of mine as sometimes, it is not always wise to use too many personal photo's. After juggling and cutting away unwanted bits of scenery, and a whole days worth of fun...this is the out come.


I even used some of that bright, hit you in the face green. Mixed with a few dabs of gesso, you know, that white stuff, I can't live without, stuff that I am so addicted to...I thought, it turned out rather well.


The leaves and branches are made using a die from MEMORY BOX. I made my own masks and stencils, to use in the back ground. The same die was used for this. 
I think this gives the back ground more depth and interest. Of course the crackle paint does help.


The ready made mask used to bring on the squares, is from CRAFTERS WORKSHOP.
The masking crackle paste is from VIVA.


With these photo's of trees, the branches draping into the water.The light layer of snow and the hint of   the sun through the leaves...this makes me want to take a cup of coffee, sit and think of a few memories gone by. 


Yes it was a lot of concentrating and puzzling to get the squares in the right place after distressing and gesso being added to the photo edges, yes to all. I think the end results made it well worth it.


I used one of the Prima alpha stamps for "THE" part of the title. Chipboards covered with design paper for the "TREES" part of the title. Before gluing down, finish with inking the edges.
Layering the letters gives a bit of fun to the title.

Till next time, try to have a happy scrappy day, 
Inky hugs,Sussipoppins


Friday, September 5, 2014

GREAT news & Heartfelt Creations!!!

Scrappy Hi to you all!

You've probably all heard the news  - I'm a semi-finalist at Heartfelt Creations! 


We all know about my flower addiction, well this is a win-win way to feed my addiction and make everybody happy at the same time! So, now you all have to help me to get on this dream design team, by voting for me HERE.

For your effort you will be entered into a drawing to be eligible to win a $50 HC Gift Certificate. You can only vote one time and you have to select 5 or more to be eligible to participate. Voting ends on September 30th, 2014.

So, it is win-win for you too!


While you are there, check out the gallery - there are some inspiring candy for the eye!

Very Important - to be in for the prize draw, you have to vote before September 30th.

So, get onto it now!

I want to wish all the semi finalists the best and don't forget to have fun!

scrappy inky hugs,
sussipoppins xox


BABY BOY card


"Wishing you a wonderful journey through a  world of dreams come true"

Love this sentiment!
Such a  sweet, wonderful thought for a new beginning....a world of dreams come true.


Yellow and blue, always safe for a boy, baby card.
A card I made for a friend, destined for a new family member in far away, sunny, Curacao.


What would we do with out flower stamps!
Made in my usual, sussipoppins way, only this time, I used stamps to give a more cabbage rose look.
Love how the vain lines in the stamps brings the roses and leaves to life.
Heartfelt Creations -HCPC 3406 Botanical Floral.
This is a fav of mine when making this flower. Dies to match.

Next time, I shall try a softer color and much,
much more......ink.....glimmer....glitter....sparkle...and all that yummy stuff....then, see how it turns out. Great I know..because I have already tried it!
Had to remember...the card is for a boy!
But I did sneak a bit of glitter in there for the swirl rose buds, and swirls,very subtle though.

Don't you love those leaves. Not too large. Gives a good base for the flowers.
The points of the leaves are balled to give them texture, but I think, it is the different colors of green that gives each leaf the real life look.
Stamp set used for the leaves, Heartfelt Creations - HCPC 3405-Leafy Medley 


Two corners are stamped with  the Heartfelt Creations - HCPC 2254 Leafy Swirls. Then, colored with green ink, finishing the swirls with clear diamond stickles. Got to get that glitter in some how.
Love what those Viva pearl pens can do. A few stips here and there with a matching blue color.


The paper swirl is made by cutting a strip of paper 1.5-2mm. wide. Wrap around a thin tool handle or a  thin paint brush handle, carefully slide it off. Pull a little to get the opening of the twirl you want.
Voila!

You now have a paper swirl matching exactly to your card paper. 
Love the bow tie....so cute, I could not let it alone, so I colored it with the pearl pen.
Yes, you see hand stitching....both layers. I never seem to get the sewing machine out for LO or cards
I just like to hand stitch the paper. I think it makes the difference
...made with more love..
 Some might think crazyness? I think the first is kinder, and more true, so I'm sticking to my story. 


Sentiment and rabbit are from the Stampin' Up  "Baby,We've Grown" 133089 
The 1/2 circle back ground frame is cut from Heartfelt creations -HCD 717 Layered Scalloped Posy.
I cut away the center of the cut paper to get a 1/2 circle baorder.

Let me, let you in on something....
for me this is a win win thing.....I managed to make this card from only 1....yes 1 30x30cm card stock design paper! Flowers, die cutting, card base, matting, yes the lot!...and I once said 
"I would never become a card maker." 
I was way back then, so...a die hard LO scrapper!
Who knows, one day, I might even do a project life LO....or some thing....
...........never say never, ever again .......
Scrappy thoughts......sussipoppins

PS
After the events of today!
Cat out of the bag!!!!!!!!!!!!!!!
One can not keep a secret any where in this scrappy world of ours.

Yes, DT call at Heartfelt Creations. Why not give it a go....I went for it.... and got in to the semi's....
So if you want to see a lot more of Heartfelt Creations and sussipoppins mixed together, go on over to the Heartfelt Creations site and vote. You have till the 30th.You get to vote for 5 semi's. Believe me, they all have something to offer...they sure know what they are doing over there at Heartfelt. Here's me thinking....forget about it....don't tell anyone, let it all happen on the quietly...go with the flow...on the hush hush......and all that...not a scrappen inky glittery chance! TRULY...did I think there was any chance of that really happening? In my scrappy world of dreams, at the moment....YES I DID.

I am now educated! Welcome to 2014! Still suffering from jet lag! LOL

So, now.......after todays events...but it has been a fun day.........
you'll just have to keep on dropping by to my place to see whats happening with the up dates..... that could also be  a lot of sharing fun.
So, till then, you guy's and gal's try to have a scrappy happy one....

Scrappy wishes to you all. oxo

Monday, September 1, 2014

LIFE TIME

Hi,

To make up to all those with a lot of faithfulness that have been waiting for something interesting to be posted by sussipoppins....which, I might add, have been waiting a fair long time...but we won't go down that street today. We take the right turn instead, down the Tutorial Lane.... 

............."THE HOW TO TUTORIAL LANE"........

Today, I have decided to add a how to to the post. Detailed instructions, instead of a brief what I did.
The supply list and Instructions,you will find at the end of the post. 

Don't forget to have fun and get those hands and fingers grubby.....Any questions etc. Just leave a comment and I shall get back to you as soon as possible.


We all know how much I love to make my own flowers, but clustering, is always a win, win in a L.O.


The butterflies are finished with a iridescent medium.


More clustering and pearl pen dots.


Close up of the swirl roses.
The stickles are added when they are glued down and dried.
Reason being....so they can't move and you can what ever them with out the risk of dropping them. It's like having an extra pair of hands.


The title is from a Prima Marketing packaging. "Waste not want not"


Love those metal clips. Some times it is just what a LO needs.


Getting a close look at the masking and boarder die cuts.


See how the rhinestones lengthen the trail of the flower arrangement.
The pearl pen dots extend the line and bring it all together.


Hope you enjoyed the photo show, now for the supplies and instructions. 
Have fun.
SUPPLY LIST:
PRIMA MARKETING -Donna Downing foam stamp, Heart. -Art journal pad 12"x12"(Jodie Lee #950682) -Paper pad A4 (Finnabar. Sunrise Sunset #960094) -E designer rhinestones #300081
MARTHA STEWART  -L Butterfly punch
STAMPIN UP   -1/2" circle punch
THe CRAFTER'S WORKSHOP -Chicken wire mask
VIVA -Pearl pen. Gold -Kristall gel medium.
RANGER -Dobber paint, Red Gold, Silver. -Stickles, Platinum
SIZZIX -Movers and Shapers, Leaves, -Picture Wheel #658558 -Tattered Florals #656640
-Decorative Boarders and Hearts #658946
THIS & THAT -Iridescent medium(Goleria) -Ink, for distressing- Red, Brown, green.-Distressing tool. (for the out side edges of the LO) -Double sided foam tape. -Flower stamens. -Alleen's Tacky glue -Swirly leaf mask. -Cardboard box or chip board. (I used cardboard box) -Crop-a-dile (for flowers or a prick tool, to make wholes for the stamens) -Balling tool and mat. (for the flowers)
-Tweezers -Card Stock. A contrast color.

INSTRUCTIONS:
#1 
Using the swirly leaf mask, bring on the design with the iridescent medium.The placement of this mask is so the points of the leaves are at the edge of the page. Both on the right as the left. I masked two times to get this effect, Later, this will give the look of peeping out from under the clustering. When dry, bring the second layer of masking with the chicken wire mask and kris tall gel. Leave to dry. Distress the edges of the design paper with the distressing tool. Then attach to the card stock, which gives you a base for your LO.
#2
Cut a heart shape from the cardboard box  carton, or if you prefer chip board.. Seal the board with gesso, this will also give the board a white wash look. Stamp with the Donna Downey heart stamp, using the ranger silver and gold paint as ink. ( wash the stamp after using the paint before it dries. If you don't , it will not come off later. ( bad for any stamp) Ink around the edges with red ink or paint.
#3
Attach the heart when dry with double sided foam tape. Place a little to one side, so it is off center.
#4
Using the picture wheel die cut x1 of each, design paper and cardboard box or chip board. Glue the two together. Ink around the edges. Attach this to the center of the heart using double sided foam tape.
#5
Cut x2 from design paper, using the decorative boarders and heart die. Cut one in half. Place one of the halves on each side of the circle frame you have attached in step 4. Place the 2nd paper frame you have just cut, on top. Forming a layered effect. (See 4th photo from bottom.)
#6
Cut a photo to fit the circle of the die cut from step 4.
#7
Make the flowers and leaves using the tattered flowers and mover and shapers leaves dies. The larges flower is made using x3 both small and medium sized flower shape. The rose buds are made with the small size flower shape. x3 for each bud. Ball the flowers with the balling tool.The centers are filled with x2 flower stamens. Fold the stamen stems in half. poke through a whole made with the crop-a-dile, then glue to hold.
#8
Ink flowers and leaves then arrange and glue them all down. Add iridescent medium and stickler. This added after they are glued down, because then they won't move or get dropped and spoil all your hard work.
#9
Attach butterflies at the body, curling the wings up. To give that in flight look.
#10
Add bling swirls and bling leaves.
#11
Using the pearl pen, stip. here and there to form swirls and dots to add to the flow of the flower clusters. Also making a trail, see photo's.
#12
I used a sentiment from the packaging for the title. Placeing a bling in  the center of the flower.
#13
Because the title had the word time in it, I added a metal clock clip.

Remember, if you have any questions leave a message and I shall get back to you. 

Have a fun scrappy day giving this LO a go,
Inky hugs, 
sussipoppins oxo