Wednesday, August 26, 2015

# Two of Three

BEST WISHES pocket card

Hi again, Second eye candy for you today......
This is a card, you will want to make more than one.......you will be wanting to keep one for the  trophy self.


This week, I tried a new card stock.....and am falling in love with it!. I got the tip from my fellow DT at Heartfelt Creations, Lizz...a real sweetheart...and does great crafting. You will be seeing a lot more of this pearl card stock with the Heartfelt Creations products on my postings. I think the two make a great marriage...what does not with the Heartfelt Creations product ?

Heartfelt Creations Products And Products Sold On Our Website:

Other Products Used: Card Stock: Crafters Companion Cuntura Pearl snow white- hint of gold A4. Ranger: Stickles, Heat Gun, Water Coloring Brush, Water Mister, Ink foam tool. Gold embossing powder, Bone folder. Glimmer Mist: Olive Vine, Flower Power, Coral Reef, Caramel Apple, Patina. Spellbinder dies: S2-082 Sentiments one, S5-201 Curved Boarders Two. Other: Double sided tape, Seam binding ribbon, 3 Pearl beads, Versa-mark, Fussy Cutting Scissors, Double sided Tape

Instructions: The finished size of this pocket card is 11.9 cm x 20.5 cm
To make the Pocket: Taking the card stock, cut the pocket back 13.5 cm x 16.5 cm. Make folds at 1.5 cm along the 16.5 cm edge and one on the 11.9 cm edge. This will be the gluing tabs. Cut into the ends to miter the corners. Sharpen these folds with the bone folder. Cut a card front. 11.5 cm x 15.5 cm and cut the center out leaving a 1.5 cm edge on three sides. Giving the card a U shape. Adhere this to the pocket tabs. This will cover the mitering in the corners. To make the frame, stamp the frame image with the gold embossing powder. Color with the glimmer mists, die cut the image using the matching die. 


Cut the clear card stock to fit and adhere at the outer part of the frame with double sided tape. ( You can see the clear card stock in this photo of the completed card.) This will stop the card catching on the leaves as it slides in and out. Alien and adhere to the front of the pocket.
Stamp twice the wood and butterfly image from the Berries and Peaches stamp set, using gold embossing powder. Fussy cut the image complete and the other fussy cut the peaches. Color with the glimmer mists. Shape and ball, using the Deluxe Flower Shaping kit. Color the seam binding ribbon with one of the matching glimmer mist colors. Make a triple bow. Cut a slot large enough for the ribbon on both sides of the peaches on the wood from the complete fussy cut image. Adhere the wood image to the front of the frame. This will cover the flowers in the frame. Adhere the ribbon across and around the pocket, placing the ends into the cut slots. Adhere the fussy cut peaches to the peach image. Adhere the triple bow to the side under the leaves. 


Stamp, die cut, color and shape the flowers and leaves. One flower for the pocket, two flowers for the card. Add a pearl to the center of the flowers. Adhere one of the flowers and leaves to the flower shape in the frame above the center circle. 


The placement of the flowers are to the left.


Stamp the banner image, masking the sentiment on the stamp. Fussy cut the image then color with the glimmer mists. Die cut and adhere the sentiment to the banner. Adhere the banner to the right. Adhere the flowers and leaves to the left. The placement will allow the card to slide in and out and the flowers will stop just above the pocket top. To finish add stickles to the pearls, sentiment and butterfly.


The insert card tab has been left plain. Although you could stamp further on it, it will show through the clear card stock. A suggestion is, you could write, stamp on the reverse side of the card tab 

This was a sure fun card to make...I loved working with this card stock. As you can see it colours fantasticly well with this sold faithful glimmer mists. Now if you all have used your stash up...but I don't believe it. I am sure everyone has a few colours in the bottom of the draws....who knows????
This week three cards posted. Yip....I got carried away this week. Had fun doing it too.
Inky hugs and scrappy thoughts.
sussipoppins

# Three of Three

You're Sweet...
A simple background brings out the elegance of this beautiful stamp and die set 


Heartfelt Creations Products and Products carried by Heartfelt Creations:
173842 Scor-pal

Other Products: Derwent Inktense water color pencils: Fuchsia 0700, Tangererine 0300, Leaf Green 1600, Sun Yellow 0200, Field Green 1500, Iris Blue 0900, Apple Green 1400, Chili Red 0500. Ranger: Gold embossing powder, Heat gun, Watercolor brush, Diamond stickles. Other: Viva Decor-Inka Gold 918, Versa-mark, off white card stock, Fussy cut scissors

Directions: This hinge card, when finished measures 18.3 cm x 13.4 cm.
Note: All the stamping is done with the gold embossing powder.
For the back and front of the card, cut x2 18.3 cm x 13.4 cm. For the hinge, cut 13.4 cm x 3 cm. Adhere together to form the card base. Cut the matting as follows, 17.3 cm x 12.3 cm, 16.7 cm x 11.7 cm, 16.1 cm x 11 cm. Place and adhere all layers to the card base. Taking the Decorative Oval die and card stock, die cut x5. Adhere one layer at a time so you can make certain all is aligned. This will form a chipboard. When all is dry apply the Inka Gold to the out side edges. Center and adhere the oval to the card base. 


Taking the stamp image used for this card from the Berries and Peaches stamp set and matching die. Stamp, color and die cut x 2. Cut away the peaches and leaves from one of the die cuts. 

See how the gold embossing makes the stamped image so royal.


The dies to match the peaches makes ones like so much easier! Love them!

Fussy cut the butterfly.  Shape all the cut images using the Deluxe Flower Shaping Kit. Stamp the sentiment x2. Cut away the word berry from the sentiment. Bring color to the edges with the Inka-Glod. Arrange and adhere all in place with the Double Dots cut to size and glue. To finish, add stickles to the butterfly wing.


See here the sentiment is stamped cut and edged with the Inka Gold. Tucked in and under, this does not take away from the rest of the embellishments.

Well...three posting for this week...triple the work but triple the fun...
I loved stamping and colouring with this stamp and die sets. I hope you give it a go or that I have inspired you to work out of the box....leaving you with that scrappy thought. 
Don't forget to go back to the Heartfelt Creations blog for the rest of the  eye candy that is there.....
Love Wednesdays!
Inky hugs 
sussipoppins


# One of Three ! Yip ! Three this week !

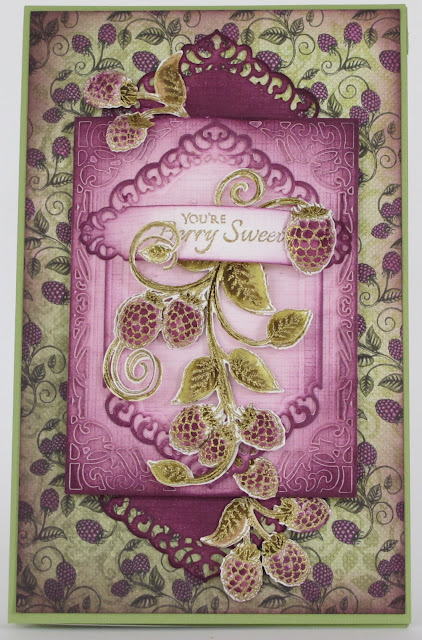
"You're Berry Sweet" 
A card you can be for anyone and everyone!


This week I have three postings at Heartfelt Creations. I got a bit carried away with all the wonderful dies and stamps this release! But it is a bonus...we get triple the inspiration...LOL

Heartfelt Creations Products and Products carried by Heartfelt Creations:

Other Products:
Spellbinders s5-218 a2 Devine Eleaquence, versa-mark, Double sided tape
Ranger: Seedless Preserves, Forest Moss distress inks, Heat gun, Gold embossing powder, water color brush, foam inking tool, paper distressing tool.
Paper: Green and Off white card stock

Directions: The finished hinge card measures 21.5 cm x 13.5 cm.
Note, all the stamping is done with embossing powder. All edge inking is done with the Seedless Concord and the foam inking tool.
To prepare the card base use the green card stock to cut 21.5 cm x 13.5 cm. Cut also a hinge, 13.5 cm x 3 cm. Adhere together to form the card base.
Find the design paper in the paper collection with the berries, cut this to 20.9 cm x 13.1 cm. Ink the edges. Adhere to the card base.
Off white card stock is used for the following: To make the frames and tags use the Divine Eleaquence die set. Stamp the sentiment and die cut the tag. 


Ink the edges. Cut the large frame x3, leaving the cutout bits in the cut. Adhere together to make a chipboard frame. Ink the edges. Cut the small frame x 2, ink the edges of one of the frames. Cut this in half where the lace cut begins, this will give you nearly 2 cm in length when the sentiment tag is placed over the cut.
The other small frames cut in half then trim to 1 cm before the lace cut begins, apply the ink to give total color coverage. 


See below and above,  the ink is applied to the edges, then faded out.


To make the Berry embellishments use the Berry stamps from the Berries and Peaches stamp set, also the dies from the Farmers Market Fruit die set. Stamp, color and die cut x 2 large Berry swirls, also x 3 small Berry swirls. Ball and shape the Berries and swirls.
To put it all together:
1. Center and adhere the main frame with Double Dots to the design paper on the card base.
2. Adhere the small frame that is cut in half at the lace edge.  Adhere the remaining half of this frame so it will have a gap of 1.5 cm to 2 cm between the cuts. Take into account this gap needs to be hidden by the sentiment tag.
3. Give the sentiment tag a rounding so it will become 3d when it is adhered.


4. Place and trim the first layer of the Berry swirl, so it looks like it hangs from the sentiment tag. Adhere the second layer.


5. Adhere the trimmed solid colored frames to each end of the main frame. To finish, trim the 3 small Berry swirls so they can be adhered in their place.


This is just one of the postings for this week...got a bit carried away with this collection and have only 4 weeks posting time....LOL So this week you get 3, next week 2.
You will see so much inspiring work on the Heartfelt Creations blog this month....so keep your sunnies handy (sunglasses) for all the sparkle and bling....
Have a scrappy one.
Inky hugs sussipoppins 

Wednesday, August 19, 2015

A Heartfelt Creations Wednesday posting

Today I have for you a pocket card ...
"MENU".


A sure worth while investment of spending a few 1/2 hours viewing the close ups and instructions...so pour yourself a coffee, tea or a dreamy whipped chocolate milk...what ever takes your fancy and indulge yourself.

Product List
Heartfelt Creations Products And Products Sold On The Website:
Other Products Used:
Card Stock: Kraft dark and Kraft light,
Ranger: Stickles, Heat Gun, Water Coloring Brush, Water Mister, Ink Foam Tool. Gold embossing powder, Bone folder. Distress Inks; Walnut Stain, Spun sugar, Tumbled Glass, Dusty Concord, Peeled Paint, Forest Moss, Bundled Sage. 
Other: Versa-mark, Fussy Cutting Scissors, Double sided Tape, Diamond stickles, Corner punch.


Instructions on how to make this card:
 The finished size of this card is 17.5 cm x 19.5 cm


For the card, taking the dark Kraft card stock cut for the card base 18.0 cm x 16.0 cm. 
For the matting with the light Kraft card stock, cut at 17.5 cm x 15.5 cm. Use the corner punch to round all corners. Find the green paper with MENU printed on it and cut to size, 17.0 cm x 15. 0 cm. Using the corner punch, round the corners. Ink the edges with the Walnut Stain ink.

 The pocket: 


Cut, 18.4 cm plus 1.5 cm each side for flaps. x 11.4 cm in the dark Kraft card stock. Fold in half. Cut away the 1.5 cm to the fold. Using the corner punch round the bottom folded edge corners. Adhere together to form the pocket. Make a matting layer for the pocket with the light Kraft card stock, 19.9 cm x 10.9 cm. rounding the corners with the corner punch.  Using the same green design paper as the card cut a matting 17 cm x 9. 9 cm. Round the corners and ink with the Walnut Stain distress ink.


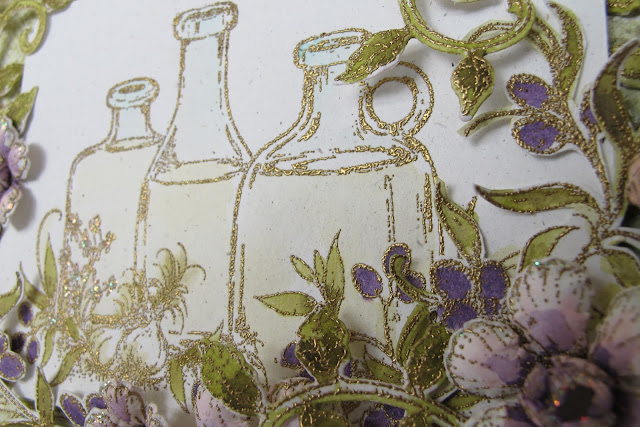
  Stamp the image from the Jugs and Accents stamp set, using the gold embossing powder. Color with the distress inks. When dry, cut this to 11.1 cm x 8 cm. Punch the corners. Adhere all the layers to the pocket front. 


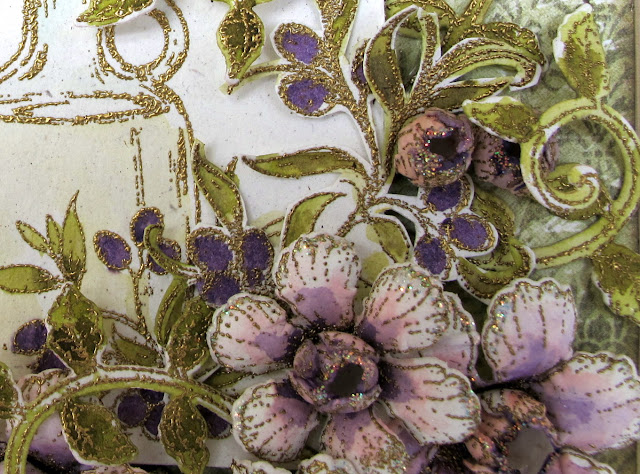
Stamp and cut, the flowers and vines with matching stamp and die sets, stamping with gold embossing powder. Color the flowers and vines with the distress inks. 


Bring shape to the flowers and vines using the Deluxe Flower Shaping kit. 


Adhere all the flowers and vines to the card front in their place. Also adding two of the vines to the left side of the card. 


To finish your project add stickles to the flower petals and buds.


We have all heard it before....the photo does not look as good as the real thing...well it is true! 
A shame my photo taking is wanting. The up side is...wait for it...that is the big reason why I started scraping. To make a bad photo look great!....you know the ones you took and don't have the negative or the children are all grown up...and that used coffee cup is in the picture....and, who is that person that keeps on getting in the way just when I took the shot. We could all go and do the moment  again...but now the kids are a bit taller and grandpapa is a bit more grumpy....so we won't....Well. that is life...there is also photo shop.....but.... I think of all the hours it will take me to learn it....I'd rather make a few extra flowers to cover the nasties. 
The solution for you, is to make the card yourself...then you too can see how really great it is...LOL
....and...if you do...you too can have inky fingers.
I shall leave you with that scrappy thought and inky hugs for this week.
sussipoppins

Wednesday, August 12, 2015

Heartfelt Creations new release for August!.....

It's called....
"FARMERS MARKET"
This collection is truly filled with all the goodness and yum you would expect from the name. 


CAST YOUR BURDEN pocket card

Heartfelt Creations Products And Products Sold On Our Website:

Other Products Used:
Card Stock: A4 SUP - Natural White, Bazzill - Red. Ranger: Heat Gun, Water Coloring Brush, Foam inking tool. Gold embossing powder, Bone folder. Distress ink: Walnut Stain Forest Moss, Fired Brick, Antique Linen, Tumbled Glass. Other: Versa-mark, Fussy Cutting Scissors, Double sided Tape, Seam binding ribbon, Corner Punch.. Round the bottom corners with the punch. Ink the edges with the Walnut Stain. Taking the Red card stock cut, 9.1 cm x 9.1 cm for the image

Instructions: 
The finished size of this POCKET CARD is, 18.4 cm x 14.7 cm. To make the pocket: Taking the A4 card stock, fold this in half. Cut away on both edges to the fold 1.2 cm. Fold the remaining 1.2 cm back to make the tabs to form the pocket. Adhere together to form the pocket. Using the corner punch, round the bottom pocket corners. For the pocket front, cut from the paper collection, Farmers Market 18.2 cm x 14.5 cm. Take the Red card stock and cut the matting, 9.1 cm x 9.1 cm for the image and 9.1 cm x 3.9 cm for the sentiment. Taking the A4 card stock and the Cut Mat Create dies, die cut the sizes needed for the image and sentiment. Gold emboss stamping these with the image from the Apple Harvest stamp set and a sentiment from the Up lifting Scriptures set. Using the distress inks, color the image. Use Walnut Stain to ink the edges. Adhere the red matting card to the stamped cards. For the large apple image, gold emboss and color this also. Fussy cut and shape by using the Deluxe Flower Shaping kit. Wrap and adhere the seam-binding ribbon across and around the center of the pocket. Adhere the sentiment to the pocket front with double sided tape or glue but the basket of apples image to the pocket front with foam squares. Adhere the fussy cut apples with foam squares in position as seen in the photo. Make and adhere a triple bow. For the card:  Taking the A4 card stock, cut 17 cm x 17.9 cm. Repeat this, using the paper from the Farmers Garden paper collection, also, cut 9.7 cm x 17.8 cm for the back of the card with the paper collection. Round the corners and ink the edges of all paper and card stock. Taking the A4 card stock gold emboss and die cut the jugs using the Jars and Vines stamp and die sets. Gold emboss stamp the large apple image, then fussy cut this. Color all the stamped images. Shape the apple image with the Deluxe Flower Shaping kit. Adhere the design paper to the card base. Ink the edges with Walnut Stain ink. Arrange the jars across the top of the card.  Staggering the placement to fill the gaps. Adhere the apple image to the right of the card as seen in the photo. Ink the edges of the back of the card and jars. Adhere the remaining paper across the back to neaten the join of the jars and card.


If you have clicked onto the video, you will get so inspired to try something out of the box. There is also so much to see this week on the blog.
Till next time, have a scrappy inky week,
Inky hugs Sussippins


Wednesday, August 5, 2015

" YOU'RE THE BEST "

Hi, This week....doing a bit of catching up...a gate fold card I made for the Blazing Poppy Collection, but did not get round to posting..... it got lost in the getting on with life list...LOL....I thought it was too good to be overlooked...I hope you think so too


‘YOU’RE THE BEST”

Heartfelt Creations Products and Products carried by Heartfelt Creations:
Other Products: Ranger: Green distress embossing powder, Water coloring brush, Water mister, Walnut Stain distress ink, Ink foam tool, Bone folder, Heat gun, 
Derwent-Inktense water color pencils: 1600 leaf green, 0500 chilli red,
Paper: SUP A4 natural white, Bazzill Brick card stock, Watercolor paper, Sketching paper. White cardboard. Seam-binding ribbon, Double sided tape. Versa-mark, 2 x pearl beads.
Green copic marker pen, E Boss embossing folder: Dotted chevron


Directions: The finished card measures 21 cm x 14.8 cm.
Take the A4 card stock, score at 7.5 cm and 22.3 cm. Sharpen the folds with the bone folder. This is your card base. For the card fronts find the papers from the Blazing poppy paper collection. Cut the card front matting 20.5 cm x 7 cm twice. Cut the card fronts 20 cm x 6.5 cm twice. Taking the embossing folder and emboss the card fronts. Water mist the papers and curl up the sides. When dry, apply the Walnut Stain ink to the edges.
With the Brick card stock cut 10.3 cm x 7.8 cm. From a SUP A4 card stock die cut the Decorative Oval and 5 leaves from the All Geared Up die set. Using the sketch paper, Blazing Poppy stamp set, stamp with the versa-mark and embossing powder, die cut with the matching Blazing Poppy die set. Color the poppies and leaves using the Derwent pencils. Mist the Poppy die cuts with water. Carefully scrunch the flowers into a ball. Gently open the Poppy. Leave to dry, checking the shaping as it dries. The Poppy will dry hard. Ink the edges with the Walnut Stain distress ink. Use the tools in the Deluxe Flower Shaping kit to make a deep dent in the center of the Poppies. This will raise the flower. Color the pearl with the green copic pen, adhere the pearl to the center of the top Poppy layer. 
Adhere the layers together.
More tips on making the poppies and the whole Blazing Poppy collection click HERE


Make a screw swirl by cutting 1.5 mm – 2 mm strips of brick card stock. Quell the strips with the quelling tool in the Deluxe Flower Shaping Kit. 


Taking the Poppy Corner stamp set, find the Poppy image and stamp with the Tuxedo Black ink onto the watercolor paper. Color the image with the Derwent pencils and a watercolor brush. When you have finished coloring, add a color wash over your work, dragging the colors to the background. Adding more ink if needed. 


Using the Cut Mat Create die size 2.75 “ x 3.75 “ die, cut the stamped image paper to size. Cut enough white cardboard to back this paper. Ink the edges with the Walnut Stain ink. Adhere together with wet glue. Find the sentiment from the paper collection, cut to size.


Putting the card together: 
Adhere the card front papers to the card base with wet glue or double sided tape. Wrap and adhere with double sided tape the seam binding ribbon around the middle of the card. 


Center the Decorative Oval frame to the front of the card, adhering swirls. Adhere the sentiment with 3d squares. To finish your card add stickles to the Poppy edges on the image and the 3d Poppies, only the left side of the frame to the card front with wet glue. Do the same for the stamped image and it’s frame. Arrange and adhere the Poppies, leaves and screws. 
Goes to show this is a real timeless collection!
Like all the collections....what do I invest in? We can not all do the " I want it all " thing....although we would all like to. As you have no doubt seen from all the yummy postings last month...this sure is a stayer...you can use it in so many ways.
A little hint for the next release for August....sssssst.....a few stamps and dies are a must have for the embellishments to finish any card off. When you see it, you will understand.....till then sleep well....lol...7 sleeps.
Till then you will have to get all inky and scrappy with the toys you already have, 
Inky hugs, sussipoppins.