


HEARTFELT CREATIONS product and product carried on their web site:
HCFB1-462 3D Rose Shaping Mold, HCFB1-489 Hydrangea 3D Shaping Mold, HCFB1-467 Leafy Accents Shaping Mold, HCDP1-2134 Moments In Time paper pad collection, HCPC-3972 Simple Moments Timepiece cling, HCD1-7380 Simple Moments Timepiece die, HCPC-3973 Timepiece Sentiments cling, HCPC-3835 Leafy Accents cling, HCD1- 7193 Leafy Accents cling, HCPC 3752 Classic Rose cling, HCD1-7110 Classic Rose die, HCPC-3900 Cottage Garden Hydrangea cling, HCD1-7278 Cottage Garden Hydrangea die, HC Stamens Pearl medium, HCST1-401 Deluxe Flower Shaping Kit, HCPP1-475 Deluxe Flower Shaping paper pad-pack of 50, HCDA1-449 Dauber, 352854 Metal Tip For Adhesive Bottles, 159723 Designer Dries Clear Adhesive, RACP500 Ranger Archival ink Sepia,, RACP614 Ranger Archival ink Magenta Hue, RACP436 Ranger Archival ink Leaf Green, RACP607 Ranger Archival ink French Ultramarine, 359848 Spellbinders Tool
OTHER PRODUCTS USED: Inks: Ranger Archival Thistle, Sap Green. Other: Double sided tape, Diamond Stickles, Fussy cutting scissors, Misti, 3D foam card stock, Hot Glue Gun, 3D double sided foam tape, Washi tape, Green organza ribbon, 2 photos.

INSTRUCTIONS:
This
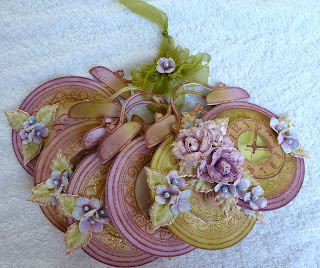
sentiment book measures 5 “ X 5 1 / 2 “
plus the ribbon hanger when completed. This book has 5 pages and a cover.
Prepare all
the elements used in this project by using the white card stock and the Sepia
ink. First prepare the clock page bases by stamping and using the matching die
from the Simple Moments Timepiece sets. Do this seven times, plus cut four
extra die cuts. You will also need six die cuts from the design paper found in
the paper pad for this collection, this will be the backing for each of the
pages. From the Timepiece Sentiments set, chose three sentiment circles then
stamp and die cut with the matching die found in the Simple Moments Timepiece
die set. Find the circle die that fits the outside of the fancy swirl circle
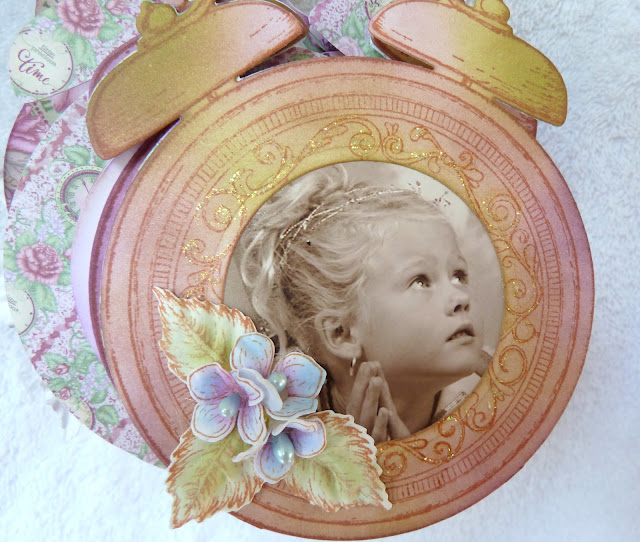
part of the clock and use this to die cut the photo to go onto the clock face.
Taking into account when die cutting the photo, this circle will be larger than
what will be seen when finished. What you will see when all is put together
will be the same size as the clock face circle. Using the same circle die used
to cut the photo die cut from the white card stock five circles, these will be
used for hand written journaling. When
adding colour to the clock elements, the inks used will be Thistle and Leaf
green unless stated.
Use the
Classic Rose sets to make three roses, each rose has 3-4 petal layers. The ink
colour used is Thistle. Watch the film to see how they are made. For the hydrangea petal flowers, use the Cottage Garden
Hydrangea sets, one petal plus a blue coloured stamen cut in 1 / 2 for each
flower. The colours used are Magenta Hue and French Ultramarine. The leaves,
use the plain leaf vine with 10 leaves on it from the Leafy Accents sets. Some
of the leaves will be trimmed away from the vine to be used in the flower
clusters. In total there will be 26 leaves used in this project so make at
least 3-4 leaf vines. The colours used for this is Leaf Green and Sap Green.
To make the two clock pages with the photo: for this book:- Using a
stamped clock and the die that matches the clock face, die cut out the clock
face for each page. Colour the clocks with the inks and the aid of the
daubers. Apply clear drying adhesive to the back side of the edge of the circle
holes. (not stamped side) Place the pre-cut photos to close the hole in the clocks.
Taking the pre-cut design paper clock backings and adhere these to the back of
each clock. Taking the journaling circle, ink the edges
then adhere this also to the back of the clock page. Trim away the clocks
feet and the bell hammer. Apply the diamond stickles to the swirls and put
aside to dry. When dry, using a hot glue
gun to adhere in a cluster, the hydrangea petal flowers and leaves on each page
as seen in the project photo.
To make the
three sentiment pages for this book:- Taking a pre-stamped and cut clock and one of the sentiments, colour with the
inks. One of these pages will be the book back page therefore adhere two of the
extra card stock die cuts to the back of this page. This page does not have a
journaling circle, the other two do. Adhere to the back of each page a
collection design paper die cut. Taking the remaining two journaling circles
and ink the edges then adhere these to the back of the clock pages. Adhere to
each page a circle sentiment to cover the clock face. Trim away the clocks feet
and the bell hammer. Apply the stickles to the fancy swirls and the edge of the
sentiment circle, when this is dry, arrange and adhere the flowers and leaves
in clusters as seen in the project photo.
To make the
front page:- Taking one of the remaining clocks and the circle die that fits
the fancy swirl frame in the stamped image, die cut this out. The rest of this
clock image will not be used. With the last remaining clock page, die cut the clock face with the matching die,
use also at the same time the die that cuts the circle with the clock handles.
Secure the dies with the washi tape so the dies will not move as you are
cutting. Add colour with the inks to all the die cut elements.
Adhere the
fancy swirl frame to the clock front using the 3D double sided foam tape. Adhere
the two extra card stock and design paper die cuts of the clock to the back of
the clock, adhere also the journaling circle
in place. Flip the page over and with the 3D foam dots or the 3D double sided foam tape adhere the die cut clock face in
place over the stamped clock face. Apply the stickles to the clock face circle
edges. Arrange and adhere with the hot glue gun the roses, leaves and the
hydrangea petal flowers in clusters as seen in the project photo. Trim away the
clock feet, leave the bell hammer alone on this book cover.
To hold the
book together, use the organza ribbon. Using a 14 “ length of ribbon, thread
this through all the clock handles then fold in half and tie a knot about
1 1 / 2 “ – 2 “ from the fold. From
another piece of ribbon make a triple bow. Using the hot glue gun, adhere the
bow to the knot in the ribbon then adhere to the bows knot two hydrangea petal
flowers. Now make another knot in the ribbon 1 - 2 “ above the bow. This last
knot makes a loop so you can not only lay it on a table but you can hung it on
a door, cabinet or draw handle.
https://www.youtube.com/watch?v=faBoB2s49RI
Hydrangea petals
https://www.youtube.com/watch?v=FSdPL7nXvQE
Classic rose


No comments:
Post a Comment