Wednesday, February 25, 2015

Peace Card & Heartfelt Creations

Hi!
My fav day of the week...hope for you too?
Yip it's Heartfelt Creations Wednesday again!
I have supprised my self with this one.
No distressing or gesso....just total soft and sweetness,
so is it suppriseing it is called
"Peace" 
Heartfelt Creations Products and Products Sold On Our Website: 

Other Products: Paper: SUP naturals White A4 (x2) Ink: SUP: Old Olive. Staz-On: Jet-black. Ranger distress ink: Broken China. Copic Makers: Holiday Blue BG05, Blue green BG09, Moss YG67, Golden Yellow Y17. Spellbinders: S4-356 Decorative Elements, S5-030 Fancy Tags Two. Ranger: Bone folder, craft mat, water spritzer, water brush, Heat gun. White seam binding ribbon, Masking paper, Diamond Stickles, Scissors for fussy cutting, Glue dots. 


 This card size is 14.5 cm x 21 cm. To make the card base, fold one of the A4 cards in half. Use a bone folder to sharpen the fold. From the remaining A4 card, die cut an oval using the S4-356 largest die. Using the die shape seen in the card photo, from the S4-030 fancy tag die set. Cut this 6 times. Glue the die cuts together making chipboard. 


 From the Paper Pad, find the background printed-paper with the flower clusters. Cut two of the clusters out, making sure you chose opposites. Having the leaves pointing down at the point of the cluster on both images. Cut also the same shapes from masking paper. Find the background paper from the paper pad with banners and cut out two of the Peace banners this will be the sentiment for the card. 

To prepare the ribbon, apply broken china ink to your craft mat then mist with water. Roll the ribbon into the mix. Add more ink as needed to get depth of color and an uneven color. You can dry the ribbon with the heat gun. Make two triple bows. To make the butterfly over lay, use the larger swirl image from the HCPC 3654 Stamp Set . Stamp the image with Staz-On ink on to clear card stock, repeat this so you have two. 


From the second stamping, you will only need the image of the butterfly. Flip the stamped image over. You will now be working from the backside of the stamped image. Bring the color to these butterflies, flowers and leaves using the Copic makers listed. To cut this stamped image so it will fit the tag you need to first place the clear card stock on top of the tag. Holding the layers securely together, with scissors cut away the excess clear card stock in the oval shape. Adhere the oval to the tag. Now, to put it all together: Not yet gluing down, position the embellishments on to the card base front. 1st, the die cut fancy oval, 2nd the tag, 3rd the bows then the flower cluster masks. So you can see that all is aligned, centered and balanced. 


Leaving the flower cluster mask in its place, remove all of the embellishments from the card. Using the stamp positioner, the small swirl stamp from the HCPC 3654 stamp set and Old Olive ink. 

Stamp the swirl so you will see the rose buds peeking out from under the flower cluster mask. Repeat this for the other side of the card. With the water brush, drag the ink from the edge of the image to fill the leaves in. Add a little broken china ink to the rose buds. With Double Dots adhere the fancy frame to the card base, then the flower clusters. 


Adhere the tag to the center with double dots, making sure you add enough height so the bows will be able to be tucked under the tag. Adhere the bows with glue dots so they will be tucked just under swirls of the tag. Fold the extra cut butterfly in half and attach in its place with a cut to size glue dot. For the sentiment, cut one of the banners in half and glue under each end of the complete banner. Place and adhere to the card. 
To finish, add stickles to the flower centers, rose buds, along the wholes on the fancy frame and to the swirls and butterfly on the clear card stock.
****
I hope you have enjoyed your scroll down my blog today. Don't forget to call in at Heartfelt Creations, to check out all that yummy talent posted on the blog....also a teaser for the new release next month.
I have good news for me...I am now feeling better. Getting over the bug since I got home from my travels I have been really sick with the bug, you know that in bed sick! Sleeping the whole day sick, and it wasn't all jet lag. I'm nearly over it....you know when you want to get back into your life and get things done.....danger...relapse...so I am not going out side yet....not till after the weekend. Ha!
great news....I can craft till then!
That is till I have to get back into the every day chores and stuff...so, till then my fingers are getting inky for sure!
Wishing you all a happy scrappy day and don't forget to check in at Heartfelt Creations to make your day even better!

Inky hugs sussiPoppins XOX

Wednesday, February 18, 2015

Heartfelt Creations' Wednesday!

Hi!

It is Wednesday again and it is tome for some Heartfelt Creations' inspiration!


Heartfelt Creations Products Used:
HCPP1 251 Butterfly Medley Collection Paper Pad
HCPC3651 Botanical Rose Cling Stamp Set
HCPC3545 Open Leaf Cling Stamp Set
HCD1-758 Botanical Wings Die
HCD1-736 Classic Leaf Die
Double Dots
Paper Blossoms Molding Mat
Paper Blossoms Tool Kit
Paper Shaping Tools & Piercing Mat
Art Institute Glue - Dries Clear


Other Products Used: Paper: SUP Neutral-white A4Yellow card stock, White stamping paper. Inks: Archival: Jet-black, Colorbox : Chestnut. Glimmer mist; Olive Green. Ranger: Bone folder, Distressing tool, Heat gun. Spellbinders: S4-189. Versa Mark embossing pad, Yellow organza ribbon, Self-adhesive gems yellow/orange, Needle and thread, Clear glue dots, White embossing powder. 


The size of this card is 21 cm x 14.3 cm. Fold the A4 card in half, use the bone folder to sharpen the fold. Taking the yellow card stock, cut 14.3 cm x 21.5 cm. This will be your card front matting. Ink the edges with the chestnut ink. Find the 30 cm x 30 cm paper in the paper pad with the yellow flowers and wings of hope sentiment. Cut this paper to 13.6 cm x 19.9 cm. Taking note to cut the paper so the design falls in the length on the bottom. See the photo of the card. This will be your card front.


Align and die cut the sentiment from the paper using the S4-189 cutting die. This sentiment will be replaced but turned later. Apply Chestnut ink to the edges of the die cut.


Prepare prick wholes .5 cm from the edge with the aid of the prick tool and mat. Back stitch with the gold thread. Taking the distressing tool, ravel and fray the four edges of this paper. Adhere the yellow ribbon across the front of the card front.


Adhere the card front paper to the matting card stock with Double Dots. Attach double, double dots to the sentiment, adhere in its place. Make and attach a triple bow with a clear glue dot to the right side of the sentiment. Stamp, emboss, die cut and shape the flowers and leaves.


First place and adhere the leaves then stack and adhere the flowers, using clear drying glue. To finish add the gems to the flower centers.

Thank you for stopping by today!

Have a scrappy week!

sussipoppins
POST NOTE: I am finally back from a month of non stop exploring across the ocean to Miami,Colombia, Costa Rica, Mexico, Los Angeles. Traveling by car from Los Angeles on highway 101 to San Simeon, Monterey and San Francisco. Then leaving the warm winter Californian sun to fly back home to Crispy Nederland. Apart from a big jet lag, I got the bug the second day I was home....so I am sick as a Hushpuppy. Hopefully with a bit of VIP TLC I should be up and about and back to my scrappy self...all going well.... by next week. xox

Wednesday, February 11, 2015

Heartfelt Creations February Release

Hi!

It is the second Wednesday of the month and it is time for the February release from Heartfelt Creations. The new collection is all about beautiful blossoms, butterflies and spring feeling!
It is the "Butterfly Medley"!


Heartfelt Products and Products Sold On Our Website:
HCDP1-251 Butterfly Medley Collection Paper Pad 
HCPC-3655 Dream in Beauty Cling Stamp Set
HCPC-3650 Butterfly Medley Cling Stamp Set
HCPC-3652 Botanical Wings Cling Stamp Set
HCD1-758 Botanical Wings Die
HCD1-179 Butterfly Medley Die
Double Dots 100 pc.
Hydra Sponges
Stamp Positioner Kit
Zip Dry paper glue
Funnel Tray
Crystal Lacquer
Melt Art Ultra Thick Embossing Enamel
Reversible Score-Mat Self-Healing 12 x 12"

Other Products Used: Paper: Cardstock: Lilac, Pale Green. Ink: Derwent ink-tense watercolor pencils: Teal green 1300, Apple green 1400, Sherbet lemon 0100, Sun yellow 0200, Fuchsia 0700, Iris blue 0900, Charcoal grey 2100, Tangerine 0300. Distress Inks: Mustard seed, Broken china, Chipped sapphire. Staz-On: jet-black. Ranger: Heat gun, Teflon scissors, Ink Tool, Water brush. Other: Versa-Mark pad, Small bowl of water, Fussy cutting scissors, Gesso, Craft knife, Diamond stickles.

This Lay Out size is 30 cm x 30 cm. From the Paper Pad, find the design paper with the trellis print, pink flowers and butterfly’s. Using the Self-Healing Mat, craft knife and fussy cutting scissors, cut away the background from the trellis and the lower butterfly, leaving the flowers and leaves intact. Cut the trellis from the paper. Cut to size the Double Dots with the Teflon scissors to fit the trellis frame and attach to the trellis back. Put this aside.


Taking the Lilac card stock and the Butterfly Medley Stamp Set, stamp the butterfly images. Color images with the Derwent pencils then die cut with Butterfly Medley Die. Cut the photos out and attach Double Dots to the back, put aside for later.

Take the pale green cardstock, Versa Mark, Jet-black ink, embossing enamel, the Stamp Positioner Kit and Dream in Beauty Stamp Set. To get a idea where you want to position the stamping, place the trellis on the card stock then put aside. Using the Stamp Positioner, stamp with jet-black on the left bottom side. Do the same, but using the Versa Mark and embossing enamel instead of ink. Stamp this just shy of the first stamping. Repeat the same with the embossing, this time a few cm shy of first stamping.


Emboss stamp once on the upper right side of the trellis, this time featuring the butterfly. This embossing stamping makes a resist on your work. Apply the distress inks with the Ink tool, shading with different colors. Always adding a little color at a time, add more ink if needed to taste. With a small bowl of water, dip your fingers in and flick to splatter on the card stock. Dry with the heat gun. From out the center of the cardstock with horizontal strokes apply the gesso with the aid of the sponge. Again starting with a little gesso, you can always add more but it is hard to take it away. Repeat, the flicking of the water. This will, again give you water marks on your paper. The same applies, you can always add more but you cannot take away. Attach your Double Dots trellis paper to the center of the card stock.


Attach the photos with Double Dots to the trellis. The placement of the photos: to cover the whole from the cut away butterfly. Cut one of the large die cut butterflies in half and do the same for the cut butterfly from the paper. With the balling tool and mat. Shape and curl the butterfly wings Adhere in place with the cut to size Double Dots.


The butterfly girls: One girl has a single half wing, the lower girl has a double half wing. The remaining half wing is placed on the flower center on the bottom left. See photo of LO. Apply crystal Lacquer to each pink flower center and all the butterfly bodies. Carefully spoon or sprinkle the clear crystals on the lacquer. Leave to air dry. When dry, gently tap off into the funnel tray. To finish, apply stickles to the butterfly wings and dot a little to each white flower center on the trellis.

Have a scrappy!
sussipoppins

Wednesday, February 4, 2015

Beautiful Moments With You layout

Hi! 

It is my favorite day of the week again - Wednesday posting at Heartfelt Creations!

And here is my creation this week:


Heartfelt Creations Products and Products sold on our Website: 

 Other Products Used: The Crafter's Workshop Masks: TCW 437, TCW 457; Derwent Intense water color pencils: (leaves) Leaf green 1600, (twigs) Willow 1900, Bark 2000, (flowers) Fuchsia 0700, Chilli Red 0500, Sun Yellow 0200, (bird and water) Iris Blue 0900, (bird house) Baked Earth 1800. Ink: Archival Black, Versa fine crimson red, Versa fine vintage sepia. Glimmer Mist: Olive Vine, Burnt Red, Pink Bubblegum. Other: Gesso, Sponge, Chipboard, Distress tool, Prima Marketing E. Line stones x 2, fussy cut scissors, Galeria Iridescent medium, spatula, heat gun 

This layout is not easy for a beginner so please, refer to the photo often for guidance, as to where and how placement of the embellishments should be. The layout is a standard size of 30 cm x 30 cm. The photo size is 9.1 cm x 15 cm. Find the pink design paper from the Birds and Blooms Paper Collection. With Archive black ink, the stamp Birds and Blooms Collage Set, stamp the background. Stamp the image a few times so the stamping will show from under the layering later. 


Using the gesso and sponge apply the gesso, spreading from out the center to the sides. This gives a darker to light effect. When dry, bring on the texture with the masks, iridescent medium and a spatula. When using masks and mediums, be careful not to smudge between extending a pattern and layering on your work. It takes time and patience but it is better in the long run, to let it dry between the layers. I always like to air dry rather than heat dry mediums. When the medium is totally dry, spray liberally glimmer mist to the right and left center of the page, forming puddles. Tilt the page so the mist puddles will form running drip lines, let them run to the bottom of the page. Repeat again, but tilting the page so the drip runs in the opposite direction. If needed, with your lips, blow to direct and help the movement of the flow. 


To speed up the drying process you can use the heat gun. Don't panic, the mediums and heat will curl and wrinkle the paper. To correct this and to enable the paper to support the weight of the goodies that will later be added, cut 30 cm x 30 cm from the chipboard. Glue the paper to the chipboard. Wet glue will allow a small time frame to enable you to move and straighten the paper to fit the chipboard. Place the paper towel over the board, with the Brayer firmly roll over the board to flatten away all wrinkles and bumps not wanted. 

In the Paper Pad you will find the card frames with lightly printed out line images for coloring in. Select two of these frames. To stamp the images onto the frames use the Versa Fine Crimson ink and the following stamps: HCPC 3648 Home Sweet Home, the image of the bird and birdhouse, HCPC 3647 Hydrangea Bird Bath, the image of the birds on the birdbath. Color the stamped images in with the watercolor pencils and brush. Attach the frames to the layout with Double Dots


Prepare the photo by backing it with chipboard. Attach this also to the layoutt with Double Dots. Look to the photo for an idea of where to position the frames and photo. 

To make the blooms and embellishments for this layout, start by using the HCPC 3644 Birds and Blooms, the blooms on a branch and 6 single blooms stamp. Stamp the images onto watercolor paper 3 times each, color in with the Derwent watercolor pencils and water brush. Then die cut them with the matching die. Ball and shape with the Paper Blossoms Tool Kit and  Paper Blossom Molding Mat


For the larger blooms, use the HCPC 3608 Arianna Blooms Set and HCD 748 Arianna Blooms die and die cut enough for 3 large, 3 small blooms plus 1 bud. Spray the stamped die cuts with the burnt red and pink bubblegum glimmer mist. Shape and ball the blooms using the Paper Blossoms Tool Kit and  Mat


For the twigs use HCPC 3645 Leafy Branch Set and HCD1 757 Leafy Branch die . Cut 2 long twigs and 1 short twig. As above stamp, die cut, color and ball the images. The 2 butterflies are taken from the HCPC 3649 Birds and Blooms Collage Set. Ink up only the butterfly image of the stamp with vintage sepia ink. Stamp twice to make two butterflies. Color in the image with watercolor pencils then fussy cut. 


Now for the real fun part, that is, putting it all together! Start first with the large Arianna Blooms, using Double Dots and wet glue, attach the 3 large blooms in their place. From now on, only wet glue will be used to attach all embellishments. Placement of the twigs: cut the short twig in two, place and glue down under and to the right side of the frame, on the right side of the layout. Place one of the small Arianna blooms under this frame and next to the photo. 


For the 2 long twigs, one is placed above the frame on the left of the layout, the remaining twig, place on the right of the same frame, under the photo. Place one of the small Arianna blooms and the bud on top of the twig and next to the large bloom. Place and attach the branch and bloom die cuts. Use two cuts for the top left corner, one tuck under the bloom on the right and the other lay on top of the left corner of the photo, draping over the bloom and down on to the frame. Place the remaining Arianna bloom in the center point of the branch. 

For the lower left side cluster, place the branch on the frame draping one of the branches up onto the photo. Now glue all the small single blooms onto the bloom image on the branches. Put a spot of glue here and there on the back of the leaves to attach. But do not do this too much, or you will lose the 3-D effect. Place the two butterflies to the lower right of the Lay Out. Take the E. designer stones from the packet and cut to look like leaves. Take off the plastic backing and put in place as shown in the photo. Add 3-D Crystal Lacquer  to the bird on the birdhouse and to the single flower centers. To finish add Stickles to the butterflies.

I hope I've inspired you to try this! 
Any questions, please leave a comment and I'll get back to you as soon as I can. 

scrappy inky hugs, 
sussipoppins

Wednesday, January 28, 2015

Jolie with Heartfelt Creations

Heartfelt Creations' Wednesday! 

Hi, it's that time of week again... and I've prepared a brand new project for you with Heartfelt Creations' newest release "Birds and Blooms"


Heartfelt Creations Products and Products Sold on our Website:
HCDP1 250 Birds and Blooms Collection Paper Pad
HCD 713 Decorative Lace Border die
Paper Blossoms Tool Kit
Paper Blossoms Molding Mat
Art Institute Glue
Speedball Brayer 4"

 Other Products Used: Green cardstock x 2; Green lace; Prima Marketing Old Road ink; ruler; pencil; scissors; cardboard (3 mm); water mister; Tim Holtz scissors; 1 meter of pale green lace 2.5 cm wide; 23 cm of green ribbon 7 mm wide; Prima Marketing E. Pearls and crystals x 2 pkt; double sided tape 

The Layout size is 30.4cm x 30.4cm. The photo size is 9.1cm x 14.7cm. From the Paper Pad you will need two of the large leaf boarder papers, one of the soft turquoise paper and one printed layout paper. Wet glue the soft turquoise design paper to a 30.4cm x 30.4cm cardboard. Take the leaf boarder papers and fussy cut the borders, ink the edges of the leaves with the Old Road ink. Using the Paper Blossoms Tool Kit and Paper Blossoms Molding Mat  shape and curl up the leaves. Fussy cut the bloom clusters from the layout design paper, also ink the edges and shape them with the balling Paper Blossoms Tool Kit and Paper Blossoms Molding Mat .
 

Cut a 9cm strip from the green cardstock. Place and glue it in the center of your background. Adhere the fussy cut leaf boarders on either side of the green cardstock. Ink all around the edges of the layout background with Old Road.

To make the paper lace: Using the cut offs from the leaf boarder papers and HCD Decorative Lace Border die, die cut four borders and from the green cardstock die cut 8. Cut away the excess lace pattern in the lengths of all the 12 die cuts, so you will have at least a 5cm wide lace remaining. Keep the cut offs for another project. Wet glue the green lace die cuts together, matching and trimming so you don't see the joins. With the water mister, lightly mist the green paper lace to soften the structure. Mist again if needed. When pliable, pleat and scrunch to get it to look like gathered lace. Put aside to air dry. When air-dried this will be hard and will keep its shape.


Adhere double sided tape to both sides of the "straighter" edge of the lace. Place the ruler on the taped edge, leaving the frilled part free, roll along the top of the ruler with the Speedball Brayer to really flatten and make sure the tape is truly glued in to all the creases. You can roll with out the ruler, but be careful you don't slip and flatten the frill. If so, you get to start all over again. Trim away any excess paper and get it as straight as you can using Tim's scissors to do this, they are strong enough to cope with the thickness of the layers. Put the lace a side to prepare the photo.


You get to do a bit of puzzle work now. Cut cardboard 8.5cm x 14.3 (x1), 6cm x 12cm (x1), 5cm x 12cm (x2) Wet glue these cardboards to the back of the photo. Centering the boards as you go along. With the pencil and ruler, rule a line in the length, 2 cm from the edge. This will be your guideline for placement of glue and paper lace.

Apply wet glue to the leaf side of the pencil lines. Place the design paper lace die cuts on top of the glue, sliding the lace so it is aligned and straight to the pencil line. Halve the green paper lace, making sure you have enough on all ends to fold under to neaten. Remove from one side the protective layer of the double sided tape on the lace and place it on top of the already adhered lace layer. Remove the remaining protection layer for the tape. Cut 33 cm of pale green lace for both sides of the sides of the boarder place the lace on top of the green paper lace covering any nasties.


Adhere a 9cm length of pale green lace to the top right and lower left of the already attached lace. Adhere the green ribbon to the lace to cover the join.


Place and adhere the photo in the center of the boarder. Arrange and cut the fussy cut bloom clusters so when placed and adhered they will fall in the length. The lower right cluster has two layers. Adhere the pearls in a row on the ribbon and in the center of the flowers.

Till next time! Have a scrappy week!
inky hugs, sussypoppins

Wednesday, January 21, 2015

Missing You card

Heartfelt Creations' Wednesday! 

Hi, it's that time of week again... and I just love working with Heartfelt Creations' newest release! 


Heartfelt Creations Products and Products Sold On Our Website:
HCDP1 250 Birds & Blooms Collection Paper Pad
HCD1 556 Birds and Blooms Die
 HCD1 557 Leafy Branch Die
 HCPC 3644 Birds And Blooms Cling Stamp Set
HCPC 3647 Hydrangea Bird Bath Cling Stamp Set
HCPS 3645 Leafy Branch Cling Stamp Set
HCPS 3354 Classic Message Cling Stamp Set
Double Dots 100 pc.
Paper Blossoms Tool Kit
 Paper Blossoms Molding Mat
Art Insitute Glue - dries clear

Other Products: Paper: Green Card Stock, Water color paper, Derwent Intense Water Color Pencils: Iris blue 0900, Willow 1900, Chilli red 0500, Sea blue 1200, Leaf green 1600; Archival Ink: Jet Black; Versafine Deep Lagoon Ink, Color Box Cats Eye black ink; Stickles Diamond; organza ribbon Blue; glue Dots; watercoloring pen; distressing Tool; double sided tape; fussy cut paper scissors. 


Instructions: This card size is 19.3cm x 15.2cm. Cut the card base with the green card stock 19.3cm x 30.4cm. Make a fold at 15.2cm. Find in the Birds & Blooms Collection Paper Pad the layout print with the frames. Cut away the outer blue print edge leaving the corners intact, put aside. Cut out the large pink frame and one of the pink small frames. With the distressing tool, distress all the edges of the frames.


Cut the lace print from the same design paper. This is inked on the edges with the black Cats Eye ink and later attached with double sided tape or clear drying glue to the base card.

Back to the blue printed strips, cut, tear to fit as a background patchwork frame for the pink printed frames. When happy with the lengths and patching of the strips, distress with the distressing tool and ink the edges with the black cats eye ink. Arrange, stack and glue down all papers using Double Dots. Attach a length of blue organza ribbon to the card, on and to the left of the pink frame. Make a separate triple bow from ribbon. Using a glue dot, attach the triple bow on top of the already placed ribbon at the left top corner of the pink frame.


With black Archival permanent ink and watercolor paper, stamp the images from HCPC 3644HCPC 3647 and HCPS 3645 Cling stamp sets  (hydrangeas border and single image Stamp x 2 each). Color these images with the Derwent water color pencils then, use the matching Birds and Blooms Die and
 Leafy Branch Die to die cut. Sorry you will have to fussy cut the Hydrangea stamp images by hand. Ball and shape all finished images with the Paper Blossoms Tool Kit and
 Paper Blossoms Molding Mat. Place and attach both boarders of hydrangeas and birds with Double Dots.


Using the Art Insitute Glue - dries clear, tuck the single hydrangeas and a few leaf images under the right side of the small pink frame. Look to the photo if you need help for the placement. Do the same for the leaves on the left side of the frame.


For the sentiment select the "Missing You" stamp from the HCPS 3354 Set. Stamp the image with black Archival ink on the right side, under the hydrangea boarder.


To finish the card, add Stickles Glitter Glue to the hydrangeas.

Until next time! Have an inky scrappy day! 

hugs, sussipoppins

Wednesday, January 14, 2015

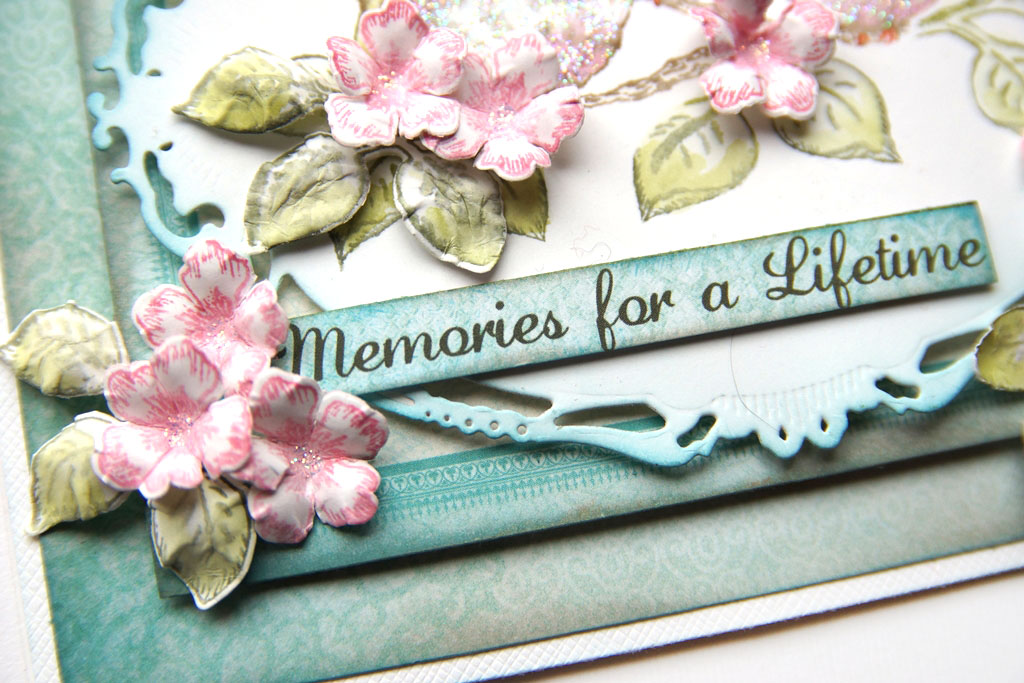
"Hanging Around" and "Memories for a Life Time'

Hi! It's Wednesday again..

It is also the second Wednesday of the month....that means Heartfelt Creations monthly release!
Will we ever have enough?
NO, not when you see this one! It certainly is a must have. May be you might want to think about investing in the total collection...
"I want it ALL"
Paper, birds, bird houses, flowers, leaves and branches. To top it off....new, fantastic packaging!
The flowers are small and sweet, these complement the stamps and dies you all ready have. The birds are plump and very cute. Color them to your needs, use them for LO's, cards, tags even mixed media......the sky is the limit!
You even get two sets of leaf types with dies to match....go and take a look for yourself.
This collection will be such fun, it can assist you to come even more out of the box and create....as die hard scrappers, we are into that!

I call this "Hanging Around"....because it's a door hanger. Have fun....

Heartfelt Creations Products and Products Sold On Our Website: 
HCPP1 250 Birds and Blooms Collection Paper Pad 
HCPC 3648 Home Sweet Home Cling Stamp Set 
HCPC 3645 Leafy Branch Cling Stamp Set 
HCPC 3644 Birds and Blooms Cling Stamp Set 
HCD1 757 Leafy Branch die 
HCD1 756 Birds and Blooms die 
Crystal Lacquer
Paper Blossoms Tool Kit 
Paper Blossoms Molding Mat
Stamp Mat Pad 
Speed Ball Brayer 
Zip Dry Glue 
Double Dots
Hydra sponges 

Other Products Used: Inks: Tim Holtz Distress Inks: Worn Lipstick, Peeled Paint, Walnut Stain, Peacock Feathers. Archival: Jet Black. Ranger: Water spritzer, Ink applicator. Other: Water color brush, card board box, gesso, white acrylic paint, paper to make a template. 

The size of this project is 25 cm x 10.2 cm. For the preparation work: To make the door hanger template shape, starting from the bottom, measure 17.5 cm, 4.6 cm for the circle hole, 2.9 cm for the hanger hook. This will give you a length of 25 cm. Cut it two times from cardboard. Chose papers from the paper pad. Cut two shapes from the paper with a soft blue/green color, one for each side of the hanger. From the same paper, cut a piece 14.7 cm x 5 cm. Using the template cut the same shape, but 3mm smaller and just above the circle line from the pink colored paper with the green swirl on it. 


Choose an oval with a boarder from the paper pad, fussy cut this out. Cut also a cardboard to fit the oval. Adhere them together. Using the HCPC 3648 cling stamp set, stamp the birdhouse image with Jet Black ink on the oval. Stamp the flower part of the image another three times on the off cuts from the pattern paper. 


To make the buds and blooms use the HCDC 3644 cling stamp set and the matching HCD1 757 die. For the 6 smaller rose buds you will need 1 bloom each, for the 12 blooms you will need 2 blooms each. 


To make the leaves use HCPC 3645 cling stamp set (the image with the four leaves) and the HCD1 754 die. Stamp and die cut it 8 times. 


 To create the twig, I choose the short fuller one. (Note: I first stamp all the images, color them with distress inks and then die cut or fussy cut them.) 


Apply the crystal lacquer to the green swirl on the paper already attached to the hanger, also to all the stamped blooms. Put aside to air dry. 


To make the blooms: you will need a water spritzer, Paper Blossoms Tool Kit and Paper Blossoms Molding Mat. First, turn the flowers with the not stamped side up and lightly mist all the die cut blooms. When almost dry, shape the blooms with the balling tool and mat. Flip over 12 of the blooms, stamped side up, press into their center with the balling tool. This will raise the petals. Put aside till all are air-dried. These blooms will stay hard when dry. 


 Now take the remaining 12 blooms, Paper Blossoms Tool Kit and Paper Blossoms Molding Mat. Ball in the center so the bloom petals curl into a ball. Apply glue to the inside petals and hold till the glue dries, thus keeping its shape. Apply the same balling method for the rose buds. 


 Putting it all together: Glue both cardboard door hanger shapes together. Using a sponge, apply gesso to both sides and when it has dried another layer of white paint. Ink all paper edges with Walnut Stain distress ink. Attach to the hanger shape: 1st the blue/green paper layer, 2nd - the pink paper layer, 3rd - the rectangle blue/green paper layer. Curl the edges up a little then glue these papers down. The 4th layer is the oval paper glued to the cardboard. The 5th layer is the stamped and colored image of the birdhouse and blooms. This is raised by cutting 2 pieces of cardboard, stack and wet glue to the back. Slide a little so you will not see it from the front of your work. 


Once the glue is dry, you can start placing the embellishments you have already made. Tucking the blooms, twigs and leaves in and under the layers. Add the balled blooms. Wait till the glue is dry, then, add the crystal lacquer to the blooms. To finish, add a touch here and there of gesso on the blooms and the edges of the curled paper.
(A good tip: I dab my finger in a blob of gesso to do this. This lets me have more control of how much or little I use on the project.)

********

Heartfelt Creations Products and Products Sold On Our Website: 
HCDP1 250 Birds and Blooms Collection Paper Pad 
HCD1 757 Leafy Branch Die 
HCD1 756 Birds and Blooms Die 
HCPC 3649 Birds and Blooms Collage Cling Stamp Set 
HCPC 3646 Fluffy Birds Cling Stamp Set 

Other Products Used: Paper: SUP Whisper white card, White card stock. Inks: Ranger Tim Holtz: Broken China, Pumice Stone. SUP Marker Pens: Regal Rose, Soft Suede, Tempting Turquoise, Always Artichoke, Tangerine Tango, Basic Black. Spellbinder Die: Majestic Elements S5-160. Other: Diamond Dust Stickles, Water pen paintbrush, Heat gun, Wet Glue or Double Sided Tape. 

This card size is 15.7cm x 12.5cm. Cut the card base with the white cardstock 15.7cm x 25cm. Make a fold at 12.5cm. Using the pale teal blue design paper from the paper pad, cut 12cm x 15.2cm. Chose a matching frame from the paper pad. Cut this to 13cm x 9.7cm. Die cut the SUP Winter White card with the largest size die from the Majestic Elements die set.


Find the design paper with the sentiment "Memories for a Lifetime", cut this out. Ink all the edges of the cut design papers and Whisper White card, first with Pumice Stone then Broken China inks.


To bring the image of the birds and branch on to the Whisper White Majestic Elements die cut, using the SUP markers draw on the image lines on the stamp being careful not to add any extra lines. Just before using the Stamp Positioner Kit to stamp the image in the correct position, breath on the inked image to make sure the ink is still moist. On a separate Whisper White card, do the same with the image of the bird on a twig from the Birds and Blooms Collage stamp, the leaves HCPC 3646 and flowers from the HCPC 3644 stamp sets. With the water brush and water, drag the color from the ink outlines into the image. Use the heat gun to dry and seal the ink. SUP inks are not permanent. When this is done you can die cut the stamped images with the matching dies, HCD1 756 and HCD1 757. Sorry, you will have to cut the bird on the twig by hand. You can now ball and shape the leaves and flowers using the Paper Blossoms Tool Kit and Mat.


 The order of placement and gluing onto the White card stock base is as follows. Glue down with wet glue or double sided tape, the largest prepared design paper. Attach Double Dots to the back of the prepared design paper frame and stamped Whisper White Majestic Elements frame die cut. When placing the layers, make sure you have them aligned and centered. Attach the sentiment with Double Dots. Glue the flowers down with wet glue. Add the leaves by tucking them under the flowers. Add three flowers and leaves to the left of the sentiment. Place the hand cut bird on a branch with Double Dots on the right of the card. Place a single flower to the bottom left of the bird. Apply stickles to all the bird bodies and flower centers. When dry, use the Black marker pen to dot the eyes, the Tangerine Tango marker pen to high light the beaks and claws on the birds.


I hope you had fun taking a look at one of many examples from this collection you will find over at Heartfelt Creations this month. 
Don't wait to order your sets on time as this will be a quick and best seller in my opinion.

I am leaving tomorrow to fly yonder.....30 glorious days...no cooking....cleaning.....
Being waited upon! Have to deal with that one!
Down side is no room for any craft gear in the baggage.....not if I want to bring some new toys back with me...seam binding ribbon on the top of the list. Got to wait for all the CHA goodies till I get back home......I am sure I will find something to bring home with me! LOL

You all have a great time crafting in the next month. I will be posting but it will be fitted in so it will be basic posts.
Inky hugs sussipoppins oxo