Wednesday, May 4, 2022

Inspiration Wednesday is here again!

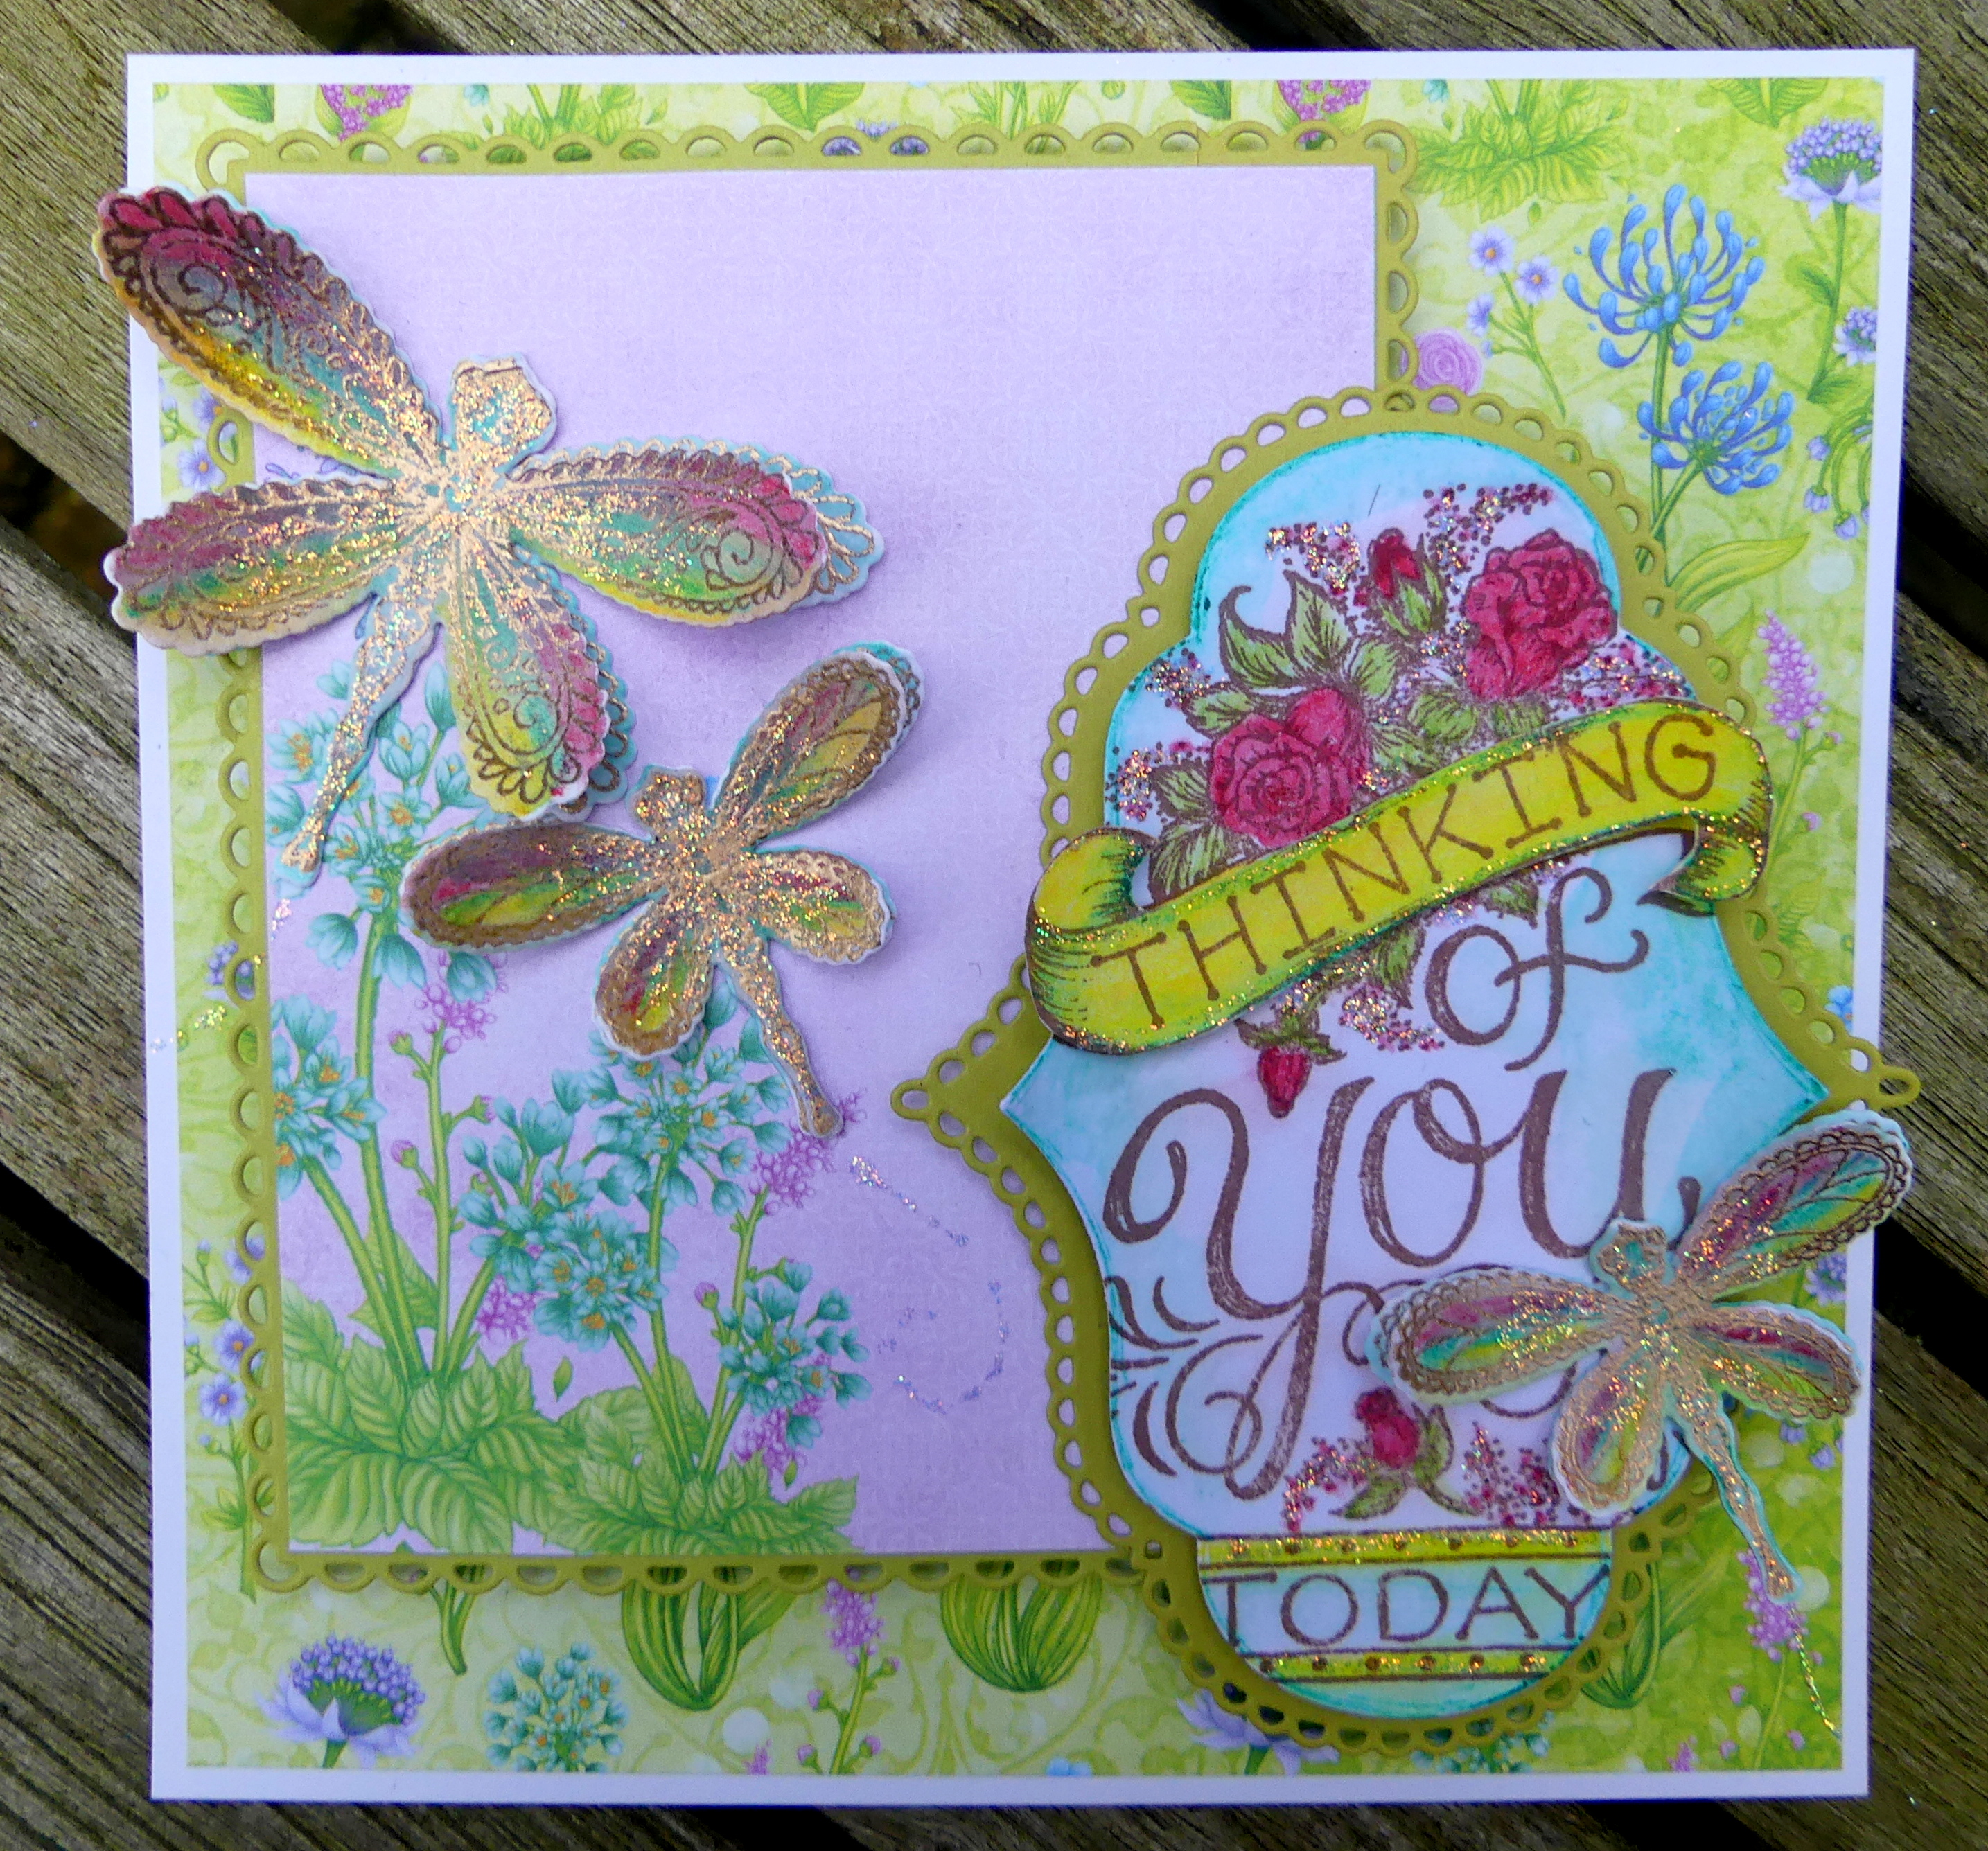
 Today is about dragonflies and amazing friends...

The beauty of a dragonfly is compared to the beauty of a amazing friend...


If you would like a print out all ready set up, go to:- https://www.heartfeltcreations.us/blog/elegant-inspiration-a-wild-poppy-sneak-peek

For a lot more eye candy go to the Heartfelt Creations blog:- https://www.heartfeltcreations.us/blog/elegant-inspiration-a-wild-poppy-sneak-peek

You will also find the sneak peeks for the next collection release, an old fav. that is returning back into the fold.

Heartfelt Creations products and product sold on their web store:

HCFB1-486 Small 3D Wild Rose Shaping Mold

HCPC-3906 Small Wild Rose cling

HCD1-7289 Small Wild Rose cling

HCFB1- 5005 3D Magnolia Shaping Mold

HCPC-3948 Sweet Magnolia Blooms cling

HCD1-7346 Sweet Magnolia Blooms die

HCDP1-2138 Decorative Dragonfly paper pad

HCPC-3983 Decorative Dragonfly cling

HCD1-7395 Decorative Dragonfly die

HCPC-3985 Dragonfly Florals cling

HCD1-7397 Dragonfly Florals die

HCD1-7398 French Courtyard die

HCD1-7306 Decorative Circle Frames die

HCD1-7203 Ornamental Tags die

HCPC-3930  Elegant Gateway Sentiments cling

 Deluxe Flower Shaping Tool Kit,  Deluxe Flower Shaping White Card Stock, Daubers, Silver Card Stock, Ranger Archival ink- Library GreenFern Green, Cactus Flowe, Forget-Me-Not, Clear Drying Adhesive, Score Pal

OTHER PRODUCTS USED: Ranger Archival ink-Venetian Orange, Diamond stickles,  Ruler, Fussy cutting scissors, 3D Foam card stock-white, Hot glue gun, Misti stamping tool, Organza Ribbon, Double sided tape, Doubles sided 3D foam tape.
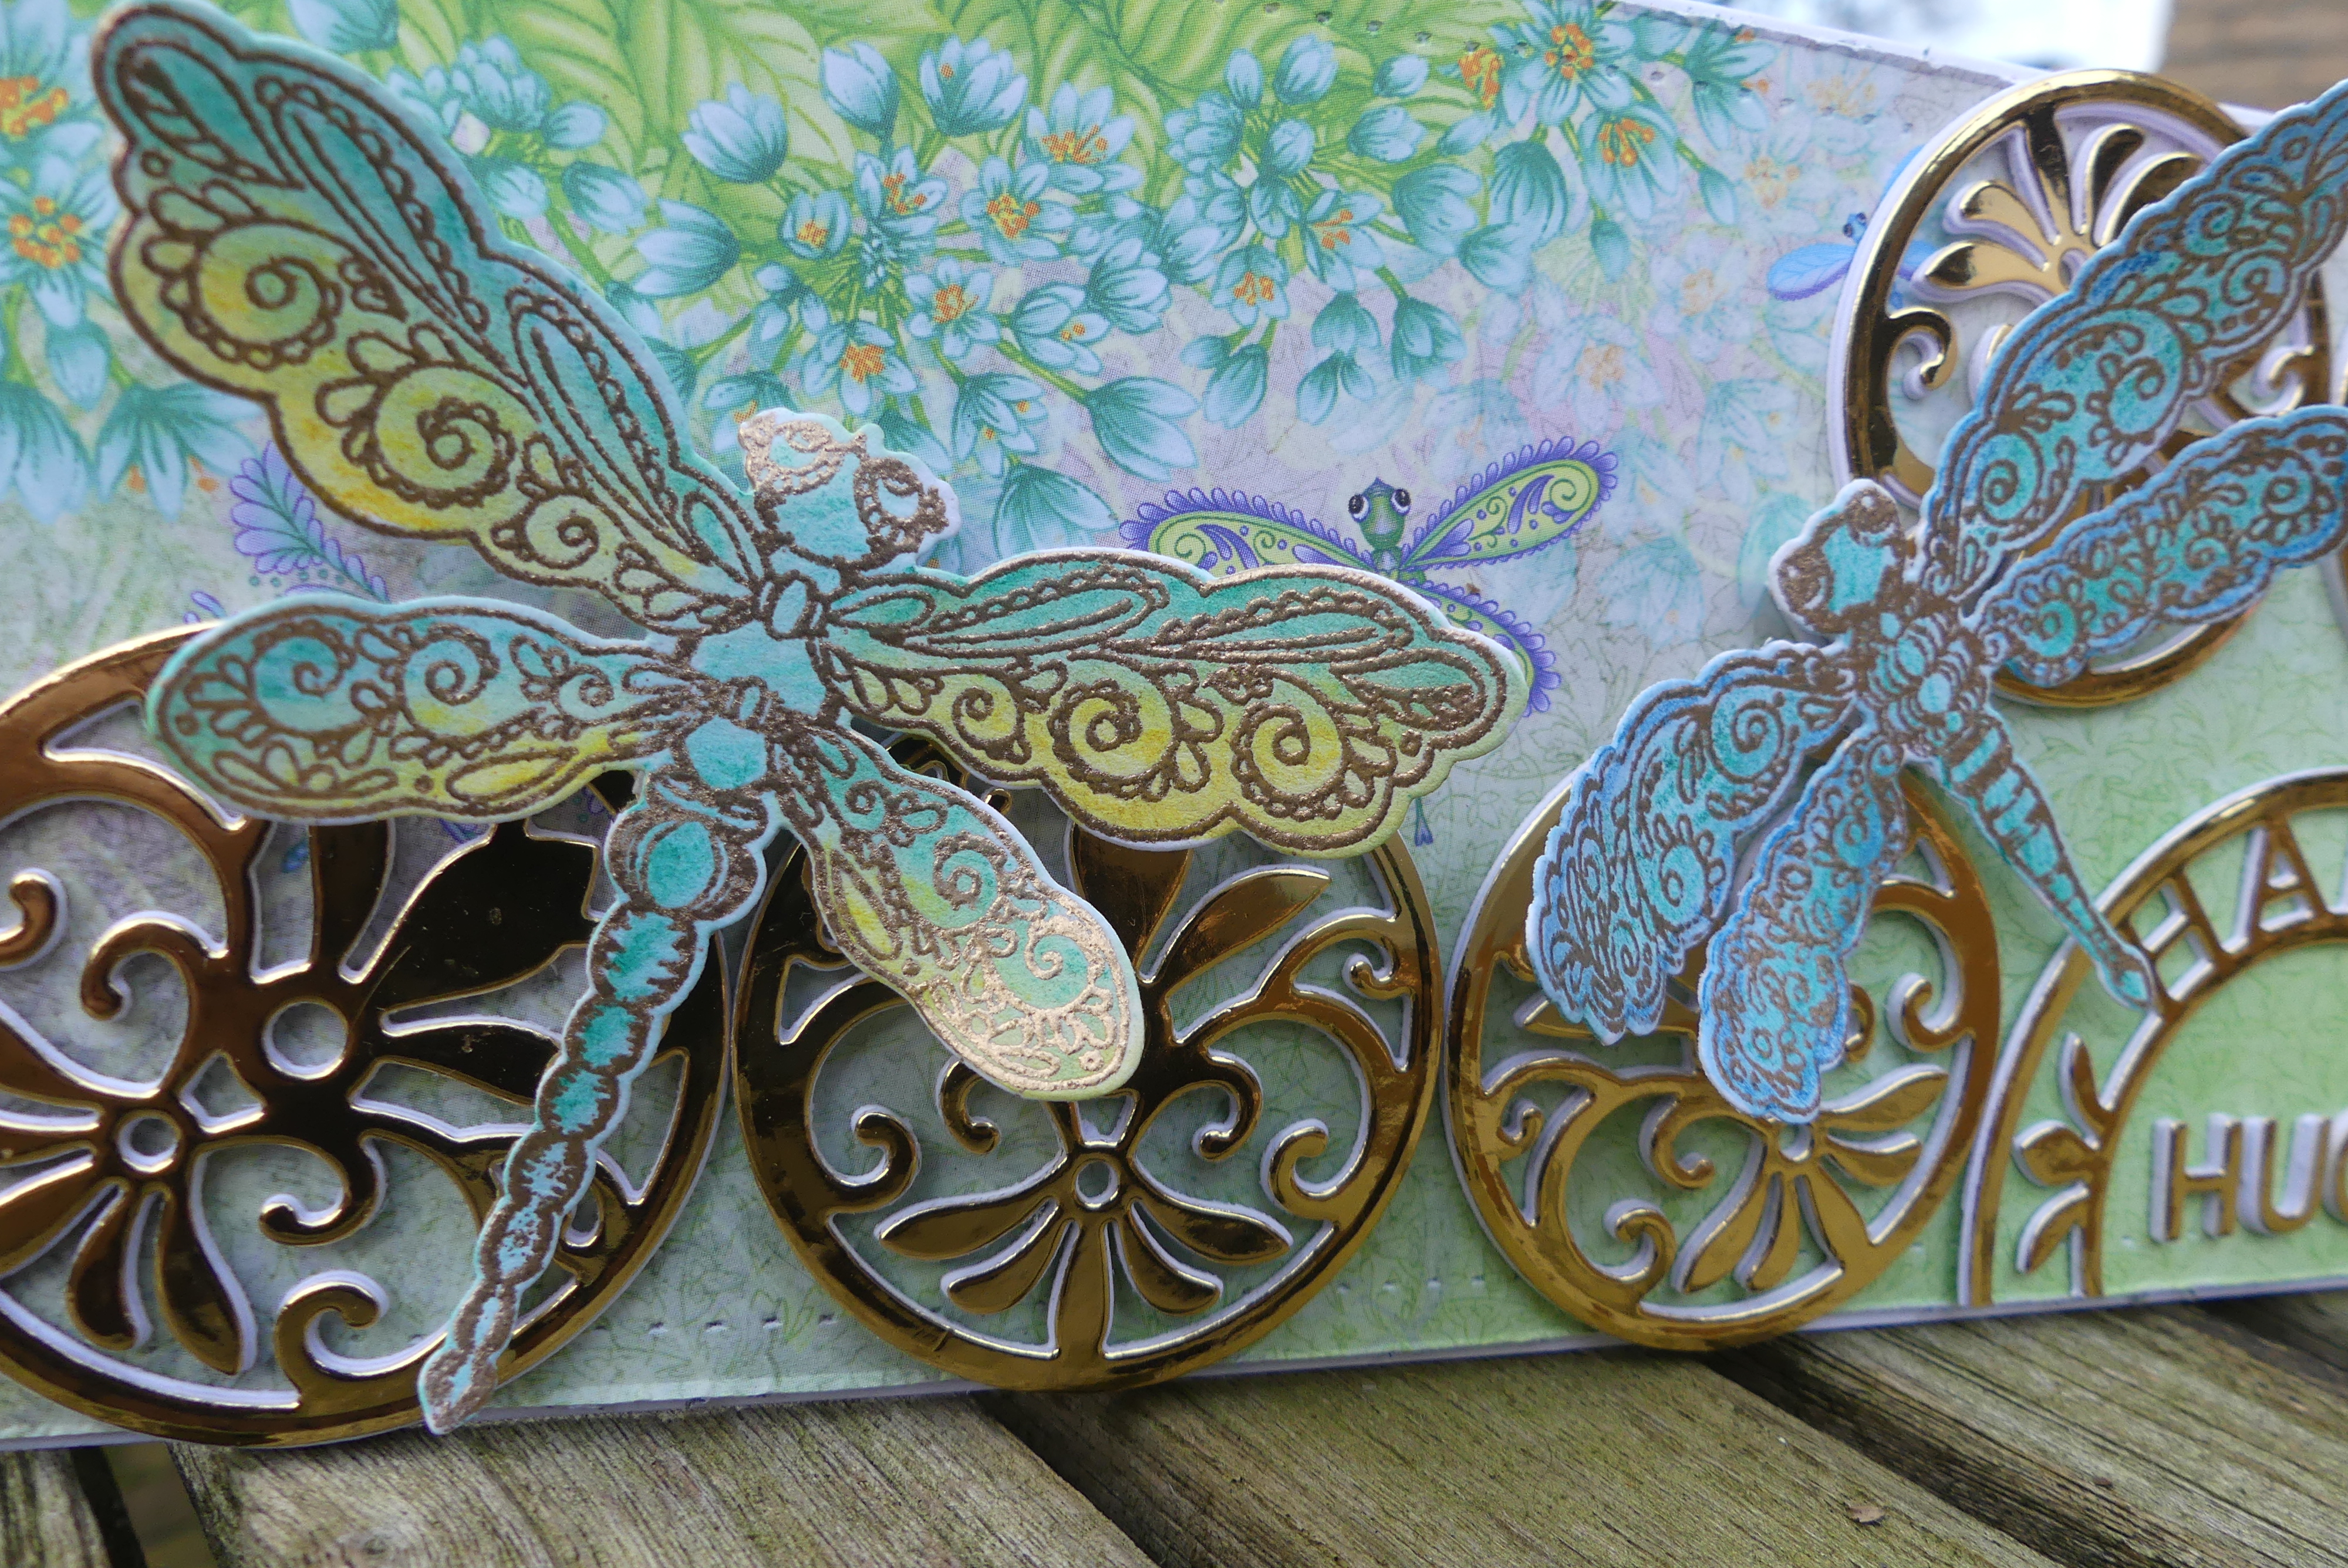
INSTRUCTIONS: This tent fold card measures  6 “ X 6 “ when completed. Taking the white card stock make a card base 6 “ X 6 “. Find the sheet 1b in the collection paper pad and cut this a little smaller than the card front. Adhere in place.

Taking the silver card stock, the 3 d foam card stock and the French Courtyard die, cut using the frame as seen excluding the circles in the center of the die set. Adhere together then adhere to the card front. Taking the Decorative Circle Frames die set, chose the eyelet circle that fits in the circle of the silver frame. Adhere this in place using the 3 d double sided foam tape or dots.

To make the flowers:  Stamp using the library green ink onto white card stock three flower image from the Dragonfly Florals set,  enough to make three wild roses from the Small Wild Rose set, four leaves from the Sweet Magnolia Blooms set. Stamp also a dragonfly from the Decorative Dragonfly set.

The colors used  for the dragonfly are Fern Green, Forget-Me-Not ,Cactus Flower. For the leaves use the Fern Green. For the wild roses and the three flowers from the Dragonfly Florals set, use the Cactus Flower and the Venetian Orange inks. Use the daubers to bring the color onto the elements. Use the matching molds to bring shape to the flowers and the leaves. Use also the shaping tools for extra help. Adhere the flowers together using the hot glue gun. Adhere the flowers, leaves and dragonfly in place.

Make the sentiment by stamping it with the Library Green ink onto white card stock banner. Fussy cut the points at one end, ink the edges with the inks then adhere in place with the hot glue gun. Adhere also the triple pre-made organza ribbon bow to under the flowers. To finish the card apply diamond stickles to the flower centers and the dragonfly.


 I hope you have enjoyed this post.

This will be my last posting as a design team member for Heartfelt Creations. Due to the health of my husband Frans I have opted to step down. For those that will still be following me, I will still be keeping my finger in the pie as I will still be posting.

So till next time...you know it....scrappy inky hugs


Wednesday, April 27, 2022

Sending happy hugs today....


Heartfelt Creations product and product sold on their web store: https://www.heartfeltcreations.us/shop/

 HCDP1-2138 Decorative Dragonfly paper pad, HCPC-3983 Decorative Dragonfly cling, HCD1-7395 Decorative Dragonfly die, HCPC-3985 Dragonfly Florals cling, HCD1-7397 Dragonfly Florals die, HCD1-7398 French Courtyard die, HCD2-7371 Letters & Numbers die, Deluxe Flower Shaping Tool Kit, Deluxe Flower Shaping White Card Stock, Gold Card Stock, Clear Drying Adhesive, Score Pal, Gold Embossing Powder, Heat It Tool

 OTHER PRODUCTS USED: INKS: Derwent Aqua Pencils: Dark Aquamarine 1210, Teal Green 1300, Cadmium Yellow 0210. Other: Versa-Mark, Pattern tracing tool, Ruler, Fussy cutting scissors, Misti stamping tool, Double sided tape, Doubles sided 3D foam tape.

 INSTRUCTIONS: This is a slimline card that measures 4 “ X 9 “ when completed.

Taking the white card stock measuring 8 “ X 9 “ and fold in half so it measures 4 “ X 9 “ for the card base. Taking the sheet 4a and cut a matting so it is a little smaller than the card front. Taking the pattern making tool and ruler make hole lines along the edge.  Adhere this to the card front with the 3 d foam tape or foam dots.

To make the embellishments: make the dragon flies by stamping with versa-mark and gold embossing powder both large dragonflies from the sets Decorative Dragonfly and Dragonfly Florals.  Die cut with the matching dies then bring color to them using the aqua pencils Dark Aquamarine 1210, Teal Green 1300, Cadmium Yellow 0210 and the water pen brush.

To make the five gold medallions: Use the medallion circle in the centre of the die set French Courtyard. Die cut this five times from the gold card stock and twenty times thus four layers for each medallion. Adhere all together then add the gold for the top layer. To make the sentiment: Taking the happy birthday circle and die cut once from the gold card stock and four times from the white card stock. Trim each layer at just under the leaf so you get the HAPPY left in the 1 / 2 circle. Adhere all together. To make the word HUGS: using the smaller sized letters from the Letters & Numbers die set, the white card stock and gold card stock. Die cut four times white and once gold. Adhere together.

Arrange all the elements as seen in the project photo. Adhere with the clear drying adhesive. The dragonflies are adhered by using the clear drying adhesive and the 3 d foam tape. 


Adorable and such fun to make....

See you next week for more happy inky fun

Hugs

This post is all about the dragonflies and beautiful die cut back ground

Over at Heartfelt Creations, there is a whole pile of eye candy...and ...it's all about dragonflies and these fantastic back grounds.
So after you are done here go over and check it out!
https://www.heartfeltcreations.us/blog/debuting-the-french-gate-and-courtyard-dies


Heartfelt Creations product and product sold on their web store:

HCDP1-2138 Decorative Dragonfly paper pad, HCPC-3984 Day Dream Florals cling, HCD1-7396 Day Dream Florals die, HCPC-3985 Dragonfly Florals cling, HCD1-7397 Dragonfly Florals die, HCD1-7397 French Gate die, HCPC- 39 ..  Elegant Especially For You cling, HCD1-7319 Elegant Especially For You die, Deluxe Flower Shaping Tool Kit,  Deluxe Flower Shaping White Card Stock, Daubers, Ranger Archival ink- Vivid Chartreus. Clear Drying Adhesive, Score Pal, Hydra Sponge, Ultra-Fine Glitter

OTHER PRODUCTS USED:

INKS: Ranger Archival Versa-fine Ink-Smoky Gray. Distress Oxide Inks: Salty Ocean, Twisted Citron, Peeled Paint, Wilted Violet, Worn Lipstick. Other: Diamond stickles, Ruler, Hot glue gun, Misti stamping tool, Double sided tape, Doubles sided 3D foam tape.

INSTRUCTIONS:

This tent fold, gate fold front and belly band card measures 6 “ X 6 “ when completed.Taking the white card stock make a 6 “ X 6 “ tent fold card base. Cut also two gate folds for the card front 6 “ X 3  1 / 2 “. Make a 1 / 2 “ fold so each gate measures 6 “ X 3 “.Using the Vivid Chartreuse ink and a dauber ink the edges of the gates. Adhere these gates to the card front.

Taking the white card stock and the French Gate die, using both the two inner dies for the gates, die cut three. Use the Vivid Chartreuse ink and a dauber to bring color to the inner gates. Apply clear drying adhesive with a hydra sponge to this then sprinkle glitter over them. Put aside to dry.

To prepare all the matting for the card: Using the outer die from the French Gate die set and the paper sheet 4a, die cut also three backgrounds. Two for the gates and one for the belly band. For the inside of the card, make a matting for the inside gates and card inside base. Adhere all in place with double sided tape or clear drying adhesive. Adhere the matting papers for the front gates in place. Adhere the glittered inner gates also in place using the clear drying adhesive.

Make the belly band by cutting white card stock 8  1 / 2 “ X 3  1 / 4 “ and 6  1 / 2 “ X 3  1 / 4 “ Make a fold at the 8  1 / 2 “ length at 1  3 / 4 “ wrap around the card front then make a fold so the belly band will fit with a little room so you will be able to slide on and off with ease. The 6  1 / 2 “ X 3  1 / 4 “ card can be adhered so it will make a band. Trim shorter if needed before adhering together. Ink the front of the belly band edges with the Vivid Chartreuse ink. Adhere the matting paper in place then the glittered inner gate.

Make all the embellishments for the card starting with the inside sentiment. Taking the Vivid Chartreuse ink and the Elegant Especially For You stamp and matching die. Stamp and die cut. Die cut also three extra white card stock shapes and adhere together. Adhere to the card inside base to the left. Stamp the dragonflies and flowers onto the white card stock using the  Smoky Gray ink. Color the elements by using the Distress Oxide inks: Salty Ocean, Twisted Citron, Peeled Paint, Wilted Violet, Worn Lipstick. Use the flower shaping tool to bring shape to the elements. Adhere to the belly band front and a dragon fly to the card inside under the sentiment.

Apply the diamond stickles to the dragonfly on the belly band front.


 Have a fun time inking and coloring.

Inky hugs

Wednesday, April 20, 2022

With bright sunny weather, it invites beautiful dragonflies....

 ...today is a card reminding us of this all year round....


HCDP1-2138 Decorative Dragonfly paper pad

HCPC-3983 Decorative Dragonfly cling

HCD1-7395 Decorative Dragonfly die

HCPC-3930 Elegant Gateway Sentiments cling

HCD1-7281 Stairway Gardens die

HCD1-7202 Album Tags & Accents die

Deluxe Flower Shaping Toll Kit,  Deluxe Flower Shaping White Card Stock, Ranger Archival ink- Sepia, DDOTS- 3D double sided foam dots, Clear Drying Adhesive, Score Pal, Gold Embossing Powder, Heat It Tool.

 OTHER PRODUCTS USED: INKS: Derwent Aqua Pencils: Sherbet Lemon 0100, Hot Red 0410, Field Green 1500, Teal Green 1300. Other: Diamond stickles, Versa-Mark, Fussy cutting scissors, Hot glue gun, Misti stamping tool, Double sided tape, Double sided 3D foam tape, Green card stock, Ruler.

INSTRUCTIONS: This card when completed measures 6 “ X 6 “. Taking the white card stock make a tent fold card to the above measurements. Using the sheet number 2 b from the paper pad, cut a matting that is a little smaller than the card front for a matting. Adhere this to the card front. Flip the sheet over to the 2 a then cut out the pink print for the card front. Taking the green card stock and the outer die from the Stairway Gardens die, die cut a frame to fit the pink paper. You do this by letting the die you don’t want to cut hang over or out from the cutting plates so the die cutting  machine does not cut the full die frame. Look to the video. Adhere this all to the left of the card front by using the 3 D tape or 3 D foam dots / tape.

Taking the green card stock and the Album Tags & Accents die set die cut the outer frame as seen in the project photo. Using white card stock, the sepia ink and the Elegant Gateway Sentiments stamp used, stamp the image twice. Die cut one of the sentiments with the inner frame die, the remaining sentiment, fussy cut he banner. Use the aqua pencils and the water pen brush to bring color to the sentiment elements. The colors used are: Sherbet Lemon 0100, Hot Red 0410, Field Green 1500, Teal Green 1300. Adhere the banner in place then the sentiment frame to the outer frame. Adhere all to the card front to the right.

To make the dragonflies, take the Decorative Dragonfly stamp and matching dies, the versa-mark and gold embossing powder. Make  two layers for each dragonfly. Make three sets. Bring color to the dragonflies by using the aqua pencils, Hot Red 0410, Field Green 1500 and Teal Green 1300. Use the shaping tools to bring shape to the wings. Adhere in place. Apply the stickles to the wings and make a glitter trail for each dragonfly. Last apply the stickles to the sentiment.

These dragonflies and all that goes with the collection, is sure keepers....you will use over and over again. As I always say an investment in happiness for a cold winters day later on....lol.

Have a happy scrappy inky day...till next time.....see the end of this post for a teaser. Hugs


Here are 3 teasers...next week we have a, what we call a side release....heart be still...stay calm....because it is a 
wowzer!


Wednesday, April 13, 2022

An adorable new release from Heartfelt Creations!!!! Adorable Dragonfly's

A card made with this beautiful collection.
"For My Friend"


Heartfelt Creations product and product sold on their web store:

HCDP1-2138 Decorative Dragonfly paper pad, HCPC-3983 Decorative Dragonfly cling, HCD1-7395 Decorative Dragonfly die, HCPC-3984 Day Dream Florals cling, HCD1-7396 Day Dream Florals die, HCD1-7367 Simple Centrepiece die, HCD1-7370 Simply Elegant Centrepiece die, HCD1-7154 Small Circle die, HCD1-7155 Large Circle die, HCD1-7203 Ornamentaal Tags die, HCPC-3845 Just For You Sentiments, HC Deluxe Flower Shaping Tool Kit, Deluxe Flower Shaping White Card Stock, Heat It Tool, Gold Embossing Powder, Clear Drying Adhesive, Score Pal, DDOTS- Double Sided Foam Dots

OTHER PRODUCTS USED: INKS: Ranger Archival Versa-fine Ink-Smoky Gray. Distress Oxide Inks: Salty Ocean, Twisted Citron, Peeled Paint. Other: Diamond stickles, Versa-Mark, Fussy cutting scissors, Diamond Stickles, Hot glue gun, Misti stamping tool, Double sided tape, Doubles sided 3D foam tape, Water.

INSTRUCTIONS:

This ezel fold card is 6 “ X 6 “ when completed. Make the card base with the white card stock and using the largest die from the Simple Centrepiece die set. Die cut X 3. From one of these fold across the middle. Make a hinge for the join 1 “ x 2  1 / 2 “. Make a fold  1 / 2 “ down the 1 “ length. Adhere two of the card pieces together with the hinge, one being the folded card piece. With the remaining card piece adhere this to the folded card so it forms a card front. This is the ezel card base completed.

Taking the design paper, sheet 2a, and the die used for the card base from the Simple Centrepiece die set, die cut this two times. One is to be adhered to the card base and the second is for the card front matting, trim a little from each side before adhering in place.  From the same paper sheet 2a die cut a circle by using the Small Circle die 3 rd in from the outside size. From the white card stock die cut two circles using the Large Circle die set, 2 nd from the outside size. Die cut twice the lace doily found in the Simply Elegant Centrepiece die set. Adhere a doily and circle to the card base with clear drying adhesive and the other doily and circle to the card front. Adhere the circle from the paper pad using 3D foam tape or 3 D foam dots to the card front.

To make the card base stop, taking he patterned paper, the white card stock and the label from the Simply Elegant Centrepiece die set. Die cut this four times from the white card stock and once from the design paper. Adhere in place to the card front as stop with 3 D foam tape or the 3 D foam dots. Using the sentiment from the Just For You Sentiments and the Smokey Gray ink.

To make the dragonflies and flowers, using the white card stock, stamps and matching dies from the sets: Decorative Dragonfly and Day Dream Florals sets. The colours used are Distress Oxide inks: Salty Ocean, Peeled Paint and Twisted Citron, with a water pen brush. The flowers are stamped with the Smoky Gray ink and the dragonflies with the gold embossing powder. Prepare two layers for each dragonfly, four large flower and one small flower. Die cut two extra white card stock from the large flower and adhere together with a coloured flower. This is done so it strengthens the flower that holds the card front in place. See the project photo. This is adhered to the right of the sentiment so it can be flattened when the card is closed and lifted in place when opened.

Adhere the flowers in place. The dragonflies, shape with the shaping tools then adhere together so you have two dragonflies with four wings. Adhere these now in place. Apply the stickles to the dragonflies and flower petals.


Wednesday, April 6, 2022

Wednesdays inspiration this week is a card that sends you a hug

 Beautifully framed with a lace background.


Products used in this card are found HERE at the Heartfelt Creations web store:-

HCDP1-2137 Sweet Pea Paper Collection, HCPC-3901 Vining Sweet Pea cling, HCD1-7392 Vining Sweet Pea die, HCPC-3982 Classic Floral Vase cling, HCD1-7393 Classic Floral Vase die, HCPC-3848 Cheerful Note Sentiments, HCD2-7400 Classic Companion Boarder die, Deluxe flower shaping tools, Deluxe card stock white, Daubers, Ranger archival Inks: Sepia, Library Green, Leaf Green, Library Green., Water brush,, Scor-pal, Clear drying adhesive, DDOTS

OTHER PRODUCTS USED: Spectrum Noir Aqua Pencils: Bright Green, Verdant Green Blueberry. Other: Inking brush, 3D double sided foam tape, Double sided tape, Misti stamping tool, Diamond stickles, Scrap cardboard, Fussy cutting scissors.

 INSTRUCTIONS:- This tent fold card measures 7  3 / 4 “ X 5  1 / 4 “ when completed. Taking the white cardstock and make a tent fold card to the completed measurements. Taking the paper sheet 1 B from the paper collect pad and cut this a little smaller than the card front. Bring colour to the paper edges with the bright green ink then adhere this to the card front with the double sided tape or the clear drying adhesive.

With the insert die from the Classic Companion Boarder die set and white card stock, die cut into two panels measuring 1  3 / 4 “ X 6  3 / 4 “. Adhere this to the centre of the card front using the clear drying adhesive.

Stamp the smaller sized vase from the classic floral vase set using the library green ink onto white card stock. Bring colour to the vase by using the inking brush and the leaf green  and library green inks. Adhere to the card with 3 D foam tape or 3 D foam dots.

Make the vining sweet Peas by stamping with the sepia ink onto white card stock both sizes from the vining sweet pea stamp set. Bring colour to the images by using the bright green, verdant green and blueberry pencils and the water brush. Die cut the shape by using the dies from the matching vining sweet pea die set. Shape the images by using the deluxe flower shaping tools. Adhere the vining sweet peas to the card using the clear drying adhesive.

Make the sentiment by stamping the sentiment from the Cheerful Note Sentiments set with the sepia ink onto white cardstock. Cut this to a banner with ribbon ends. Make a curve in the banner then adhere in place over the vase.

To finish the card apply the diamond stickles to the leaves, stems, the runners in the vining sweet pea images and the vase.

 Thanks for dropping by...till next time, have a happy scrappy day.

XOX

Wednesday, March 30, 2022

Have a Sweet Day with this adorable card.

 ..this card was so simple and fun to make....enjoy. 


A few detailed photos to enjoy.


Products Used From the Heartfelt Creations Web Store:- HCDP1-2137 Sweet Pea Paper Collection, HCPC-3901 Vining Sweet Pea cling, HCD1-7392 Vining Sweet Pea die, Card stock white, Ranger archival Inks: Sepia, Red Geranium, Gold embossing powder, Water brush,, Scor-pal, Clear drying adhesive, Heat It Tool, DDOTS

Other Products Used:- Inks: Spectrum Noir Aqua Pencils:  Soft Red, Lagoon, Bright Green, Cypress. Other: Inking brush, 3D double sided foam tape, Misti stamping tool, Diamond stickles, SUP embossing folder-scripty, Tweezers, Inking brush, Versa mark ink pad, Scrap cardboard.

INSTRUCTIONS:- This is card measures 7  7 / 8 “ X 6  3 / 8 “ when completed. Taking the white card stock make a tent fold card to the completed measurements. Taking the sheet 6 A from the paper collection and cut this to 6 “ X  7  1 / 2 “. Make the script imprint in the paper by using the embossing folder. To enhance the script, lightly brush over the surface using the inking brush and red geranium ink. Adhere this to the card base by using the 3 D double sided foam tape.

Stamp the vase by using the lager vase in the classic floral vase set, white card stock, versa-mark, gold embossing powder and the heat it tool. Bring colour to the vase by using the ink brush and the red geranium ink. Use the flower shaping tools to bring a rounded shape to the vase. Apply 3 D foam dots or scrap card board to support the rounded shape when adhered to the card front. Adhere the vase to the card front, 3  1 / 2 “ from the top of the card.

Make the lace frame by using the die from the classic floral frame die set and the white card stock. Colour the lace frame with the inking brush and the red geranium ink. Adhere to the vase on the card.

Make the sentiment by stamping the sentiment from the classic floral vase stamp set with sepia ink onto white card stock. Using the circle die that the sentiment fits into from the small circle die set then die cut. Sprinkle a little gold embossing powder around the edges of the circle, secure the powder by using the heat it tool and apply the heat from under the circle so the powder will not get blowen away. Hold the circle by using the tweezers so you wont get burnt from the heat. Adhere the sentiment to the lacy frame with 3 D foam dot or scrap cardboard.

Make the sweet pea vines by stamping on white card stock with sepia ink, three large and one small sized images from the vining sweet pea stamp set. Die cut these with the matching die set after they have been coloured with the soft red, lagoon, bright green and cypress aqua pencils. Bring shape to the image by using the deluxe flower shaping tools. Sprinkle a little gold embossing powder on each flower then secure the powder as was done with the sentiment circle. Adhere the vining sweet peas in place as seen in the project photo. To finish, apply the diamond stickles to the leaves. 


Till next time....have a great day.

XOX


https://www.heartfeltcreations.us/gallery/golden-sweet-day

Share this link on your blog & social media! Link goes live on March 30th, 2022


Please do not reply to this email.