Wednesday, March 28, 2018

This 28th March brings you another Heartfelt Creations SWEET PEONY collection yum....

..."Praying For You"  Z fold card


Heartfelt Creations Products And Products Carried On Their Website:

Other Products Used:
Maroon archival Ink, Pink card stock, Hot Glue Gun, Water Mister, Bone folder, Paper distressing tool, Water coloring brush, Scissors, Rule, Fussy Cutting Scissors, Double sided Tape, Double Sided 3d Foam Tape, Pink ribbon, Misti stamping tool, Zutter bow maker, Crop-a-dial, Versa-mark, Clear embossing powder.


Click HERE to see how I make the peonies (scroll to the bottom of the posting)

Click HERE to see the video on using the Deluxe Flower Shaping Tool Kit

Click HERE to see the video on making flowers with the flower shaping moulds

Click HERE to see a video on making the Peony's


Instructions:
The finished size of this Z card is 7.28” x 17” (18.5cm x 15cm)
Taking the white cardstock and cut for the card base 5.82” x 12”(14.8 cm x 30.5cm) Make folds at one end, 2.36”x 4.72” (6cm and 12cm) this will be the card foot.
Taking the pink card stock cut a card front measuring 4.13 x 7.48” (10.5cm x 19cm). Make a fold in one end for a hinge. .o59” (1.5cm) Center this and adhere the hinge to the front top edge of the card base. Taking the pink card stock cut the matting for the card base and the foot folds of the card. Cut the matting a little smaller than the white card stock. Find from the paper collection the design with the Peonies and the flowerbed scenery.  Cut a second layer of matting for the card with this. Cutting a little smaller than the pink card stock. Adhere all layers of the matting to the card front but before adhering the inside card front pink card stock and paper print, first wrap the ribbon around both layers and adhere in place then adhere both layers to the card base. For the inside sentiment and decoration; cut from the pink cardstock for the inside card sentiment 3.74” x 5.70” (9.5cm x14.5cm) Taking a piece of white card stock cut this to 2.16” x 3.34” (5.5cm x 8.5cm) Taking the stamp with the sentiment and maroon ink, stamp the sentiment. Adhere in place with 3d foam tape. Taking the ‘Peony bud and Blossom’ 
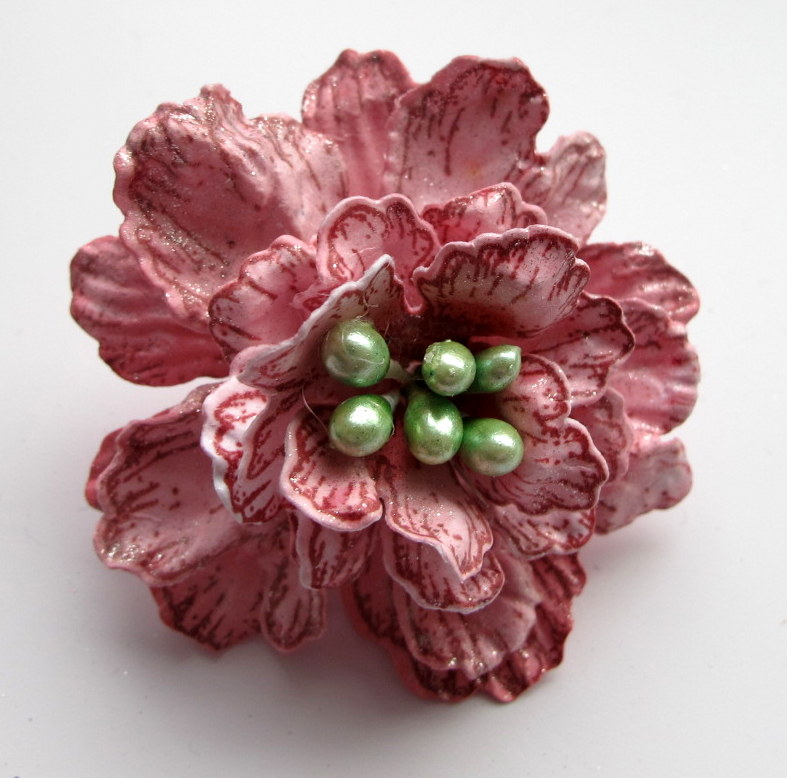
stamp and matching die sets stamp, die cut and color both sizes of the peonies. Adhere these in place with the 3d foam tape. To make the flowers use the stamps and dies for the Sweet Peony’s, stamp using the Archival inks and white card-stock. Bring color to the stamped flower petals and leaves with the 3d stamping inks. This will give a beautiful metallic sheen to your flowers. Taking the crop-a-dile, make a small hole in the center of each petal. Using the flower shaping molds bring shape to the petals. The rose flower-shaping mold was used for the peonies. The yellow stamens are used for the peony centers. Thread the stamens through the wholes as you stack the flower petal layers. See the video to see how this is done. Used the clear drying glue to apply the glitter to the flower petals and leaf veins. To decorate the card front flap, make a triple bow from the ribbon with aid of the Zutter bow maker. Adhere this to the front flap. Arrange the flowers and adhere. Arrange the flowers in a cluster tucking the peony buds and leaves under the bow and flowers. Once all the embellishments are secured to the card front flap adhere the sentiment to the top of the flowers with the hot glue gun. Using the white card stock, stamp the ‘Praying For You’ with the maroon ink, then with the clear embossing powder. Die cut the sentiment with the matching die. Color the sentiment with a green wash from the moss green stamping paint. Apply a little clear drying glue across the card front flap and card front, sprinkle the glitter and leave to dry.


 Love these peony buds, they are  great fillers.


Above are a few close ups so you can see how the embellishments are placed, below a side view of the card so you get to see how it stands.


This z card is so fun to make, it sure is a winner if you like to add a lot of embellishments.
Next week I had for you a little cute gift box...here's a few sneak peaks...
till next week, have a scrappy inky time.
Hugs


That was another project from the Sweet Peony collection....a must have collection because you will use it over and over again....a true classic....more eye candy to come next week....
....till then inky hugs and Sussipoppins love.
OXO

Wednesday, March 21, 2018

21st March brings you Heartfelt Creations with lots of inspiration...an altered Cigar Box ....


I've been saving the cigar boxes for a rainy day and that is today!


Heartfelt Creations Products And Products Carried On Their Website:

RLHS100 Hydra Sponges

Other Products Used:
Maroon archival Ink, Pink card stock, Hot Glue Gun, Water Mister, Bone folder, Water coloring brush, Hole pricking tool, Scissors, Ruler, Hot glue gun, Fussy Cutting Scissors, Double sided Tape, Double Sided Foam Tape, White organza Ribbon, Cardboard packing box, Misti stamping tool, Crop-a-dial, White Deco Art Stencil Paint,


Click HERE to see how I put the flowers together. (the photo tutorial is at the bottom of the posting)

Click HERE to see the video on using the Deluxe Flower Shaping Tool Kit

Click HERE to see the video on making flowers with the flower shaping moulds


Instructions:
The finished size of this cigar box is 8.89” x 5.51” x 2.95” (17.5cm x 14cm x 7.5cm) 
The cigar box size used 6.299” x 1.259” (16cm x 11cm x 3.2cm)
This project uses 5 peony flowers, 3 peony buds, 24 double lilacs, 5 lilac buds and 15 peony leaves.
Taking the white paint, paint the inside and out side of the box. Put aside to dry.
Taking the white card stock cut x2 3.779” x 10.629” (9.6cm x 27cm)
Make a fold at 5.70” (14.5cm) from one and 5.70” and 5.90” (14.5cm and 15cm ) on the other , adhere the two pieces together so you have a triple fold card folder with the short ends glued to make the base.
Taking the pink card stock cut the card matting a little smaller for the inside and out side of the card folder.
Taking the paper pad find the paper with the brick and window with flowers printed on it, use this for the second matting. Again cut a little smaller than the pink card stock. Adhere all the matting to the white card folder base. Cut extra matting for the card folder front. Adhere this to the card front with a layer of cardboard between the two layers to give height.
Taking the Fleur boarder die and cut a double boarder for the front. 5.118” (13cm) long. Two single boarded pockets, 1st 2.16” x 5.51” (5.5cm x 14cm) 2nd 3.34” x 2.36” (8.5cm x 6cm) Apply glitter to the edges of the lace boarders with the aid of the clear drying adhesive. When dry, trim and adhere in place as seen in the detail photos. These will form the pockets for the tags for journaling and photos. The front, trim the boarder and adhere on a angle. Make the flowers and leaves using the large and small Sweet Peony stamps and matching dies. Use also the Lush Lilac stamps and dies for the lilacs and lilac buds. Use the 3d stamping paint to bring color to the flowers and leaves. Use the flower-shaping mold to bring the shape into the flowers. Using the flower shaping tools to ball the flower centers only. Make holes in the flower centers for the stamens. Stack the petals and adhere together using the hot glue gun or the clear drying glue. Apply the glitter to the flower petal using the clear drying glue and dipping into the glitter. Put aside to dry. Do the same with the leaves.  Arrange the flowers into clusters as seen in the photo of the project. Find the printed sentiment. Trim and adhere in place on the front of the card folder. Make the tags by cutting from both pink card stock and the design paper. Place the tags into the pockets.


  Above photo showing the placement of the tags


Above photo shows the fold out card base.


Taking the pink card stock cut strips to cover the box sides, box base, box lid inside and out side. Cut a little smaller than the box so the white paint will still show. Taking the paper pad find the paper with the brick and window with flowers printed on it. Cut strips for the matting of the box sides, this is cut a little smaller than the pink card stock. Adhere to the sides. Taking the same design paper cut the paper for matting for the box lid top, again a little smaller than the pink card stock. Spritz the paper wit water, when dry adhere loosely so it will not sit flat. Taking the same paper design cut two mattings a little smaller than the other for the box lid inside. Adhere layers of cardboard between the matting layers. Adhere all layers to the inside lid. Taking the Fleur boarder die cut a double lace boarder from the design paper that measures (15cm) trim this to fit the matting of the lid inside. Apply glitter to the lace edges and when dry adhere in place.


Make a triple bow from the ribbon; adhere to the lower center of the box lid. Arrange the flower clusters as seen in the project photo. Place the card folder into the box. Because the flowers are 3d and this cigar box is to low, the box does not close. So this is a table centerpiece that stays open. To keep it open, apply glue from the hot glue gun to the out side box hinge so you will not see it.


Lots and lots of photos so you can see how this was put together.


Now this sure is a box of tricks....lol Hope you had fun...
till next week with more Heartfelt Creations yummy fun.
Sussipoppins love and inky hugs
OXO

Wednesday, March 14, 2018

Today, 14th March Heartfelt Creations introduce's a new collection!....


...."Sweet Peony"

   
Sweetly fragranced, and delicately airy, the graceful peony flower is a breathtaking and dreamy blossom that calls a quiet attention to itself! Lush foliage filled plants bursting forth with tightly wound flower buds among softly ruffled blossoms bring with them a hint of old fashioned romance and delight! Join Heartfelt Creations as we stroll through beautiful peony filled gardens in the new Sweet Peony Collection! Pause, linger and refresh your soul as you amble through a paper collection filled with delightful peony flowers in happy hues of angelic pinks and dark burgundies, set among a refreshing array of leafy greens, sky blues, and sunshine yellows! Soft swirls, gorgeous stripes, and dainty lace like accents come together to create pleasing backdrops for bold peony blossoms, chipping birds and divine window scenes! Three coordinating cling stamp set and die combinations bring the luscious peony flower to the forefront of this gorgeous collection. An assortment of varying sized peony petals and foliage die cut pieces work together to create dimensional and dynamic peony blossoms ready to captivate and take center stage on card fronts, scrapbook layouts and altered art pieces! 
So, breathe deep, drink in the sweetness of the peony blossoms, and feel free to linger awhile as we take in the gentle beauty of the Sweet Peony Collection


Heartfelt Creations Products And Products Carried On Their Website:

Other Products Used:
Maroon Archival Ink, Pink card-stock, Gold thread and darning needle, Golden Rod Stickles, Hot Glue Gun, Water Mister, Bone folder, Water coloring brush, Paper distressing tool, Hole pricking tool, Pricking mat, Scissors, Ruler, Fussy Cutting Scissors, Double sided Tape, Double Sided 3d Foam Tape, Cream color wired ribbon, Cardboard from a packing box, Misti stamping tool, 
Crop-a-dial

  
Click HERE to see the video on using the Deluxe Flower Shaping Tool Kit
Click HERE to see a video on the lush lilacs


Click HERE to see a video on making flowers with the flower shaping molds

Click HERE to view a video on the Peony’s 


 Click HERE to see how to make the pleated frill/ribbon.


Instructions:
The finished size of this Lay Out is 12” x 12” (30.5cm x 30.5cm)
The photo used for this LO is 2.36” x 3.34” (6cm x 8.5cm)
Taking the Sweet Peony paper collection and find the design paper with the birdhouse and white picket fence print. You will need both papers. Find the two papers with the printed stripes and the cardboard backing from the paper pad.
Taking the papers with the birdhouse and fence, fussy cut the birdhouse and the two birds leaving the edge of the paper intact. Taking the 2nd paper cut a circle 9.40”   (23.9cm) Cut the circle in the lower left side corner. Thus having the birdhouse and fence in the circle.
Taking the cardboard box cut enough for two layers to fit the circle. This does not have to be an exact circle; it can be patches of cardboard, as you will not see it. Adhere to the back of the circle. Adhere the circle to the LO base. At this stage you will still see the cut away from the base this will be covered later.
Taking the striped design paper, cut into strips. The wider strip with the green print will be used. Put the other strips aside for another project. You will need at least 8 strips for this LO.  Make box pleat folds in the strips joining as needed to make a long pleated paper. Distress the edges with the paper-distressing tool. Lay the pleated paper flat on a prick mat then prick the wholes to make a centerline. Taking the gold tread and darning needle and backstitch in the wholes. This will make the base for a pleated frill. Adhere to the LO base around the circle making sure the edge of the frill covers the circle edge. Now the cut away is covered.
Spritz the frill with water, when the frill almost dry, using your forefingers and thumb round the pleats so they become a rounded frill. Put aside to dry.
Taking the stamps and dies for the Sweet Peony’s, stamp using the Archival inks and white card-stock. Bring color to the stamped flower petals and leaves with the 3d stamping inks. This will give a beautiful metallic sheen to your flowers. Taking the crop-a-dile, make a small hole in the center of each petal. Using the flower shaping molds bring shape to the petals. The rose flower-shaping mold was used for the pink peonies and the basic flower-shaping mold was used for the lilac pink flowers. The yellow stamens are used for the pink and the purple rock candy is used for the lilac pink flowers. Thread the stamens through the wholes as you stack the flower petal layers. See the video to see how this is done. Use the clear drying glue to apply the glitter to the flower petals and leaf veins.
Taking the lilac stamp and matching die, make the lilac flowers. Using again the 3d stamping paint to bring color to the lilacs. Use the lilac flower-shaping mold.
Taking the wired ribbon, make a double triple bow. Adhere the bow to the lower left side on the paper frill.
Apply 3d dots or 3d foam tape to the fussy cut birds and birdhouse. Adhere in place on the same printed image.
Taking the photo, back this with cardboard from the packing box. Two layers. Once your flowers are made, arrange the photo and the flowers as seen in the photo of the LO. Adhere in place. Arrange the peony flowers around the bow and on the paper frill. Adhere the peonies in place then adhere the leaves under the peonies. Arrange and adhere the lilac flowers around the photo and frill. Add also as fillers to the flower clusters. To finish apply the golden rod stickles to the lilac enters.
*******
Is this a fantastic romantic collection or not!
You are going to have so much fun with this....I know you will be ordering 2 or 3 of the paper pads as they are to die for! Be in quick as i know this collection is going to be a sell out!
Till next week with more yum,
Inky scrappy hugs....Sussipoppins love,
OXO
Extra! Extra! Extra!
 ....step by step picture tutorial on how I made my flowers.
1. You will need 3 stamens, fold them in half as shown. Apply glue or the hot glue gun, Twist with the thumb and forefinger to have all stems glued together ready to thread into the flowers.


2. See below what you will be needing to make the flowers. Once colour is applied run them through the flower shaping moulds as seen in the video in the LO instructions. the hole is made with the smallest hole maker in the crop-a-idle. You also see how to shape the petals. The deluxe flower shaping tool is used to bring a little more shaping into the petal center.


 3. This is the follow up layers of the flower for the larger peonies. Keep on adding layers until you are happy how the flower looks. Adding clear drying glue or using the hot glue gun between each petal layer.


4. Once all the petals have been threaded with the stamens, you see below how the stamens are scared with the hot glue gun. Once I have put the hot glue onto the stamens, fold them back and place onto a silicone mat to cool. Once cooled, trim the excess with a pair of scissors. Then you are ready to go.


 5. Two flower samples with green stamens.


6. See how the flower looks different with an extra layer.


7. What ever you do....have fun. OXO

7

Wednesday, March 7, 2018

7th March brings you, a Heartfelt Creations Lush Lilac


6" x 6" mini book


Other Products Used: 
Card Stock: Bazzill: Mauve 12in x 12in (30cm x30cm) x 8. Other: Diamond Stickles, Versa-mark, Misti stamping tool, Water coloring brush, Scissors, Ruler, Black Archival Ink, Hot glue gun, Double sided tape, Cardboard, Sewing machine and thread, Repositionable tape, Round clear plastic bauble that opens. 2.75in (7cm)


Instructions:
Click HERE to see a video on how to make the the lush lilacs
The finished size of this mini book is 6in x 6in (15cm x 15cm)
Taking the 6x6 Layered circle card set, find the page with the 2.75in (7cm) pre cut circle in it, this is to be used as the front page. Or find the circle hole that fits your bauble. The remaining pages, it does not matter which order they are adhered to the spine as the circles in the pages will not bee seen when the book is finished. Begin constructing the book by adhering all the pages to the spine. Put aside and continue the preparation of the pockets; fold out pages and photo matting as follows:


For the pockets and the foldout pages, these are the same size:
From the card stock cut x 7, 5.70in x 11.41in (14.5cm x 29cm) Fold these in half so this will give you a folder measuring 5.70in x 5.70in (14.5cm x 14.5cm) 4 of these will be the pockets, the remaining will be the fold out pages.


For the pocket fold outs and single pocket insert:
Taking the cardstock sheets and cut x3, 4.92in x 11.02in (12.5cm x 28cm) Fold in half so the folded page will measure 4.92in x 4.92in (12.5cm x 14cm) cut x1 single page 4.92in x 5.51in (12.5cm x 14cm)
Front and back book covers:
From the off cuts from the pockets and fold out pages, cut 3x, 5.70in x 5.70in (14.5cm x 14.5cm) 1x 5.70in x 0.78in (14.5cm x 2cm)


For the eyelet circle around the circle inside cover:
Take the circle die that fits the circle hole, the eyelet circle die and the card-stock. Place the dies on the card-stock and use repositionable tape to secure the dies in position.


For the photo matting:
The Cut Mat Create die sets are used for this. Use the die size to fit the photos and journaling wanted for the book. Card-stock and the blue patterned design paper can be used for this as desired.


To make the pockets:
Take the boarder die, place and align to the front of the pocket so you are only cutting to the fold of the cardstock. Using the sewing machine, sew the pockets closed. Do this to all the pockets. Adhere to the book pages; this will cover any pre cut circle holes in the pages.


For the finishing of the book pages and pockets:
For the matting of the fold out pages: Taking the paper collection, find the design papers with the 6in x 6in (15cm x 15cm) mini prints and the large print design papers with the umbrella and tags. Chose the paper designs and cut to fit the foldout pages and pocket fold out pages. These are all cut a little smaller than the card-stock as matting. Adhere the matting papers in place. Larger photos and journaling can be added later to these pages. You can see the sample mini book has a few card-stock and design paper matting already adhered for photos.


For the 1st book page with the pocket and bauble: (above photos)
First make the flowers and flower buds ready by, finding the design paper print with the flowers and lilac buds. Stamp these using the versa-mark, glitter embossing powder and the aid of the Misti-stamping tool. Die cut the images out. Bring shape to the flowers and buds by using the Lush Lilac shaping mold. Bring further shaping to buds and flowers with the flower shaping tool kit. Put aside. Taking the bauble, separate the bauble and cut the hanging loop off with the scissors. Keep one side for this book and put the other side away for another project or book for another time. You could also make 2 books at the same time. If so, you will need double the cardstock and two paper pads for this. Taking the cardstock pieces for the front outside and inside cover of the book, the design paper for the front matting and the circle die that fits the pre-cut circle. Align the die to the papers and cut the circle out. Put the design paper with the circle cut out aside for the front covers later. Adhere all the papers and card-stock in place. The cut out circle from the design paper is aligned and adhered to the placement of the ½ bauble. Do this by placing the circle on the pocket and the ½ bauble on top. Shift them in place as you close the book cover. The bauble will then fit into the circle hole of the front cover. Taking the card-stock, note scroll image stamp and ink, stamp and die cut.  Die cut 3 extra cuts from cardboard and adhere the layers together. Taking the coloring pens, color the flowers and leaves on the scroll image. Trim, as needed the edges of the scroll so it will fit into the bauble when adhered to the design paper circle on the pocket. Adhere in place. Arrange and adhere the flowers to the scroll. If needed, add a little of the diamond stickles to the flower petals to get that glitter bling going. Taking the heart border die from the eyelet hearts die set and die cut the mini hearts from the card-stock as confetti. Place all the confetti, glitter glass, glass beads and sequins onto the scroll then, using wet glue adhere the bauble to its place to make the shaker. Careful not to move all the confetti, glass beads etc. on the scroll or it will stick to the sides. This will be the shaker. Carefully put aside so the glue can dry before the confetti etc. moves as a shaker. Once all is dry, adhere with the hot glue gun the 10 lilac buds to the out side of the bauble circle. Add and adhere the lilac flowers between and on top of the lilac buds to form a flower ring around the bauble. The card-stock single page when matted with the chosen design paper goes into this pocket. The adhered foldout pages are matted with the chosen design papers. 3 are needed for this. The same as for the fold out pages for the pockets, when finished these are slipped into the pocket with the foldout showing on the out side, thus hiding the pocket until opened.     
Out side book front cover: ( Photo's below)


 Inside book front cover and first page:


For the inside and outside of the front book cover: (photo's above)
Taking the 2 precut 5.70in x 5.70in (14.5cm x 14.5cm) card-stock with the circle cut out of it, adhere to the inside and to the out side cover.  Taking the pre-cut eyelet circle ring, adhere this to the inside front cover so the hole is framed. Taking the design paper used to for the circle for the bauble, adhere this to the front cover. Taking the circle dies that makes a 0.39in (1cm) frame for the circle hole in the front cover. Adhere this in place.  Adhere the lilac flowers on this frame, 2 deep. Adhere the lilacs 3 deep at the base of the frame as seen in the mini book photo. Thus making a flower frame around the circle hole. Add diamond stickles to bring more bling to the flowers if needed. Taking the cardstock precut for the book cover back and spine. Adhere in place. Cut a design paper strip for the spine. Adhere in place.


For the finishing of the book pages and pockets: (above photo's)
For the matting of the fold out pages: Taking the paper collection, find the design papers with the 6in x 6in (15cm x 15cm) mini prints and the large print design papers with the umbrella and tags. Chose the paper designs and cut to fit the foldout pages and pocket fold out pages. These are all cut a little smaller than the card-stock as matting. Adhere the matting papers in place. Larger photos and journaling can be added later to these pages. You can see the sample mini book has a few card-stock and design paper matting already adhered for photos.

To finish the book:
Add photos and journaling as wanted or if you give this book as a gift, the receiver can add photos etc. at their convenience. Using the rest of the collection stamps and dies, you can make more embellishments to add and decorate when the photos are adhered in place.


This is of course a basic book yet to be fully decorated. This is done once the photos are adhered in place.
Have fun with this....I did.
Inky hugs...next week we have a new release...you think this is a drop dead collection....wait till next week!
OXO
For more inspiration visit the Heartfelt Creations blog sign up so you don't miss a posting.