Over at HEARTFELT CREATIONS there is so much yum and goodness for you....
There you will find exciting new flower shaping molds and new easy to fill journals,here's what I did with the new play toys from the new releases!
Have fun...but you will need to scroll to the end of the post...that is to see all the goodness I have for you today.
It's a shame you can't feel the texture...getting all inked up is so fun...
make another few while we're at it....lol
Look at all this yum. Once all the embellishments are made....then the real fun begins. Get your hot glue guns out and ready to fire....
DRUM ROLL.... this is what it's all about....
You got to get this for your self! Your life will never be the same again!
This takes all the hard work out of flower making
Even crafters with tender hands and fingers can make flowers again with this!
Don't you think we need the moulds for the leaf vines as well???? I sure do!
The a look at what it will do for you. This sure puts the fun back into fun!
...just rub the tummy, prick a hole in the centre....thread some stamens through and adhere with the hot glue gun at the back...then Bobs your uncle....your'e done.
Below the product list and instructions on how the journal cover was put together...
Not done yet!
Scroll further for more yum and goodness.
Heartfelt Creations Products And Products
Carried On Their Website:
HCFB1-462 3D Rose Shaping Mold
HCJB2-5004 3Ring Journal Binder – White
HCS1-458-2 Bright Pearl – Medium (pink and
green)
HCPC-3813 Todays Quotes stamp set
HCPC-3815 Words Of Comfort stamp set
HCPC-3752 Classic Rose stamp set
HCD1-7110 Classic Rose die set
HCD1-776 Eyelet Oval die set
HCD1-1756 Small Oval die set
HCDP1-283 Young At Heart paper collection
HCST1-401 Deluxe Flower Shaping Kit
HCPP2-451 White cardstock 14.5 oz.
HCDA1-449 Stack and Store Daubers pack of 6
RAHT Heat It Craft Tool
359760 Gold Embossing powder
159723 Designer Clear Drying Glue
359848 Spellbinders Tool N’ one
ANC818 Go-Mam-Go prills
31510 Funnel tray
532423-KIT Sizzix Vagabond 2
Other Products used:
Gala Glitz-Teal, Water Mister, Hole
pricking tool, Dutch Doobadoo modeling paste, Spatula, Crafters Workshop 12 x
12 template TCW261 ART IS,. Inks: Jet Black Archival Ink, Distress Inks: Forest
moss, Fired brick, Victorian velvet, Wild honey. Lindy’s Stamp Gang Sprays:
Grab a Guy Gold, Hydrangea Blue, Ponderosa Pines Olive. Other: Hot glue gun, Versa-mark,
Fussy Cutting Scissors, Misti stamping tool.
Instructions:
Take the 3 ring journal folder, the
modeling paste, spatula and the crafters work shop template to first apply the
letter writing to the front cover and spine of the journal folder. Put aside to
dry. Returning back to the journal front cover. When the cover modeling paste
is dry, spray with the Lindy’s stamp gang sprays till you get the color you
want. Misting with water if needed. Do this also to the back cover of the
journal. Dry the sprays with the heat it tool or you can leave it to air dry.
Take the eyelet die and die cut the frame
from a piece of white cardstock. Trim the inside part away from the lace out
side edge. Put the inside part aside for later. Bring the Wild honey and Fired
brick ink onto the lace frame edge. Taking the scalloped oval die from the
small oval die set cut this x 6. Take the Words of Comfort stamp set and find
the sentiment with ‘Today I Choose’ on it. Stamp this on one of the ovals with
the aid of the misti-stamping tool. Adhere all the layers together with wet
glue so you can slide it to match the scalloped edge.
Taking the banner die from the ‘Banners Of
Love’ die set and the stamp set ‘Todays Quotes’ and find the stamp with ‘Todays
Accomplishments’ Use the two in combination to make the banner. Cut the banner
x 3 extra from the card-stock, adhere all together to make a chipboard banner. This
is to be sprayed with the gold Lindy’s stamp gang spray later when the spraying
is done to the journal cover.
Taking the white card stock and design
paper scraps from the Young At Heart paper collection use the classic rose
stamp and die set to make the rose petals and leaf swirls. Use the distress
inks to bring color to the leaves, rose petal tips and centers. Spray the
petals and leaves with the water mister place in the rose mold then put the
mold through the die cutting machine twice to get a good press. ( Do not make
the paper or card-stock too wet as the paper will break in the mold when you
put it through the die cutting machine. If you do make it too wet, leave to dry
until they are just moist just as you would when balling to bring shape to the
petals with the tools. ) For the
blue / green colored flowers, these are sprayed with the Lindy’s stamp gang
sprays. Spray also the cut away inner part of the eyelet frame that was put
aside. Leave to dry a little, as the petals will still be too wet. When ready
put these through the machine in the rose mold. Take the petals out of the
molds with the aid of the piercer tool found in the flower shaping tool kit. Leave
the shaped petals to dry completely. When dry, shape the centers so the petals
cup up. Prick a hole in the petal center to you can thread the stamens through
the opening. The stamen colors
used are the pink and the green fond in the bright pearl assortment bundle. Take
three stamens, fold in half then thread the stems through the whole. Secure
with at the back with the hot glue gun. The glue is cooled off, trim the excess
stems away.
When the cover is dry, adhere the outer
part of the eyelet frame to the center of the cover. Cut the sprayed eyelet
center frame in half and adhere each piece below and to the sides of the outer
frame. The scalloped frame with the sentiment is spritzed with the Lindy’s
stamp gang sprays. The banners colored with the blue spray and the out side
highlighted with the gold spray. Mist so the sprays will run a little. Adhere
this to the inside of the eyelet frame when dry. Arrange the leaf swirls and
flowers to and around the frame. Adhere with the hot glue gun. Apply the wet
glue for the Prills and Gala glitz as shown in the photo. Using the tray, apply
the Prills and Gala glitz with apply the Prills with a spoon and sprinkle
gently so the Prills will not bounce everywhere. The small banner that has been
sprayed with gold, adhere to the bottom right of the journal cover.
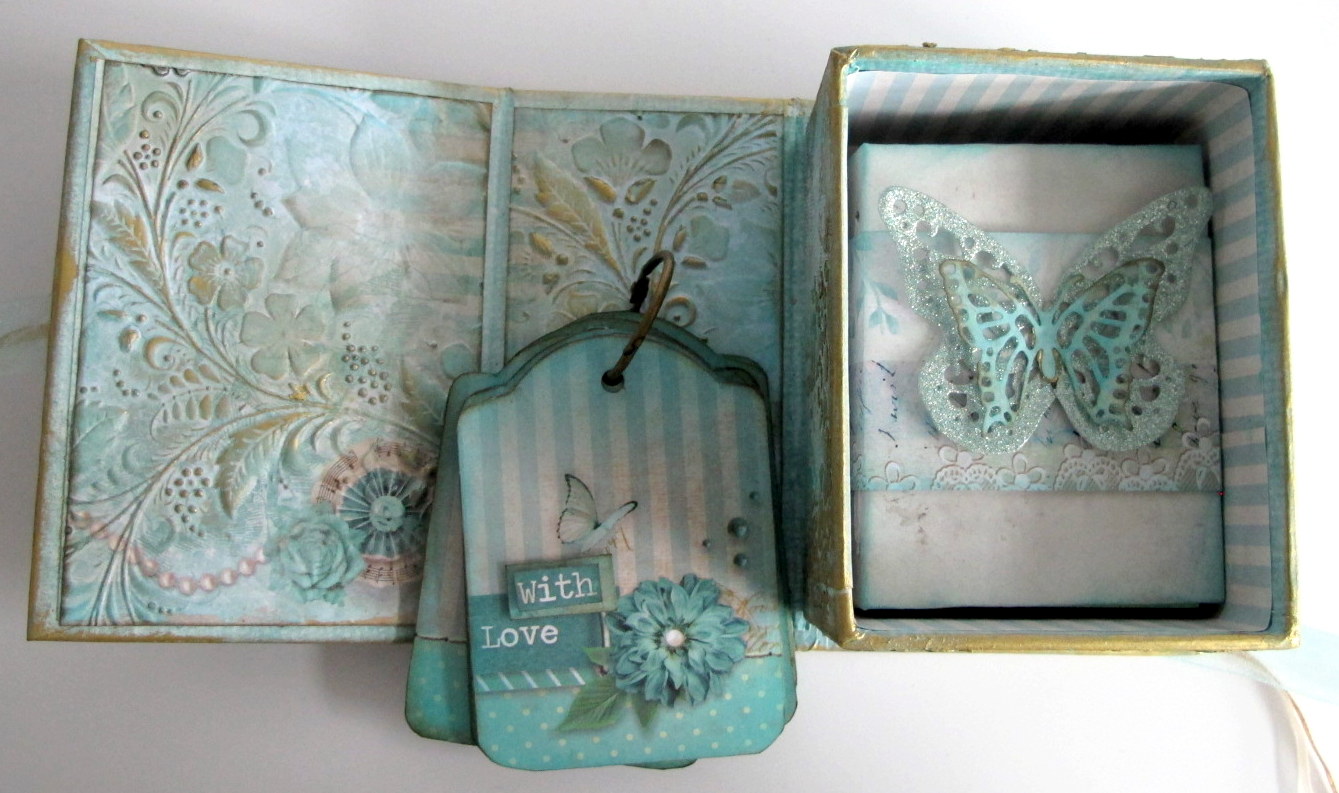
HERE IT IS!
The pages to go in the journal. My take on it anyway. All the hard work is done, printed and all prettied up for you. All you need to do is, add photos and do some journalling.
Heres the product list and the how to for these pages.
Heartfelt Creations Products And Products
Carried On Their Website:
HCJB1-5003 Heartfelt Inspiration Journal
Pages
HCPC-3651 Botanical Rose stamp set
HCD1-759 Botanical Wings die set
HCPC-3813 Todays Quotes
HCPC-3800 Young At Heart stamp set
HCD1-7158 Young At Heart die set
HCPC-3814 Words Of Encouragement stamp set
HCST1-401 Deluxe Flower Shaping Kit
359760 Gold Embossing powder
159723 Designer Clear Drying Glue
359848 Spellbinders Tool N’ one
White Card-Stock
359760 Gold Embossing Powder
RAHT Heat It Craft Tool
Other Products Used:
Card-stock: Brown, Taupe. Inks: Zig permanent
blackball pen 5mm , Black Archival Ink, Distress Inks: Forest moss, Wild Honey,
Black Soot, Mustard seed, Crushed Olive, Aged Mahogany, Victorian Velvet. Other:
Versa-mark, Hot glue gun, Double sided tape, Ruler, Green Bling Stones, Misti
stamping tool, Water Mister, Inking tool, Water coloring brush, Scissors, Ruler.
5x photos, Hot glue gun.
Find the two pages with the coffee cup /
chocolate cup on it from the inspiration journal pages. For all three pages, arrange
the photos wanted for the pages where wanted, trim to size if needed. Taking
the brown and taupe card-stock matt the photos as seen in the photos. Adhere
the photos with double sided tape to the matting.
For the 1
st and 2
nd pages, stamp, die cut and colour the airplane using the white card stock. Adhere this to the page corner as seen in the photo of the pages.
Stamp the flowers and leaves with the gold embossing powder, die cut and colour with the inks from the product list. Bring a little shape to the flowers and leaves, not too much if they are too high they will get crushed and will take too much room in the journal. Adhere the made flowers and leaves to the corners of the photos on each page shown in the photos. Apply and adhere the bling stones with the hot glue gun to the flower centres. Find the ‘Happy Memories’ sentiment stamp from the listed stamp set, brown card-stock then stamp this with the gold embossing powder. Trim the sentiment card-stock to size, adhere to the page. Taking the permanent marker pen, write two rows of journaling around the photo matting edges, doddle the flowers, leaves and dots in the corners of the flowers and leaves. Taking the stamp sentiment of ‘This moment in time’ and stamp it next to the ‘I am in charge’ print in the paper. Find the stamp with the scripture 1Tim 1:7, copy the scripture verse and hand wright the verse to the outer edge of the second page.
2nd Page
close ups
Had to get some of my own in....lol...
For the 3rd page, the journaling is written around the photo card-stock matting. Use the sentiment stamps ‘So grateful’ and ‘I will never forget this day’ to stamp with the black ink at the top right and bottom left of the page. The stamp with the verse from Psalm 18:32 is hand written as journaling. Continue to fill the page with doodling and journaling about the event and photos. The page that would follow this page could be used only for journaling about the days events or it could be used to start a record of a new adventure.
You can see I had fun playing around here....lol....of a time.
....And thats only 3 pages! Imagine doing the whole book. Check out what the other DT members have done. Some of them have been good little girls and...done, did....a whole book of this yum goodness!
I won't hold you up any longer, because eI know you want to get back to the BLACK FRIDAY fun
Have a scrappy yippie time.
Inky hugs...till next time
OXO