Friday, November 30, 2018

The Heartfelt Creations November Alumni blog hop is here already !!!!


A randomly chosen comment from a mystery blog will receive a $25 gift certificate to shop at Heartfelt Creations. To claim your prize please email Heartfelt Creations at socialmedia@heartfeltcreations.us with "Winner of the November Alumni Hop" in the subject line.
The hop starts at 8AM EST on Friday, November 30th, 2018 and closes Monday, December 3rd, 2018 at 11.59PM EDT. The winner will be announced on the HC blog and on FB on the Wednesday December 5th.
The hop links are to be found at the end of this post.....have fun hopping.


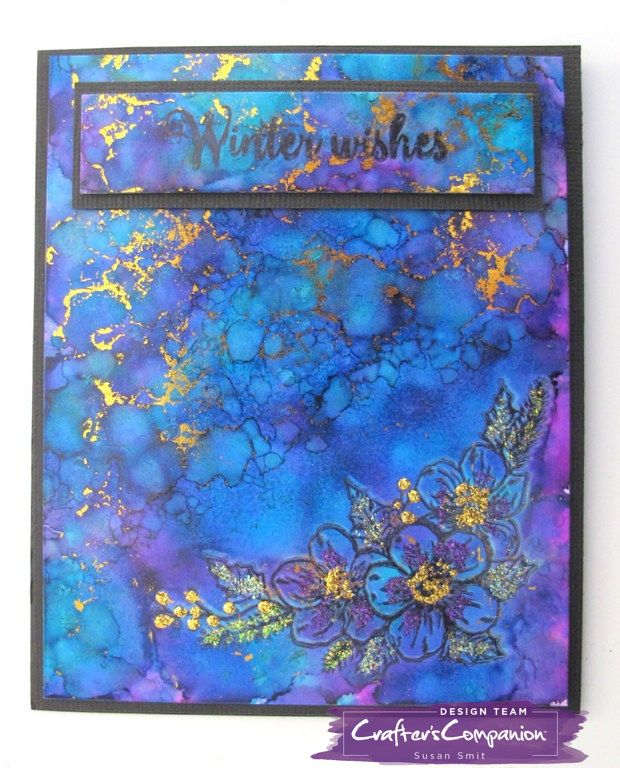
Here below is what I made for the November Alumni blog hop.....enjoy.


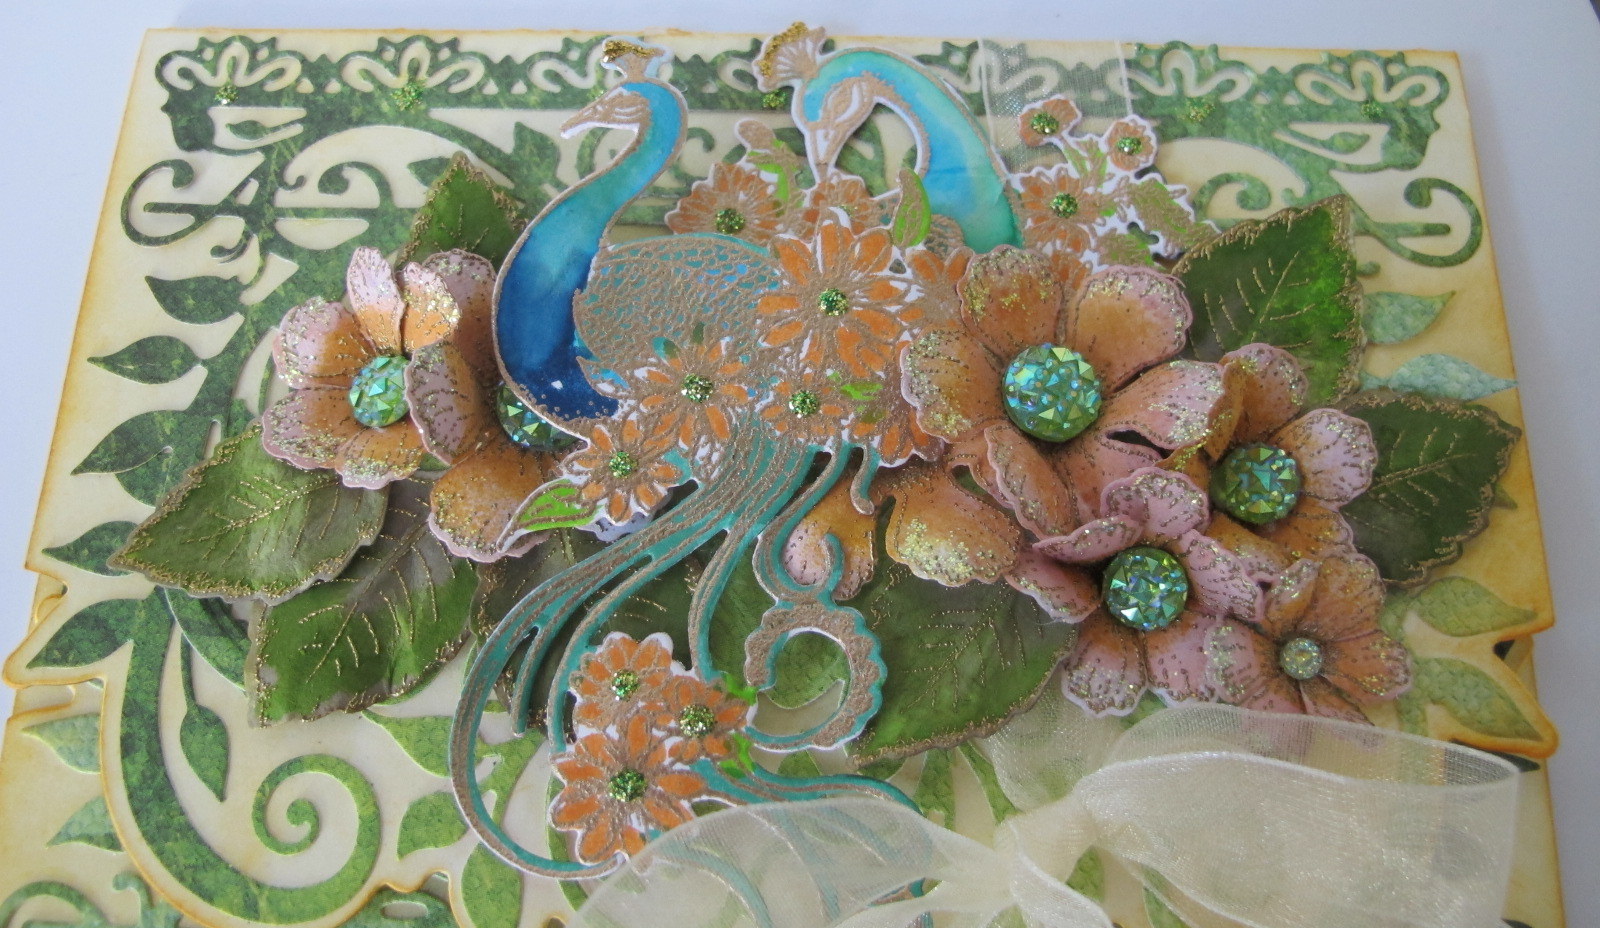
...A gift voucher envelope is always handy to have on hand for those special occasions when you haven't had time to shop for a gift....or....what do you give when they already have everything....lol
Cash or a gift voucher and now you can wrap it up in a card made with love.


Please NOTE! This is a limited edition and will not be available anymore after the 8th of December 2018. After that it becomes a collectors item....
So if you do not have this and have been wanting to invest in your Heartfelt Creations stash...now is last your chance to get this beautiful timeless collection. 
A couple points of interest, this is the first of the die sets to match the stamps in the new Heartfelt Creations branding about 4 years ago and the Heartfelt Creations own exclosive pink die designs.
when this collection was released it sold out with in weeks! The peacock dies were released later than the original release....food for thought. I for one am sorry to see this go but I am sure there will be something just as exciting to replace this collection.

Heartfelt Creations Products And Products Carried On Their Website:
DDOTS  Double Dots/3d foam squares
159723 Designer Clear Drying Glue
173842 Score-Pal
359848 Spellbinders Tool N’ one
HCPP2-451 White cardstock 14.5 oz. 30x 30
RAHT Heat it craft tool 
Archival Inks:
RACP  Black
31510 Funnel tray
Gold embossing powder

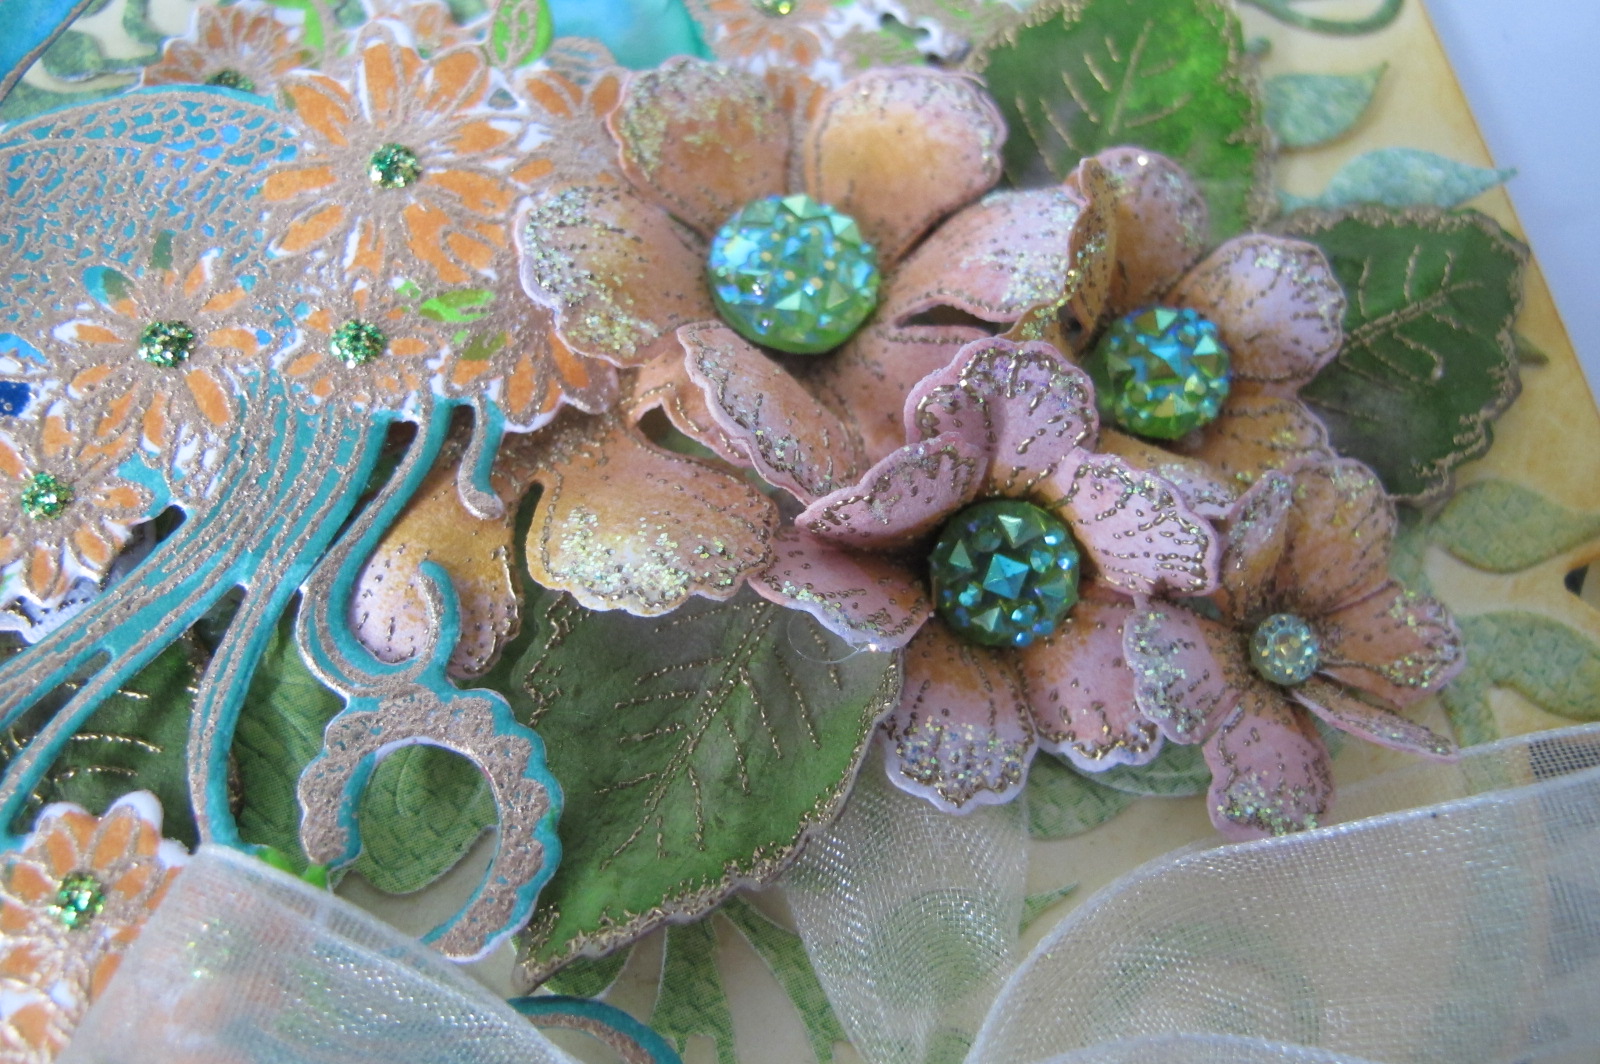
OTHER PRODUCTS USED: Hot glue Gun, Bone folder, Scissors, Ruler, Misti, Wild Honey and Forest Moss distress inks, Stickles- Green and Diamond, Organza ribbon, ½ crystal bling (for the flower centres), Spectrum Noir water cooler pens (for the colouring of the peacocks)

INSTRUCTIONS: The finished size of this envolope card is 6” x 4 ¾ ” / 15cm x 12cm. 
  
*Taking a white 12” x12”/ 30cm x 30cm card stock , cut in half. This will give you enough for 2 cards, or put one aside for later.
*Taking the Sweetheart outer die piece place this onto the shorter edge of the card-stock and die cut. Repeat this for the other edge as well. Look to the photos for clarity.
*Place the long edge on the score-pal. Making fold lines so you will end up with a 12cm / 4 ¾” for the card back. This will give you a flap and a fold up pocket when all is folded.
*Taking the Sweetheart inner die piece and the collection design paper. Die cut x3. Two for the envelope flap and one for the fold up pocket.
*Taking the paper collection chose a paper for the lining of the card. Cut to fit and adhere in to place. Details seen in the photos.
*Ink the white card-stock edges and flaps with the Wild Honey and the Forest Moss Ranger Distress inks.
*Adhere one of the die cut pieces to the bottom flap. Fold up and adhere the edges of this flap to form the pocket.
*For the top flap, trim the dies cuts and adhere in place. See the close up photo above.
*Adhere the ribbon so it will wrap around the card and tie a bow at the lower edge of the flap to keep the card closed.
*Stamp the peacocks, leaves and flowers using gold embossing powder. Colour, die cut and shape what is needed for the card front. Trim the tail away from the peacock that will be placed on the right above the flowers. Arrange the peacocks, leaves and flowers then adhere in place with the hot glue gun.
*to finish the card apply the stickles to the flower edges and to the small flower centres. Add the ½ crystals to the shaped flowers using the hot glue gun. Look to the photo below


Below photos of the inside of the card, showing the fold up pocket and the design paper chosen.


Above you see the fold up pocket.


Don't forget to leave a comment and some love behind and to visit the other blogs for the hop....you never know....you might get picked to be the winner this hop....if not, there is always next time....and it's fun.
Sussipoppins love and inky hugs.

......YOU ARE HERE....https://sussipoppins.blogspot.com/2018/11/the-heartfelt-creations-november-alumni.html


A quick up date....we have a winner. 
Pat Bowman.
To claim your prize please email Heartfelt Creations at socialmedia@heartfeltcreations.us with "Winner of the November Alumni Hop" in the subject line.
Have fun choosing your goodies

Monday, November 26, 2018

"With Love"

Featuring the Gemini  stamp and border dies from Crafters Companion


CRAFTERS COMPAINION PRODUCT LIST:
Gemini
Scoreboard
Stamp rockers
Gemini Stamp & Die set- Peony
Flutterby collection CI17-CC-Die With Love die
Gold Foil
Centura Pearl-snow white hint of silver A4 300gm

OTHER PRODUCTS USED:
Versa-mark, Heat gun, Hot glue gun, Clear drying glue, Double sided tape, White embossing powder, Ruler, Organza ribbon , Distressing tool, Green card-stock,
Various colors of Alcohol ink, Alcohol Blending Solution, Yupo.

 TITLE:  “With Love”

MEASUREMENTS FOR THIS CARD:
#1 Tent fold Card base13cm x 17.5cm
#2 Mating 12cm x 16.5cm (Green card-stock)
#3 10.8cm x 15cm plus the 1.5cm fold.

INSTRUCTIONS:
#1 Make the tent fold card base
#2 Cut the green card-stock to size, distress the edges
#3 Taking the die sentiment and the Green card-stock, cut 4-6 words. Adhere together in a stack.
#4 Adhere the card stock to the card front using 3D foam tape or squares.
#5 Once you have made the back ground with the alcohol inks apply the gold foil
 #6 Taking the embossing powder stamp the Peony image, use the matching die to cut the boarder
#7 Taking the white card-stock cut to 10.8cm width, use the boarder die to cut the edge.
#8 Adhere the stamped front to the white card-stock making sure the white shows along the edge. Make the 1.5cm fold.
#9 Adhere the front to the green front using tape and glue.
#10 adhere the organza ribbon to the back of the green card-stock and tie a bow to hold the front closed.
#11 Adhere the sentiment just below the ribbon line


Using all my stash of Alcohol inks...love using the gold foil in the finish....MmmmMmm


Sussipoppins inky hugs and love,
till next time


Monday, November 19, 2018

"Winter Wishes"

Featuring the Winter rose from Crafters Companion

CRAFTERS COMPAINION PRODUCT LIST:
Gemini
Scoreboard
Stamp rockers
Stamp set from the #20 Crafters Inspiration craft kit
Gold foil

OTHER PRODUCTS USED:
Black card-stock, Alcahol inks, Alcohol Blending Solution, Yupo, Clear drying glue, 3D foam tape, Double sided tape, Ruler, Archival jet black ink., stickles

TITLE: “Winter Wishes”

MEASUREMENTS FOR THIS CARD:
#1 The finished tent fold card measures 11cm x 13.5cm
#2 The finished yupo card front measures10.5cm x 13cm
#3 The yupo for the sentiment measures 9cm x 2cm
#4 the mating for the sentiment measures 9.4cm x 2.4cm

INSTRUCTIONS:
#1 Taking the black card-stock make the tent fold card to the finished measurements.
#2 Making the yupo back ground by using various colors of alcohol ink and the blending solution.
#3 Apply the gold foil to the yupo just before the ink dries.
#4 Taking the stamp and black ink, stamp the image.
#5 Stamp on a scrap the sentiment from the stamp set and mat with the black card-stock.
#6 Adhere to the card front using 3D foam tape or squares.
#7 Adhere the card front to the base using 3D tape then apply the stickles to the stamped image.


Till next time...
love with inky hugs,
Sussipoppins

Monday, November 12, 2018

'Congratulations'


CRAFTERS COMPAINION PRODUCT LIST: 
Gemini
Scoreboard
Stamp rockers
Water Brush Pens CC-WTBRSH-M3PC
STAMP- CC-St-DFL Decadent Flowers
CARDSTOCK- Sheena Douglas White stamping card A4 60 sheets 300gsm 
INKS- Spectrum Noir water markers

OTHER PRODUCTS USED:
Card stock
Versa-Mark
Heat gun
Hot glue gun
Clear drying glue
3D foam tape
Double sided tape
Gold embossing powder
Fussy cutting scissors
Ruler
Organza ribbon.

MEASUREMENTS FOR THIS CARD:
#1 Card front-10cm x13.5cm
#2 Card front matting #1- 15cm x 11.5cm
#3 Card front matting #2- 15.5cm x 12cm
#4 Card front base- 16.8cm x 12.3cm 
#5 Card front base fold- 5cm

 Instructions:
#1 Make the card base.
#2 Cut the card front matting’s and adhere together using the 3D foam tape.
#3 Taking the stamping paper, stamp the image using the gold embossing powder.
#4 Color using the Spectrum Noir water makers that match the card stock used.
 #5 Adhere the colored card front to card base then make the sentiment.

#6 Make the bow and adhere to the top of the card.


...this is for those that love to fussy cut, play with gold embossing powder so you can stay in the lines....lol...and for those that just, love to get their hands inky and play.


Inky hugs and loves...till next time
Sussipoppins
OXO


Monday, November 5, 2018

5th Nov brings you a Crafters Companion 'Congratulations' card

The elegance of simplicity....


CRAFTERS COMPAINION PRODUCT LIST:
Gemini
Scoreboard
Stamp rockers
Water Brush Pens CC-WTBRSH-M3PC
STAMP- CI18-STAMP Crafters Companion Inspiration issue 18 and CC-St-DFL Decadent Flowers
PAPER- Fancy design card-stock
CARDSTOCK- Centura Pearl-snow white hint of gold A4 300gm
INKS- Spectrum Noir water markers

OTHER PRODUCTS USED:
Versa-Mark
Heat gun
Hot glue gun
Clear drying glue
3D foam tape
Double sided tape
Gold embossing powder
Fussy cutting scissors
Ruler
Organza ribbon.

MEASUREMENTS FOR THIS CARD:
#1 This tent fold card base measures- 17cm x 14cm
#2 Card matting- 16cm x 13cm
#3 Card panels- 2x 5cm x 12.5cm and 1x 4.5cm x 12.5cm
#4 The sentiment banner 7.5cm x 1.5cm
 
 Instructions:
#1 Make the card base and card fronts.
#2 Distress the edges of the card front panels.
#3 Adhere the fronts to the card base using 3D foam tape.
#4 Stamp the sentiment with black ink, distress also edges.
#5 Stamp the birds, and flower using gold embossing powder.
#6 Fussy cut the images, adhere the 2 birds to the card front center.
#7 Adhere the fussy cut flower using the 3D foam tape.
#8 Make the organza bow and adhere to the lower center of the card.

#9 Place and adhere the sentiment to the right of the card.


 All the fun is in the colouring. The gold embossing makes it that much more elegant and easier to keep in the lines....for those that are still learning....lol....aren't we all?


I am so in love with these water cooler markers.....it was easy to travel with them. I was colouring this while getting a tan on a beach in Greece on vacation last month. Yes...taking a break every now and then, keeping myself cool by taking a dip in the gorgeous clear clean sea water sure was an inspiration. If you have visited Greece, you will know what I mean.
Till next time...inky Sussipoppins hugs to you,