Wednesday, March 30, 2016

Heartfelt Creations Wednesday!


"We don't have it together, but together we have it all"

Hi, how are you? I am having sunny day today...the rain is not in sight...getting that spring feeling! I hope you too get that sunny spring feeling after scrolling down my post...lol 


Heartfelt Creations Products:
HCDP1-264 Winking Frog Paper Pad.
HCPC-3727 Flirting Frogs cling stamp set
HCPC-3729 Leaping Frogs cling stamp set
HCPC-3725 Water Lily cling stamp set
HCD1-780 Ornate Borders and Pockets die set
HCD1-791 Flirting Frog die set
HCD1-792 Leaping Frogs die set
HCD1-790 Water Lily die set
HCD1-728 Timeless Glamour die set
HCD1-743 Raindrops on Roses die set
HCST1-401 Deluxe Flower shaping Kit
Products Carried by Heartfelt Creations:
685glitter-Crystal Ultrafine Transparent Glitter
ANC829-Express Yourself Prills
Art institute clear drying glue
Gold embossing powder
DDOTS
Other Products used:
Ranger: Distressing tool, Foam inking tool, Forest moss distress ink, Heat gun,
Derwent Inktense pencils 72: Tan-1720, Felt green-1530, Cherry-0510, Apple green-1400, Baked earth-1800, Willow-1900, Dark aquamarine-1210, Red violet-0610, Oak-1730, Golden yellow-0230, Fushsia-0700. Paper: Aquarelle paper, Crafters Companion Centura Pearl-snow white hint of gold 300gsm. Other: Spellbinders s4-388 Stately Circles. Green Organza ribbon, Glue dot, Double sided tape, Versa-mark, Tonic die cutting machine, Tonic paper cutter
Instructions:
Watch this video to see how to make the “We Don’t Have It All Together” Winking frog.
This completed card measures 14.7 cm x 20.8 cm.
Make a tent fold card base from the 300gsm cardstock to measure 14.7 cm x 20.8 cm. Find the design paper in the paper pad collection. Cut to 14.6 cm x 20.7 cm. 
Distress the edges with the distressing tool. Adhere to the card base with double sided foam tape or foam dots. Taking the Aquarelle paper, stamp and color all the images. Die cut with the matching dies. Cut a few extras to support the paper and to make chipboards from the layers. Trim the Frog border to separate the different frogs as seen in the photo.


Shape the Lily’s and adhere together. 


Add the prills and glitter to the Lily’s. 


Stamp and cut strips from the sentiment, apply ink to all the edges. The sentiments will be adhered with foam dots or tape. 


Using the circle die from the Stately circles set, die cut the stamped image of the Frogs under the mushroom. 


Taking the Ornate Borders die cut the frame so the borders will peep out from behind the circle. Taking the Raindrops on Roses die, cut this twice. Cut both in half so you have four lace borders. Ink all the lace border edges, including the circle. 


Make a ribbon from the ribbon. Adhere all to the card front. Adding layer by, layer and applying foam tape or foam dots as needed to keep the height balanced. Glitter is added to the raindrops and the lace border edges to help the card to pop.


Don't you love these little critters!?! Love the borders...and the little frog with the crown is the fav of the month... Don't forget to go on back to the Heartfelt Creations blog to check out all the rest of the eye candy over there. Have a fun week,
Inky, scrappy  hugs sussipoppins

Post Note: 
I am so looking forward to this weekend...it is full of excitement and wonder. I am booked into a Work Shop with Finnabair in Belgium. For those that do not know her...she is a real sweetheart and does wonderful mixed media...I love her work and have followed her for years. She works under the umbrella of Prima marketing....bells start to ring....now you know her. I finally got to meet her at the CHA in January. of this year. Anna told me she was doing a WS over this way, Belgium, which is about 2-3 hours drive from where I live....a hop skip and a jump away...lol...so needless to say, as soon as I got home I looked it up and booked...a double WS...so I am doing both...it's going to be all day fun fun fun! I will show you what I learnt and how much fun I had when I get photos edited. To make my weekend even better...my DH has booked us into Cirque Du Soleil the following day, Sunday....so looking forward to this one. From what I have seen, and heard, the theme is under the sea? So looking forward to that one. We go every year...it's our thing, our 'yearly date'. I love all the costumes etc...but the body can do!...theirs not mine...lol
So I will be having a named packed fun weekend...need the rest of the week to get over it....
See you next time...oxo

Wednesday, March 23, 2016

Today...'YOUR'E TOADALLY AWSOME'


Heartfelt Creations Products and Products Carried by Heartfelt Creations:
85 glitter-Crystal Ultrafine Transparent Glitter
ANC829-Express yourself Prills 
85glitter-Crystal Ultrafine Transparent Glitter
Art Institute clear drying glue
Double Dots/ 3d foam tape
Gold embossing powder
Watch this and see how to create these flowers

Other Products used:
Ranger: Forest moss and Walnut stain distress inks. Foam inking tool. Distressing tool, Heatgun, Water color brush,
Derwent Inktense pencils 72: Felt green-1530, Shurbet Lemon-0100, Light Olive-1540, Golden Yellow-0230, Lagoon-0810, Crimson-0530, Dark Aquamarine-1210, Willow-1900, Cadmium Yellow-0210, Neutral Grey-2120
Paper: Crafters Companions Centura Pearl-snow white hint of gold 300gsm. Aquarelle paper. Rainbow colored organza ribbon, Double sided tape, Fussy cutting scissors.
Tonic cutting machine, Tonic paper cutter.

 See the whole collection and see how to make the Lilies "You’re ‘Toadally’ Awesome


Instructions:
Completed tent fold card measures 20.9 cm x 14.7 cm
Make the tent fold card base to the above measurements from the 300gsm card stock. 


Cut a card front 14.6 cm x 20.8 cm. place the corner die to the edge, cut then repeat on the other side to form a pocket.


 Ink the edges of the lace with the Walnut stain. With the paper from the pad, cut 19.5 cm x 13.7 cm. 


Slip this into the pocket adhering with double sided tape. 


Make the tag by cutting from the cardstock 15 cm x 12.2 cm. Die cut the top with the corner die and add ink to the lace edges. Using the aquarelle paper, stamp with the gold embossing powder the Fiddle’n Frog image. Color with the pencils. Stamp, color and die cut the Fiddle’n Frog, cut extra to make chipboard from the layers. 


Add glitter to the glow flies. Cut this to11.7 cm x 12 cm so it will fit the tag. Stamp an extra frog and color also. Die cut this out plus 4 extra to make a chipboard from the layers. 


Cut a strip of design paper for the back of the tag to tidy the corner cutting. Adhere all together. Later this will be slipped into the corner pockets. 


Make a bow and adhere it across the card front. Adhere the card front to the card base. 


Stamp and color the Lily’s and Lily leaves, shape, add prills to the centers and glitter to the tips of the petals. 


Stamp and die cut the single girl frog from the Flirting Frogs set, cut extra to make a chipboard. Add glitter. 


Stamp and trim the sentiment. Adhere all to the card front.
I hope you 'Toadlly' enjoyed this posting today...lol
Going to get on with my day now...sending you a sussipoppins inky hug.
*******
Today is a very special  day for me...us. It is Nisan 14
I commemorate this day because....on this day many years ago, Jesus gave us the greatest gift...he offered up his earthly life for us so we may have the hope of eternal life on a paradise earth.
After sundown this evening I will be at a special once a year gathering to honour this event.
A reading of the events that took place that night. Mark 14:17-72
More info go to JW.org

Wednesday, March 16, 2016

Wednesday's Winking frog


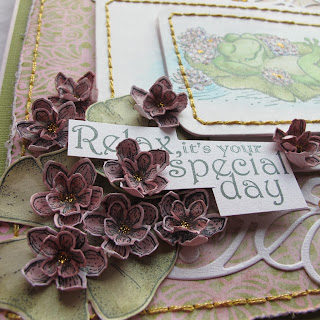
'Relax, it's your special day'


HCPC-3728 Winking Frogs cling stamp
HCPC-3726 Fiddle'n Frog cling stamp set
HCPC-3725 Water Lily cling stamp set
HCD2-742 Cut Mat Create 1A
HCD1-790 Water Lily die
HDC1-779 Regal Borders and Pockets die
HCST1-401 Deluxe Flower Shaping Kit
DDOTS Double dots/3d foam tape
85glitter-Crystal Ultrafine Transparent Glitter
Art Institute clear drying glue

Other Products Used:
Paper: Crafters Companion Pearl Centura-snow white hint of gold 300gsm, Green cardstock. Ranger: Distress inks: Mowed lawn, Forest moss, Peeled paint, Mermaid lagon, Victorian Velvet, Aged mahogany. Archival jet black ink, Golden rod stickles, Prick pen. Distressing tool, Water brush, Prick pen, distressing tool. Other: Needle and gold thread. Yellow Crystal stones. Tonic die cutting machine, Tonic paper cutter.

Go here to see how to make the Lilies and the rest of the collection.
Go here to learn about die cutting boarder dies.

Instructions:
This completed hinged tent fold card measures 20.7 cm x 19. cm
Taking the 300gsm cardstock, make the hinged card base by cutting 20.7 cm x 19 cm x 2. Cut the hinge to measure 20.7 cm x 4 cm, fold in the length. Adhere to join both cards front and back. Cut the green cardstock to, 20.3 cm x 18.4 cm, adhere to card base. Find and cut the design paper from the paper collection19.2 cm x 17.3 cm. 


Stitch around the edge with the gold thread then distress the edges with the distressing tool. Taking the 300gsm cardstock, 3.75” x 5.75” and the 2.75” x 3.75” dies from the Cut Mat Create die set, die cut each size 3 x. Later, to make chipboard frames from the layers. 


Stamp the image of the relaxing frog into one of the larger sized frames. Color the image with the pencils. Align and center the smaller die onto this colored image, die cut. Adhere the layers to their own size then stitch around each frame. You can now adhere the smaller frame to the lager frame. 


Taking the chosen border die from the Regal Borders and Pockets die set, die cut x 2 from the 300gsm card stock. 


Stamp, color and die cut the Lily’s and Lily leaves. Shape the Lily’s with the shaping tool. 


Stamp the sentiment. Adhere all the layers to the card front. Once the Lily leaves and Lily’s are secure, apply the golden rod stickles to the Lily centers. Adhere the yellow crystal stones then apply the glitter to the stones and the Lily’s surrounding the relaxing frog. Before adhering the sentiment, trim as needed.


I hope your day is just as relaxing as the winking frog above...wink wink....
Don't forget to go on back to the Heartfelt Creations site to check out all that
amazing eye candy there. I hope you are having a wonderful sunny day...
Inky love and hugs 
sussipoppins

Wednesday, March 9, 2016

Heartfelt Creations March release....wait for it....Winking Frog....

Lets Hang Out!


Introducing the "Winking Frog " collection

Don your rubber boots, grab your field glasses and come along as we set out to explore picturesque marshes filled with dazzling water florals, glistening dragonflies, miniature forests of cattails and flourishing crops of toadstools! Walk softly and  be aware of your surroundings at all times as the delightful gems we seek are not always easily seen and blend in with their surroundings perfectly.  Pause and listen carefully as the only clues we have to follow, leading us to our destination are the soft and throaty croaks filling the cool evening air.  Follow the quick flickering of the lightning bugs as dusk begins to fall, being careful to not be seen in their shadows.  Now...grab your field glasses...we've discovered the habitat we've been so curious about! Through your field glasses you see them...you have a front row seat to witness their fun and frolic, entertaining antics and flirtatious ways, and can only hope to eventually be invited in to make their acquaintances and join in the laughter and merriment!  Come along side Heartfelt Creations as we discover and reveal the amusing and spirited "Winking Frog" Collection.  Vintage inspired illustrations will bring back memories of classic childhood story books, quick witted sentiments will add a touch of fun, and the serene and calming color palette of the collection is sure to speak to the heart of everyone who ventures here.  The invitation has been sent to join in on the high jinks, so now it's your turn to dive in...try your hand at creating beautiful water florals, hop from lily pad to lily pad on handsome decorative paper, play hide and seek with glorious die cuts and with the little polliwogs among the weeds and cattails....now aren't you glad you listened and wore your rubber boots!

Video to watch on this collection release here ...showing you how you can maker the flowers that go with this collection

Heartfelt Creations Products and Products carried by Heartfelt Creations:
HCDP1-264 Winking Frog Paper Collection
HCPC-3730 Froggy Hangout cling stamp set
HCPC-3725 Water Lily cling stamp set
HCD1-790 Water Lily die
HCD1-776 Eyelet Oval die
HCST1-401 Deluxe Flower Shaping Kit
Art Institute clear drying glue
85 glitter-Crystal Ultrafine Transparent Glitter
Double Dots/ 3d foam squares

Other Products used:
Ranger: Distressing tool, Distress Ink: Mowed lawn, Mermaid Lagon, Mustard seed, Ripe persimmon, Chipped sapphire Archival jet black ink. Cardstock: Crafters Companion Pearl Centura-snow white hint of gold 300gsm, Green baszzill. Needle and Gold thread. Fussy cutting scissors. Seam binding ribbon. Tonic die cutting machine, Tonic paper cutter

Instructions:


This finished hinged tent fold card measures 22.5 cm x 16.2 cm
Taking the 300gsm cardstock, make a tent fold card by cutting x 2, 22.5 cm x 16.2 cm. making a hinge to join the 2 cards together. Using the same cardstock die cut the Oval lace frame and the plain oval frame. Apply the glitter to the lace part of the frame. 


Stamp the image in the frame plus an extra image. Color both stamped images with the Derwent Inktense pencils and water brush. Die cut 1 of these images with the matching die. Cut 4 extra cuts to make chipboard from the layers. 


From the green cardstock cut 22.2 cm x 16.2 cm. Adhere this to the card front. Taking the paper found in the paper pad, cut 20 cm x 14 cm. Stitch the edges with the gold thread then distress using the distressing tool. 


Adhere this to the card. Adhere the die cut chipboard frog in place then apply glitter to the raindrops. Once the frame is adhered to the card front take the seam binding ribbon (colored with distress inks, Chipped sapphire and Mowed lawn) make a bow and secure across the card with a glue dot. Stamp the sentiment, trim into pieces and adhere as shown in the photo.

Another peck at the finished card.


Thats it for this week....so much more to see at the Heartfelt Creations Blog....keep checking back each week for more posts on this fun collection.
Have a inky scrappy day....
Inky hugs from sussipoppins   xoxoxoxo

Wednesday, March 2, 2016

"My Wish For You" on a Heartfelt Creations Wednesday


The Sunrise Lily collection here
HCDP1-263 Sunrise Lily paper pad collection
HCPC-3720 Sunrise Lily Cling stamp set
HCD1-787 Sunrise lily die
HDC1-780 Ornate Borders and Pockets die set
HDC1-778 Fleur Borders and Pockets die set
HCD1-783 Border Essentials die set
These products can be found here
Deluxe flower shaping tool kit, DDots, Art institute glue, Scor-pal


Other Products Used:
Cardstock: Black, Crafters Compaion-Pearl Centura snow-white hint of gold
E-boss embossing folder Perverarance EF-PER-LTR. Ranger: Archival-jet black ink, Forest moss, Tea rose, Mustard seed distress inks. Diamond and Golden rod stickles, Water mister, Water colouring brush. Glue gun. Tonic paper cutter and die cutting machine.


Instructions:
This tent fold card finished size is 14 cm x 21 cm.
To make the card base, cut 27.9 cm x 20. cm. Fold to make the card the above size. Cut for the card front base, 20 cm x 13.9 cm. Emboss this. Bring the ink on with the foam inking tool using the Walnut stain and Forest moss inks. Adhere to the card base
Make the sentiments for the tag and card front. Inking the edges as was done with the card base. Make the tag, using the card stock, paper from the paper pad and dies. When finished the tag measures16 cm x 10.2 cm. Adhere the sentiment to the tag. To make the front pocket, using the Fleur Borders and Pocket die set cut in the paper and card stock. Leaving an extra 1.5 cm on the straight sides to form the pocket flaps. Once the flaps are folded under they will make the pocket. Ink the edges. Adhere the pocket to the card front. 


Make the Lily swirls, by stamping and die cutting. Color the swirls then ball with the deluxe flower shaping kit, adhere in place as seen in the photo. 


Make the Lily’s and leaves. Adhere in a cluster on the card with the hot glue gun. You can do this with glue but you have to hold them in place till they dry. 


Slip the tag in position. Then you can see where to add the small Lily on the tag. 


Adhere the banner sentiment with the foam dots. 


Die cut the numbers 2016 from the Borders Essentials die set. Cut x 4 each number. Adhere together then adhere to the card. 


To finish, add stickles to the Lily’s and numbers.


Thats it for this week...thanks for dropping by to visit my place.This weeks card is sure one of my favs from this collection. Make sure you go on over to Heartfelt Creations and visit...a lot of eye candy going on over there.
Next week we have a new release coming out....another eye catcher for the greenies and  nature lovers...thats all I am going to hint at.
Till next week...inky hugs to you all from,
 sussipoppins