Wednesday, December 27, 2017

Heartfelt Creations Wednesday...

Hi...it's raining this morning, so snuggle up and enjoy this posting featuring the Cameilla Carnation in a tent fold card.


Heartfelt Creations Products And Products Carried On Their Website:

 Other Products Used:
Inks: Archival Inks: Coffee. Distress Inks: Crushed Olive, Peeled Paint, Ripe Persimmon, and Fossilized Amber, Walnut stain Paper: Watercolor paper. Card Stock: Kraft 300gm
Other: Stickles, Hot Glue Gun, Water Mister, Bone folder, Water coloring brush, Paper distressing tool, Scissors, Ruler, Versa-mark, Misti Stamping Tool.


Instructions: 
The finished size of this tent fold card is 5.90in x 5.90in (15cm x 15cm)
See HERE tips on how to make the carnations 
*Make the card base, using Kraft card-stock to measure 5.90in x 5.90 in when folded into the tent fold. 
Finding from the paper collection the light and darker orange design papers. With the lighter orange design paper make the first matting, cut this a little smaller than the card front. Taking the darker orange design paper cut this 5.118in x 5.118in (13cm x 13cm) Ink both matting papers with the walnut stain ink with the aid of the daubers. Adhere the inked layers to the card front with 3d dots.
 *Taking the watercolour paper and the stamp from the Fanciful Carnation cling stamp set, stamp the image with the gold embossing powder. Taking the white card-stock, Stamp 2x the images using the archival coffee ink. Bring colour to all the images using the ripe persimmon, fossilised amber, crushed olive and peeled paint distress inks and the aid of the water brush. Die cut the images made from the white card stock and put aside. Find the large circle die that fits the image from the Large Circles die set, die cut this and die cut 4x extra circles the same size from the white card stock. Adhere all the circles together to form a chip board circle. Apply colour to the circle edges using the ripe persimmon distress ink and the aid of the daubers. Adhere this circle to the centre of the card front.
 *Taking the light orange design paper and the large carnation stamps. Stamp with the gold embossing powder enough for three carnations. For 2 carnations cut 2x large petals and cut 4x smaller petals. Which will be placed next to each other on the card front later. For the smaller carnation tucked to the top and between these stamp and cut 3x large petals. Add the ripe persimmon ink to the petal edges then use the floral basic mold to give the petals shape.  Look to the video film on how to use the molds. Bring more shape to the petals with the flower shaping tool kit and your fingers. Adhere the carnation petals together using the hot glue gun. Finding the green design paper, stamp the10 leaves with the gold embossing powder. Bring extra colour to the leaves by using the green colored distress inks. Bring shape to the leaves by using the flower-shaping tool set.
 *Adhere all the carnations leaves and die cut carnation buds to the foot of the circle as seen in the card photo using the hot glue gun.


A few close ups are always handy to see the details. These carnations are truly fun to make once you get the hang of it....like every thing else. Carnations are a good flower to have as they go with any accusation card or project. Don't for get to go back to Heartfelt Creations and see what else they have for you there today.
Wishing you happy scrappy moments,
Inky hugs Sussipoppins

Wednesday, December 20, 2017

COMFORTING SCRIPTURE

This Heartfelt Creations Wednesday brings you a fun Com forting Scripture project, full of comforting and inspiring words from the bible.

First we take a look on the outside and zoom in on those adorable carnations.
They are first embossed in gold embossing powder then shaped with the new flower molds.


 Bows always brings sweetness to a card and organza makes it that much more special.


Below you see all the layering using the off cuts from the lace doily die


Below you get to see all the tags in the box. this makes a wonderful gift for someone feeling poorly and down or a just because.
Og course the tags can be more decorated but you then need to take into account that only 3 or four will fit in the container. I have made eight tags for this box. A message could be added to the back of each tag to make it evan more personal. One could also add glitter to pop it. There are so many things you could to the details to make it your own. Remember to have fun while doing it.


Heartfelt Creations Products And Products Carried On Their Website:


 Other Products Used:
Inks: Archival Inks: Coffee. Distress Inks: Victorian Velvet, Broken China, Peeled Paint. Card Stock: Kraft 300gm. Other: McDonalds hot chips container x2, Hot Glue Gun, Water Mister, Bone folder, Water coloring brush, Paper distressing tool, Scissors, Ruler, Green Organza Ribbon, Misti Stamping Tool. Pencil and photocopy paper

For the making of the carnations click HERE

Instructions:
The finished size of this project is, 4.33in x 6.29in (11cm x 16cm)
Taking the McDonalds hot chip box, make a pattern by tracing around the form onto the photocopy paper with the pencil. Cutting into the box folds as you go to be able to trace the details of the folds and curves. Make also a pattern for the front matting for use later. Make a pattern for the tags; this is the size of the back of the box made a little smaller but longer. Taking the Kraft cardstock, trace the pattern onto this then cut it out. Trace all the curved folds onto the Kraft card stock using the smallest balling tool from the flower shaping tool kit. Using the score-pal for any straight folds needed. Gently bring the curved folds into the cardstock. Adhere the box together by looking to the second box to see the placement of adhering. Apply peeled paint distress ink to all the folds and edges of the Kraft card-stock box.
This box has 8 tags. They are made to different lengths so when finished the lace is seen on each tag. Once the tags are cut from Kraft card stock, find the patterned paper wanted for the tag fronts. Cut these the same size as the tags. Using the paper-distressing toll, distress all the paper edges. Taking the lace die from the Festive Holiday Doily die and the white card stock. (1x doily for two tags) The doily is cut in half in the length, saving ant off cut swirls for use in decorating the front of the box. Both pieces are used. Ink the doily pieces with the broken china and peeled paint ink. Adhere the doily pieces to the top of the tag. Adhere the distressed design paper tags to the Kraft tags. To make the scripture sentiments, use each one of the scripture texts found in the sets Words of encouragement and Words of comfort onto white card-stock. Find an oval that will fit and die cut the stamped image. For each oval sentiment, cut 4x extra from the white card stock to make oval chipboards when the layers are adhered together. Once the ovals have been adhered together, apply ink to the edges with peeled paint distress ink. Adhere to each tag, a completed oval sentiment.
To decorate the box front: Find the design paper with a blue tint that matches the project cut the front mating with the aid of the matting pattern already made. Distress the edges with the paper distressing-tool. Adhere to the front of the box with wet glue or double-sided tape. Adhere the ribbon around the top of the box. Make a full bow and adhere to the left of the box on the ribbon line. Taking the scripture based stamp with “ I am complete in him” stamp this with the coffee archival ink. Find the circle that fits the sentiment and die cut. Die cut 4x extra and adhere these circles together to form chipboard. Apply peeled paint distress ink to the edges of the circle once the adhesive is dry. Adhere to the box front center. Taking the carnation, leaf stamp, and matching dies make 3x carnations by stamping with the archival coffee ink then die cutting. Each carnation has 5x petal layers, 7x leaves. Bring shape to the carnations using the mold as seen in the video above in the instructions. Stamp three carnation buds from the Fanciful Carnations stamp and matching die sets. Bring color to the leaves and buds using the Peeled paint ink for the leaves and Victorian velvet ink for the carnations.
Taking the saved off cuts from the lace doilies, trim away any unwanted details to make a swirl. Arrange and adhere the carnations, leaves and swirls as a cluster, between the circle and the right foot of the box
 Well thats a long post and lots of photos so you should be able to understand how it is all put together.
If you need more help make a comment that I need to contact you, then I shall mail you back...or post the answer.
Have a inky scrappy week, till next time
Sussipoppins inky hugs
OXO


Wednesday, December 13, 2017

Introducing the new Camellia Carnation collection by heartfelt Creations


Hi, to start the new collection off, today I have a tend fold card without a sentiment....
this can be a good thing....a card to save in the stash for a rainy day....you know, the card you need in a hurry and you don't have the time to make right now....lol...

Introducing the Camellia Carnation collection
Beautifully ruffled in delicate layers and commonly gifted to express love, fascination, and distinction, the carnation flower is certainly recognizable and a floral garden and arrangement favorite. Thought to be one of the oldest cultivated flowers in the world and is known to be a wonderful choice for special occasions such as, weddings or just because occasions. With an outstanding reputation as a cut flower, and an amazing array of colors and sizes, it is no wonder that the carnation flower remains so popular today! Heartfelt Creations invites you to celebrate the beauty and gentle humbleness of the carnation with the Camelia Carnation Collection! With a color palette of fiery reds, pastel pinks, sunset orange tones, and lush hues of greens, the gorgeous paper collection brings with it a bold but feminine feel. Filled with attractive carnations clusters, exquisite flower gardens, and decorative lace like details, this pretty paper collection is sure to become a perennial favorite. Two cling stamp sets and coordinating dies come together to create enamoring and realistic carnation blossoms with delicately illustrated details and varying sized petals ideal for assembling full sized carnation flowers to charming mini versions, while a third cling stamp set lends itself perfectly to layering and creating dimensional carnation clusters. So join with us as we celebrate and give recognition to the traditional, but somewhat overlooked and under praised carnation flower!


This card sure was fun to make! Of course using the new 'Floral basic shaping mold' was a bonus....you got to get them! They save so, so much time...and what about the hands!....Yes thats right.....no more pain!
Now sit back, view and enjoy the ride...


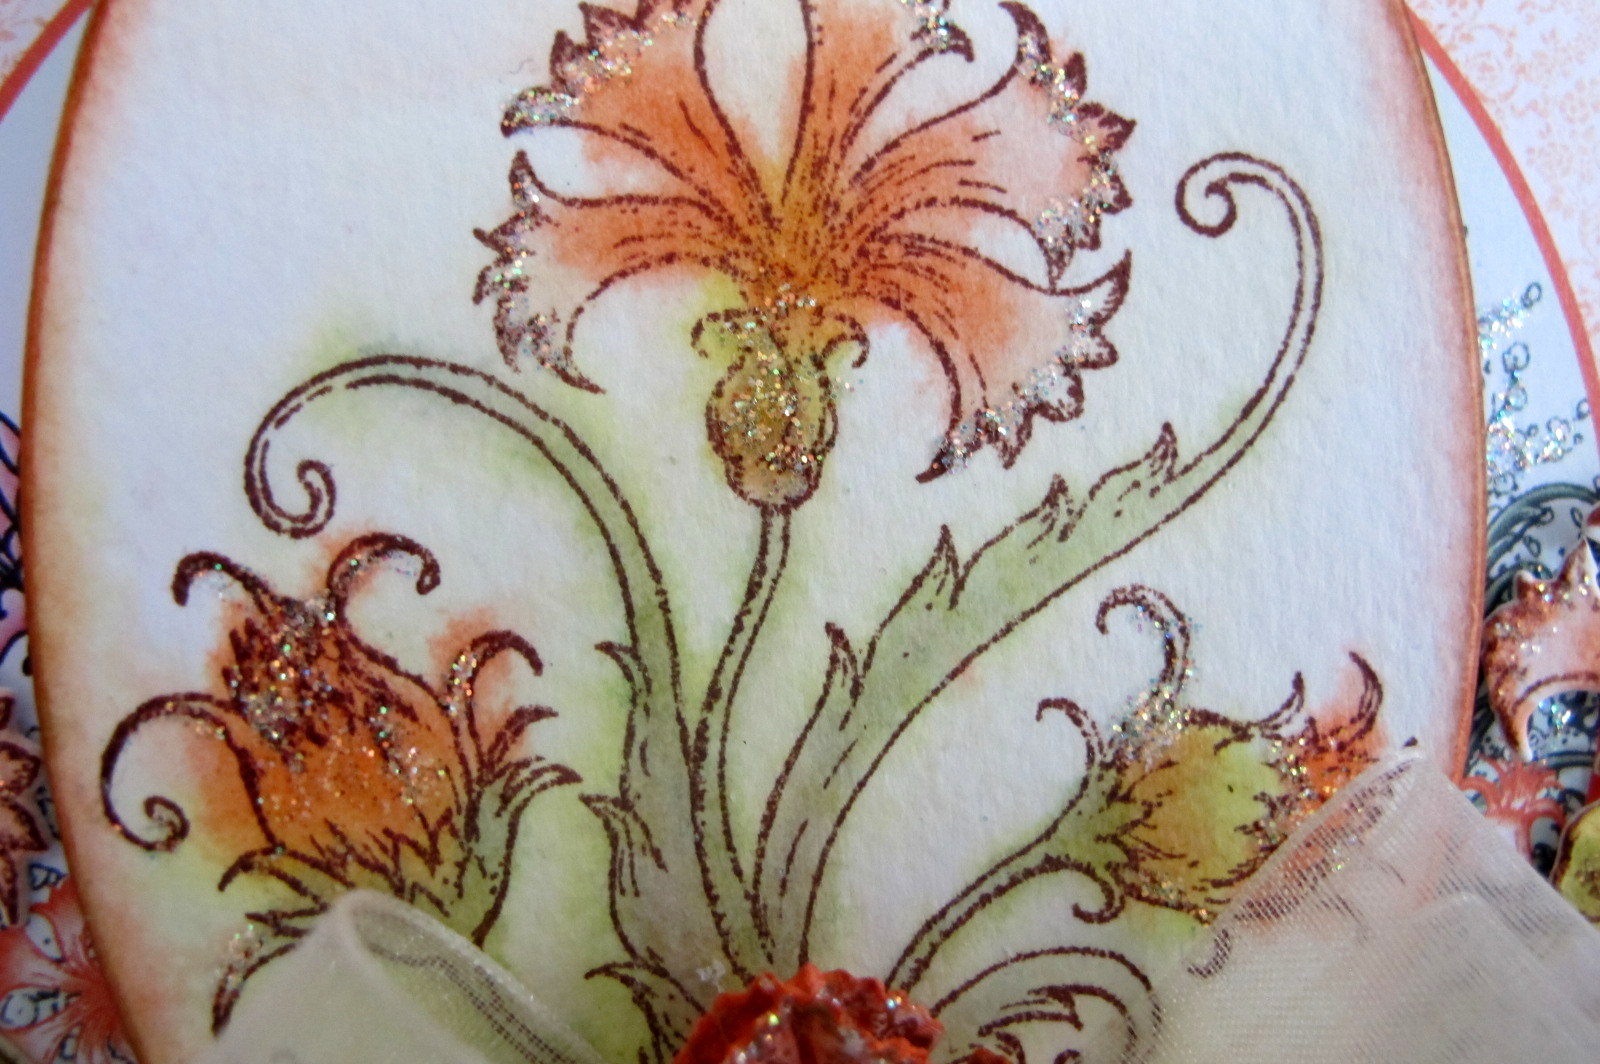
This stamp image is fantastic for water coloring. 


PRODUCT LIST:
Heartfelt Creations Products And Products Carried On Their Website:
 Other Products Used:
Inks: Archival Inks: Coffee. Distress Inks: Fossilized Amber, Ripe Persimmon, Crushed, Peeled Paint. Paper: Watercolor paper. Other: Stickles, Hot Glue Gun, Water Mister, Bone folder, Water coloring brush, Scissors, Ruler, Versa-mark, Light Green Organza Ribbon, Misti Stamping Tool.

INSTRUCTIONS:
VIDEO on making the Carnations 
The finished size of this tent fold card is 5.31in x 5.31in (13.5cm x 13.5cm)
Taking the white cardstock make the tent fold card base. Finding the orange papers for the 1st and 2nd matting. Cut these papers a little smaller than each other, ink all the edges with the ripe persimmon distress ink. Find the card front matting from the design paper prints with a circle in it. Cut this out of the frame and ink the edges as the other papers. Adhere all three matting layers to the card front with 3d foam dots.
Taking the watercolor paper, the stamp from the fanciful carnation stamp set and the coffee ink. Stamp this image 3x. 1x for the oval and 2 for die cutting. Color the images with the inks. Cut the oval using a oval size that will fit the image from the large oval die set. Taking the white cardstock, cut 4x extra of the ovals. Adhere all the oval layers together to form a oval chipboard. Ink the oval edge. Put aside.
Finding for the leaves, the green design paper from the collection and orange colored design paper fro the carnations. Taking the small camellia carnation stamp set and matching die set. Stamp and die cut the petals 3x for each of the two flowers and 8x leaves. Make the carnation flowers as seen in the film. Bring shape to the leaves using the flower shaping tool kit.
Taking the organza ribbon make a full bow. Adhere the ribbon across the foot of the card front. Adhere the oval to the center of the card front. Adhere the carnation flowers to the top and under the bowknot. Adhere a few leaves to the bow and under the bow. Taking the carnation image that has been die cut earlier. Trim away the buds, give them shape using the flower shaping tools Adhere these between the carnations on the bowknot. Using the remainder of the trimmed image, adhere these to each side of the oval and under the bow. Add the carnation bud to the cluster. 
To finish the card, apply the diamond stickles
*****
thats it for today...be back next Wednesday with more yummies,
till then, scrappy inky hugs.
Sussipoppins
OXO

Tuesday, December 12, 2017

Snow Globe Crafters Companion love today because...

...it's snowing.


Code red yesterday...which means...stay at home!
It's safer...so what better than a snow globe to set the mood.


I love the cut out snow fakes....pop them out and you have auto 3d.
A few blue crystal bling stones for the centres....beautiful!


A triple organza bow at the foot with more bling....wow.


Glitter behind the pop out snow flake round...makes any glitter girl happy.


Embossing folder inked with tumbled glass ink, sets the tone. Got to add that stickle glitter to the high lights of the embossing.
The dark blue matting pops the white.
I hope you have been inspired to try this out. Well worth the effort on these snowy chilly days.
Inky hugs, till next time.
OXO
*******
PRODUCT LIST:
SNOW GLOBE Base  DS-MMX-SGB
WHITE CHRISTMAS DS-CX-WHCH
EMBOSSING FOLDER 3d HOLLY & IVORY FRAME EFS-3D-X-HOL
PEARLA WHITE-HINT OF SILVER A4 300gm card-stock
Stickies-Stardust
3d foam tape
Tumbled Glass distress ink
Dark blue card-stock
Blue organza ribbon
Blue crystals

Wednesday, December 6, 2017

This Wednesday is the last of the...

 ...adorable 'HEARTFELT LOVE' collection showing...
..for now....lol, but, as always there will be more for sure at another time. 
So enjoy the journey today.


‘Praying for you’ 

Heartfelt Creations Product List:

Other Products Used:
Pan-Pastels: Pink-26603, Green-26083. Card-stock: Pink, Dark Pink. Inks: Forest Moss, Victorian Velvet distress inks, STAZ-ON Black Cherry. Other: Bone folder, Craft mat, Scissors, Ruler , Sate skewer, Versa-mark, Fussy Cutting Scissors, Double sided Tape, Double Sided Foam Tape, Misti stamping tool, Hot glue Gun.


Instructions:
The finished size of this card is 6.102in in x 5.31 in (15.5 cm x 13. 5 cm)
Taking the white card-stock, make a tent fold card base 5.31 in x 5.31 in (13.5 cm x 13. 5 cm) Take the pink card-stock and make the matting a little smaller than the card base. Adhere the matting to the base with 3d foam dots. For the card front, take the pink card-stock and cut to 3.858in x 4.803in (9.8 cm x12.2 cm) Find the paper in the collection with the verse beginning with “There is strength for every burden,” Trim this so it fits the pink card-stock. Ink the edges with the Forest Moss and Victorian Velvet distress inks and daubers. Adhere together using double sided tape. Taking the dark pink and pink card-stock and the lace border die from the Sweet Borders die set, die cut this 2x each colour.  Adhere the two colours back to back. Trim to fit a border at both sides of the card front. Adhere in place; adhere also along the card front bottom edge. Adhere this to the card front with 3d foam dots so it peeks over the top of the card base 0.787in (2cm) For the banner, find the stamp in the Banners of Love stamp and matching die collection. Stamp the image using the gold embossing powder onto the white card-stock. Die cut 4x extra from the white card-stock, adhere all the layers together to form a chipboard banner. Adhere the banner in place by using the 3d foam dots.


To make the flowers:
To see how to shape the petunia, watch the video at https://youtu.be/KOy_qNB9OAk.
 For more tips on creating with the foam paper & stamp; stamens, watch the tutorial at https://youtu.be/Oma6ctVmUD0

 The flowers are made from the art foam paper and green stamens. They are coloured using the pink and the leaves the green Pan-Pastels. Make the leaves using the same method as the flowers. Arrange and adhere in place around the card front corner and the banner, using the hot glue gun. To make the screw swirls, take the dark pink card-stock and cut small strips of card-stock .039in (1mm). Wrap the card-stock strips around the sate stick. This will form a screw. Trim the screw to the length wanted. Adhere in place using the hot glue gun, pull to stretch the screw out so you will get a swirl screw effect. Add more to the flower clusters as fillers. This card has 10.


Don't you love the foam flowers!?!....I can't get enough of them!
Can't wait till you can see next weeks new release...a door is going to open to a whole new world for you...lol
Till then happy scrappy hugs
Inky love from Sussipoppns
OXO


Tuesday, December 5, 2017

...a different kinda love from Crafters Companion this time...

hi...this sure is something different for me! But I like it!


This card is featuring the Crafters Companion new 'Flutterby' Collection
A truly beautiful collection with dies, embossing folders, luxury papers and luxury card-stock.


Above a details look at this fantastic butterfly!
Here I have coloured two and layered to get a in flight 3d look.
....and yes....the stamp has a matching die! We all know how I love the stamp and die sets that match.
There is another set that complements this one...just haven't got it yet...but it's on the must have list!
The under butterfly is cut in two at the body. Cut away the body and adhere off center with 3d foam dots to keep the wing hight.
You can go crazy colouring this large butterfly! Great for practising and using 'ALL' the pencil colours.


The sentiments have been taken from the Crafters Companion Holly Hobbie 
'Life's Treasures' stamp set.
Thats another stamp collection I had to invest in...sorry to say no dies though. But because they are so adorable I had to have them.....had to have them all! So you will see them posted at some stage.
pssst....I've been colouring them today....I made time for it....lol.
A tip about the stamping on this beautiful matte foiled card stock....you have to use the Staz-On ink. If you don't, it won't show up for the party.


A close up of the die cutting of the cute little butterfly's. Save the butterfly's to use as confetti or adding to cards. The die has been used twice on this card front at different heights to give a staggered look. See how this luxury card-stock shows through the die cuts....loving this! It's aptly called 'Arrangement of Butterflies'
Another tip for this die: Use it to make your own stencils
Leaving you with that note, sending happy scrappy love,
Sussipoppins
OXO


PRODUCT LIST:
Metal die set-Arrangements of Butterflies
Luxury Foiled card pad
Stamp and Metal die- Botanical Butterfly
Stay-On black ink
3d Foam dots
Spectrum Noir-Colour Blend pencils