Wednesday, March 29, 2017

“ Relax it’s your special day “


This card is for some that need reminding to relax....lol...I'm not one of them...Ha Ha!


Heartfelt Creations Products And Products Carried On Our Website:

Other Products Used:
Paper: aquarelle paper 170gm, Pearl finished creamy yellow cardstock.
Double-sided foam tape, Double sided tape, Archival ink jet black, Stickles stardust, 
Coloring: Spectrum Noir Color Pencils: Leaves: 047, 102, Palm tree: 058, 047, 110, Hammock: 026, Monkey: 100, 008, 026, 101, 098, Flowers: 009, Coconut: 111, 110, Winsor &Newton Oil Color solvent, Blending stumps


Instuctions:
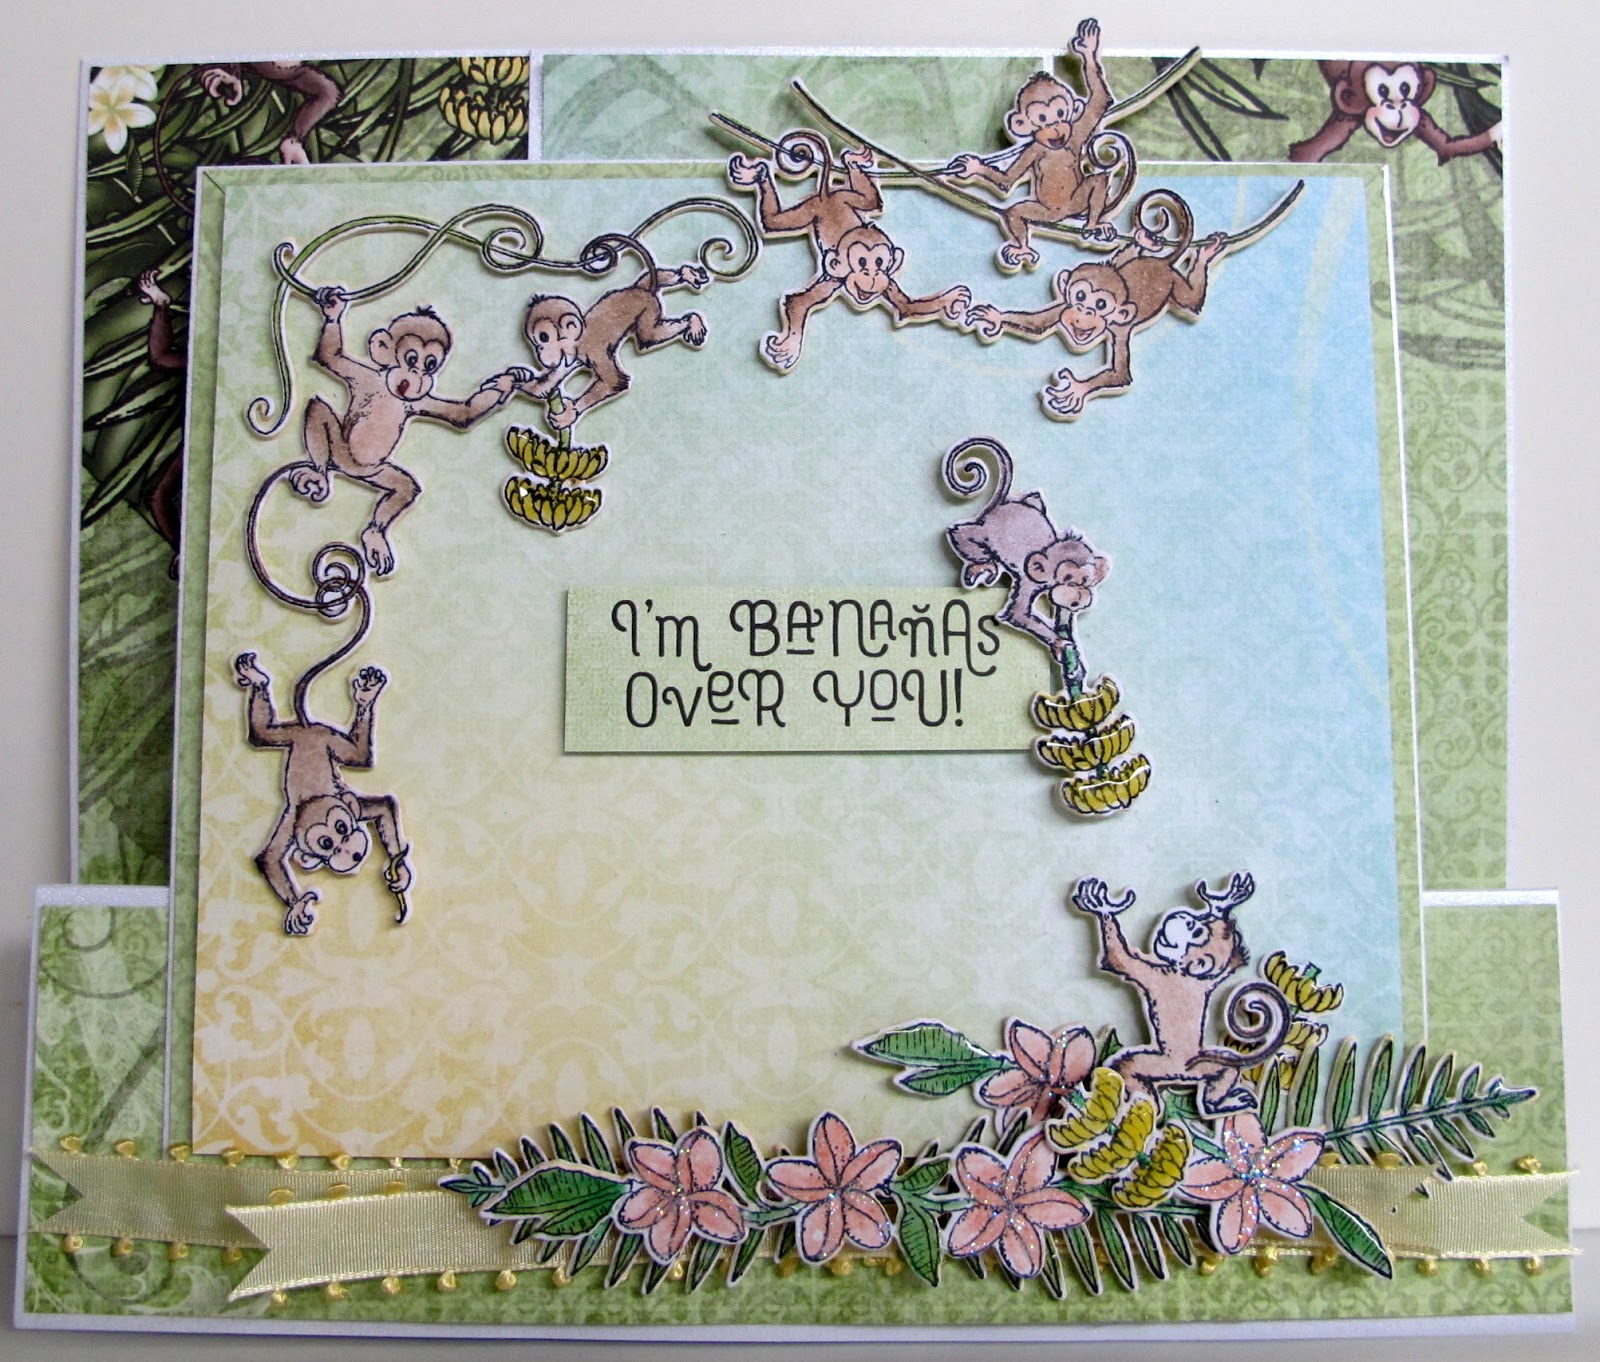
This tent fold card measures five and three quarters of an inch x five and three quarters of an inch. (14.5 cm x 14.5 cm ) when finished. Taking the card stock make the card base. Cut for the card front from the same cardstock four and a half x four and a half of an inch (11.4 cm x 11.4 cm ) Cut from the design paper in the paper collection, for the card base five and a half x five and a half of an inch. (14 cm x 14 cm ), for the card front four and a quarter x four and a quarter of an inch. (10.8 cm x 10.8 cm ) Adhere the design paper matting to the card base with double sided tape. Adhere the card front to the card base wit 3d foam tape or squares. Stamp the images, color the die cut. Die cut 4 extra layers for each image; adhere together in layers to form chipboards. Arrange and adhere to the card front. Find the sentiment in the paper collection and adhere to the base of the palm tree and under the monkeys tail with 3d foam tape or squares. Apply crystal lacquer to the coconuts and stickles to the flowers.


Here you see the stickles and crystal lacquer use to enhance the images.


Below a side view so you can see all the layering


Thanks for stopping by to visit my place,
till next week....have a scrappy time.
Inky hugs and sussipoppins kisses

POST NOTE: All my craft gear is back from storage and now my room is finished...
(a long haul, we started last year -round August, the builders started 1st October with promises of finishing 24th Dec.  we still have a few things need finishing like stair banisters painting etc before carpeting the stairs.)
My work is not yet done.....a woman's work is never done!.....lol. I have been sorting and relocating all my toys....this has been frustrating as I get side tracked then all I want to do is play....amazing what one collects over the years!....but it was a much needed task and it is starting to give the pay off now. Truly, I do need it all....lol....well thats the story I'm sticking to anyway.
It's been a long haul...falling down stairs, spraining ankles and DH sawing into tops of fingers....
(thats why the stairs are not finished...I need to jump in there and start sanding and doing the prep...not really my thing)...yes it has been fun....lol...but well worth the venture. I have a wall of windows, so lots of natural light the whole day, for the night true daylight lights and once all the clutter has it's place...lots and lots of working space....long live Ikea! I have to find the time to get those photos done so I can post them for you...now that will be a giggle...lol...never enough time in the day!
Will be hanging curtains today.
Hugs


Wednesday, March 22, 2017

"Im Bananas Over You"

Hi a simple cute card for you today,
"I’m Bananas Over You"  


Heartfelt Creations Products And Products Carried On Our Website:


Other Products Used:
Paper: aquarelle paper 170gm, Crafters Companion Hint of Gold 300gm, Cream or white cardstock. Double-sided foam tape, Double sided tape, Glue dots, Archival ink jet black, Stickles stardust, Yellow ribbon. Coloring: Spectrum Noir Color Pencils:
Palm Branches: 047, 102, Monkey: 100, 008, 026, 101, 098, Flowers: 009, Bananas: 016, Winsor &Newton Oil Color solvent, Blending stumps


Instructions: 
This card when completed measures seven inches x eight and a quarter inches. The measurements to make this card are as follows. The card base: eleven and ten sixteenths x eight and a quarter of an inch, make folds at seven inch and nine and five sixteenths of an inch along the longer edge. The card foot will then measure two and five sixteenths x eight and a quarter of an inch when the folds are folded into hill and valley folds. Cut the card front, six and elven sixteenths x five and a half of an inch the slider two and three quarters x four and a quarter of an inch. The slider stay:- four and a quarter x two and three quarters of an inch. Taking the design paper from the paper collection, cut matting for the card foot, card front, slider and card background about two sixteenths of an inch smaller than the base. Adhere this to the card base. Cut the second design paper matting for the card front about one quarter of an inch smaller than the card base. Adhere this with 3d foam tape or squares.
Taking the slider, adhere only up to a half of an inch of the top of the slider to the center of the card base background. Taking the slider stop, place this on the back of the card front so the slider will slide up and down to allow the card to stand and lye flat. This slider allows the card to stand without falling when loaded with 3d embellishments. 


Find the sentiment in the paper collection, cut and adhere to the center of the card front with foam squares. Stamp, color and die cut all the images from the collection. Cut 4-6 die cuts extra to make into chipboard by adhering in layers. Place and adhere two layers of yellow ribbon across the foot of the card. Arrange and adhere in place all the self-made chipboard images as seen on the card photo. Add stickles to the flowers and crystal lacquer to the bananas and palm branches to finish the card.


Don't you love these check monkeys. They are so much fun when the crystal lacquer is added, see you next week for more monkeying around fun.
Till then, scrappy inky hugs from sussipoppins

Wednesday, March 15, 2017

Hang in there Wednesday

Hi, this Wednesday I have a simple but cute card for you. 
Again, from that monkeying around collection!


“ Hang in There ”

Heartfelt Creations Products And Products Carried On Our Website:
Other products used:
Paper: aquarelle paper 170gm, Crafters Companion Hint of Gold 300gm, Cream or white cardstock. Double-sided foam tape, Double sided tape, Glue dots, Archival ink jet black, Stickles stardust, Yellow ribbon, Coloring: Spectrum Noir Color Pencils: Leaves: 047, 102, Monkey: 100, 008, 026, 101, 098, Flowers: 009, Winsor &Newton Oil Color solvent, Blending stumps


Instructions:
This card when completed measures seven and a half x eight and a quarter inches. The measurements for this card are as follows. The card base: eleven and ten sixteenths x eight and a quarter, make folds at seven inches and nine and five sixteenths of an inch along the longer edge. The card foot will then measure two and five sixteenths x eight and a quarter of an inch when the folds are folded into hill and valley folds. Cut the card front, six and nine sixteenths x six and nine sixteenths of an inch the slider, two and three quarters x four and a quarter of an inch. The slider stay, four and a quarter x two and three quarters of an inch. Taking the design paper from the paper collection, cut matting for the card foot, card front, slider and card background about two sixteenths of an inch smaller than the base. Adhere to the card base. Taking the slider, adhere only up to half an inch of the top of the slider to the center of the card base background. Taking the slider stop, place this on the back of the card front so the slider will slide up and down to allow the card to stand and lye flat. This slider allows the card to stand without falling when loaded with 3d embellishments. Find the sentiments in the paper collection, cut to size and prepare by backing with 3d foam tape or squares. Stamp, color and die cut the image of these two cute monkeys and two large palm branches using the above sets from the Monkeying Around collection. Cut 4-6 die cuts extra to make into chipboard by adhering in layers. Place and adhere the double bowed yellow ribbon across the foot of the card. Adhere the sentiment to the center of the bow with an extra foam dot if needed. Place the longer sentiment below the bow.  Adhere the palm branches to the top right of the bow, then the cute pair of monkeys. Add one of the flowers from the flower boarder to above the monkey’s ear. To finish apply stickles to the flowers. 

*****

This is what the slider guide looks like when it is adhered to the card base top before decorating.


Below you see the placement of the slider stop behind the slider before adhering to the card front back


here you see where to add the glue. Double sided tape will not hold as it gets a lot of movement.


A side view of all the layers


I hope this helps anyone that has had trouble with the making of this card base.
Till next week with another monkeying around card . 
Inky hugs from me to you,
Sussipoppins love.


Wednesday, March 8, 2017

Welcome to Heartfelt Creations Wednesday, introducing the "Monkeying Around " collection

Are you ready for an adventure?  Grab your water bottle, sunscreen, and safari hat and join us as we explore exotic jungles taking in the lively and entertaining antics of the new Monkeying Around Collection by Heartfelt Creations!  Filled with amusing illustrations of ever so charming monkeys, this newest collection is sure to have you “going bananas” with excitement!  Four entertaining cling stamp sets supply you with an assortment of fun filled, mix and match monkey images to create just the right amount of monkey mayhem for any of your paper crafting project needs, while various sized palm tree fronds, floral accents, bananas, coconuts along with lush palm tree die cuts add a dimensional tropical feeling to your projects with ease!  Trek through a paper collection filled with deep jungle greens, sunlit yellows and ocean like blues, accented with balmy breeze teals, pretty floral pinks and a hint of sunset reds creating just the right tropical color palette to showcase these adorable apes on cards, scrapbook layouts or altered art pieces.  So, come along with us as we join in with the monkey chatter, swing from vine to vine and take part in the shenanigans of the new Monkeying Around Collection!

Slider card- "Hope You Feel Better Soon"
Heartfelt Creations Products And Products Carried On Their Website:
Other Products used:
Paper: aquarelle paper 170gm, Crafters Companion Hint of Gold 300gm, Cream or white and Brown cardstock, Double-sided foam tape, Double sided tape, Glue dots, Archival ink jet black, Stickles stardust, Brown twine, Prick pen. Coloring: Spectrum Noir Color Pencils:Palm branches: 047, 102, 058, Monkey: 100, 008, 026, 101, 098, Flowers: 009, 058, 047, 110, Winsor &Newton Oil Color solvent, Blending stumps


Instructions: 
This card when completed measures seven inches x eight and a quarter inches. The measurements for this card are as follows. The card base: eleven and twelve sixteenths x eight and a quarter of an inch, make folds at seven inches and nine and five sixteenths of an inch along the longer edge. The card foot will then measure two and five sixteenths x eight and a quarter of an inch when the folds are folded into hill and valley folds. Cut the card front six and eleven sixteenths x five and a half of an inch, the slider two and three quarters x four and a quarter of an inch. Taking the brown cardstock, cut matting for the card foot, card front and card background about two sixteenths of an inch. Adhere to the card base, but please NOTE, for the card front, adhere only the sides and bottom of the brown cardstock to the card base, leaving the top open. For the cards design paper matting, cut this also two sixteenths of an inch smaller than the brown matting. For the card front, find the framed print in the paper collection, cut out and adhere to with 3d foam dots or tape. Taking the slider, matt it the same as the card base and foot. Adhere only up to half an inch of the top of the slider to the center of the card base background. Slip the slider in between the brown cardstock and card front base. The slider will now allow the card to stand when pulled a little. This slider card is strong enough to hold a lot of 3d embellishments when placed.


 Find and cut the sentiment also from the collection papers. Make two holes for the twine. Thread the twine through the holes and tie a knot each end, this will be later adhered so the monkeys will be holding it. Stamp, color and die cut the monkeys, flower borders and palm branches from the matching stamp and die sets. 


For the flower boarders and monkeys cut 4 extra for each image, cut 2 extra for the palm branches. Stack and adhere the stamped images so they form chipboard. When the glue is dry, arrange and adhere in place. Tuck the twine under the monkey’s hands. 


Apply the crystal lacquer to the monkeys and stickles to the flowers.


Arn't these monkeys adorable...they get up to all kinds of shenanigans. I hope this collection inspires you to do the same in your craft space.
Till next week, have a scrappy inky time.
sussipoppins inky hugs.
OXO


Wednesday, March 1, 2017

This Heartfelt Wednesday another flowering dogwood card for you...


Hi, this Wednesday I have a panelled card for you. I hope you enjoy scrolling today as much as I did making the card. 
Single Dove panelled card


Heartfelt Creations Products And Products Carried On Our Website:

Other Products Used:
 Card Stock: Eggshell white, Green, Aquarelle paper (170gm)
 Ranger: Stardust stickles, Heat Gun, Water Mister, Inking foam tool.  Bone folder, Water coloring brush, Scissors. Distress Inks: Forest moss, Peeled paint, stormy sky, Gathered twigs, Milled lavender, Dusty concord. Other: Versa-mark, Double sided Tape, Double Sided Foam Tape, Scoreboard, Misti, Hot glue gun

Instructions:
 Click HERE   to see how to make the dogwood flowers.


The finished size of this card is   7”  x  6”  Take the egg shell white cardstock and cut the card base 5“ 6/16th  x 10“ 1/16th. Make the folds so the card front measures 3” and the ends are 1“ 3/16th. Cut the matting from the design paper a little smaller than the panels.


Ink the edges of the matting with the gathered twigs then adhere to the panels. Taking the eggshell white cardstock cut the borders x 4 and Botanic windows x 2. Trim to fit the panels. Ink the Botanic windows with the gathered twigs then adhere to the card front and panels with 3d foam tape.


Taking the gold embossing powder and aquarelle paper, stamp, die cut and color the flowing, flowering branches, leaves, flowers and dove. Shape the flowers and leaves with the flower shaping tool kit.


Die cut the stamens from the green cardstock then adhere to the flower centers. Adhere all to the card front and panels as seen in the photo of the card. Once all is secure and dry, apply stickles to the doves feathers and flowers.


Next week we have a new collection for you..yes we will be Monkeying around...all month...lol
Inky hugs and wishing you a happy scrappy day.