

Trying something new with the posting...all constructive feed back is welcome.
Below, is the mini book book preseanted open. You get to see the tags out of their pockets. See how the inked edges fade into the centre, so what ever you write will look fantastically great, made with love...LOL That is why it is important to take the time to ink the edges, then you get that royal, luscious look.

Below, you can see how the red die cut paper folds around the spine on to the back of the book. The water splatters gives an aged look to the book. An option you can delete if it is not your thing.

Zooming in here to show you the stitching with gold thread also the gold embossing that gives the cover papers that yummy texture.

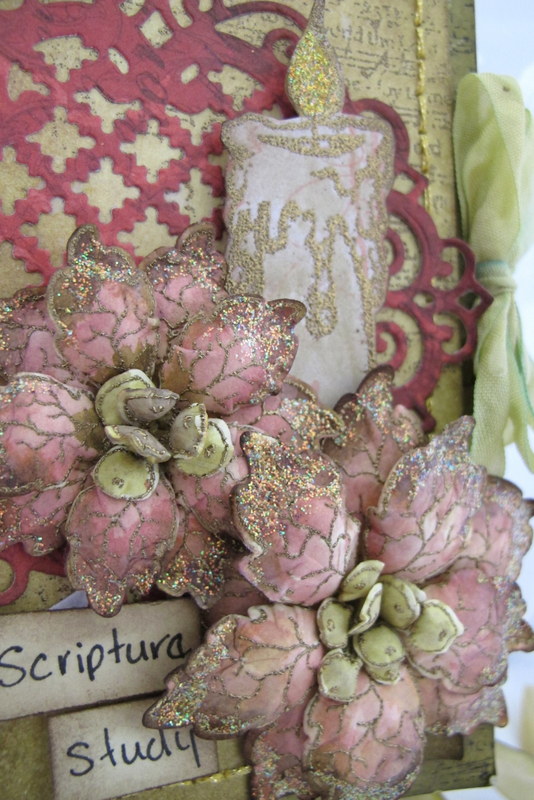
Show casing the candle and the Poinsettias. A bit of fussy cutting going on here...The title, tucked under and into the flower cluster. If your hand writing is not the best, may be you can print a font to use. Or invest in a alphabet stamp small enough for the job....have fun finding one you like....LOL....I know how painful and time consuming that one can be....
Now a look inside the book...remember you can make and addapt this book for any purpose...always remembering.... it is your party.

You can see what I did with the inside, You can dress it up even more if you wanted. There is plenty of room to write notes to your self and glue pictures. You could even make a lot more tags.

On this page the paper strips each have one of the fruitage's of the spirit featured in the scripture. You will find this in, Galatians 5:22 and 23...great way to use bullet reminders.

A reminder of what the finished book looks like after all those close ups

I think this is a great basic mini book idea because, it can made to cater to any occasion, subject, can be placed on the coffee table as a show peace or just so you have it handy to review a few scriptures you want to remember. The book will also make a wonderful gift for someone dear to the heart....you could think about making a presentation box to go with it. Now that would be a wonderful gift to receive!
Don't forget you can always adapt the theme of the book it to fit the needs of the day....occasion....person...or age
I wish you much fun making these wonderful poinsettias for this project and many many scrappy hours getting inky fingers...
Hugs sussipoppins...xox
Here is the Product list and instructions:- ( Trying something new...I have presented it this way so it will, maybe, easier to print off...hopefully...)
Study Scripture mini book.
Heartfelt Creations products and other products sold on our website:
HCDP1-255 Blazing Poppy paper collection
HCPC-3684 Sparkling Poinsettia cling stamp set.
HCPC-3683 Joy to the World
HCPC-3682 Sparkling Poinsettia Swirl cling stamp set
HCPC-3681 Poinsettia Candle cling stamp set
HCD-743 Raindrops on Roses die set
HCST1-416 Deluxe Flower Shaping Kit
387623 Stamp Positioner
159723 Art Institute Glue- clear drying
352854 Metal Glue Tip-Art Institute
DDOTS Double Dots- 3d foam squares
TSMP900 Memento Tuxedo Black
173842 Scor-pal
Other Products:
Paper: 4 x pale yellow / natural colored card stock 30 x 30, Masking paper. Ranger: Gold embossing powder, Heat gun, Prick pen, Ink foam tool, Water-mister, Watercolor brush. Distress Inks: Walnut Stain, Victorian Velvet, Aged Mahogany, Forest Moss, Antique Linen, Bundled Sage, Mustard Seed. Stickles-diamond. EK Success: 1 " Circle punch, Corner punch-large.
Other: Glue dots. Versa-mark, Silk seam binding ribbon-1 meter, Gold thread and needle, Black writing pen. Bible for scriptures.
Directions:
This mini book when finished measures 15.2 cm x 7.8 cm. To make the mini book base you need 2 sheets of card stock. 30cm x 30 cm. Score or fold in half. Turn the paper, score or fold in 1/2, cut along this fold line to the last fold line. Repeat with the second paper. Fold and arrange the papers in the book form so you get a pocket every second page. You can punch and ink the paper now if you want but I did it after gluing the pages together. Use wet glue on the edges to adhere. (If you use double sided tape, the sticky from the tape will not dry and some times the tag will stick to it from the inside of the pocket) Punch a half circle in the top of the pockets. Give color to the pages and pockets with the distress inks. Taking the background stamp, using the music part of the stamp, stamp across all the pages, including the front and back of the book, with black ink. For the book cover, cut 15 cm x 14 cm from the same card stock as the book. Taking again the background stamp with the gold embossing powder this time using the whole stamp image. Ink up the paper. Flick a few spatters of water over the inked cover to give an aged look. When dry, prick wholes along all the edges and embroider this with the gold thread. With this same paper, score a 1 cm spine for the book. Please NOTE, every book is different so check this before scoring and adjust if needed. Take the seam binding ribbon and color this with the distress inks to match the book color. Make a double bow.
With the remaining ribbon, adhere a length to each the front and back at the center edge. This will become the book closing, so you need to adhere at least 2cm into the page to make it strong. First adhere the cover at the spine then to the front and back of the book. This will also hide the ribbon ends. Find the red paper from the paper collection and die cut the frame using the raindrops die set. Ink the edges of the frame, and then adhere to the book cover. You need to decorate the inside of the book before you go any further with the front cover. Cut papers from the paper collection to fit the inside pages as wanted. Make a few pockets by punching half circles and making pockets for the pages. Because this is a scripture study book, I used masking to use the stamps to fit from the Sparkling Poinsettia collection HCPC-3683 and HCPC-3682. For the scripture tags cut 1 cm x 10 cm strips from card stock. Ink the edges with the Walnut Stain ink. Write the scriptures from the Bible what that you want to highlight. Make also for the book Titles Scripture Study Cut from card stock cards 9.5 cm x 4.7 cm to write out the scripture text and adhere them where wanted. Because there is a lot of pockets you can add or take away later what you want. To make the tags: Cut 16 cm x 6.3 cm and 13 cm x 6.3 cm for each page pocket made. With the Joy to the World stamp set, take the stamp image with the swirled heading. Mask the Joy to the World words so you have only the heading. Stamp this at the top of each tag with black ink. Ink the edges with the distress inks to match the book. Make your Poinsettia flowers by stamping with gold embossing powder, and using the matching dies to cut out. The Poinsettias are colored with the distress inks. Use the Deluxe Flower Shaping Kit to shape and ball the flowers. Using the water-mister to soften the card stock while shaping. Find the candle image in the Sparkling Poinsettia Candle stamp set. Stamp the candle with the gold embossing powder and fussy cut the image. Order of placement for the embellishments: Adhere with a glue dot, the double bow to the point where the ribbon ties and frame meet. Arrange and adhere the, title, Poinsettias and candle. To give the Poinsettias their sparkle, add stickles to the points of the petals.
This is so heartwarming Sussi. I love all the care and love you poured into this piece. I myself would gave a really hard time parting with it & sending it in. Fantastic! Hugs
ReplyDeleteSussi, I just love this design! The aging, inking, distressing, embossing...all beautifully done! Those embossed poinsettias...ooh la la! You put so much love into this...and it shows!
ReplyDeleteAbsolutely gorgeous. I love everything about this.
ReplyDeleteSussi, this mini book is absolutely gorgeous :) the inked edges and all of the wonderful detailed added touches makes this so special. I too would have a hard time parting with this one my friend :)
ReplyDeleteSuper tutorial Sussi! I love your mini book; so many layers and details. Great distressing and embellishments! Hugs
ReplyDeleteWhat a great little book and the step by step descriptions are really useful Susan! I absolutely love those teeny tiny scriptures strips, what a fun idea! You are always so creative and it's so much fun to visit your blog!
ReplyDeleteSussi, this is fantastic and would be such a wonderful gift to receive. Your attention to detail is incredible...and the coloring of the poinsettias is stunning!
ReplyDeleteHugs,
Tracey