
Hi! It's Wednesday again..
It is also the second Wednesday of the month....that means Heartfelt Creations monthly release!
Will we ever have enough?
NO, not when you see this one! It certainly is a must have. May be you might want to think about investing in the total collection...
"I want it ALL"
Paper, birds, bird houses, flowers, leaves and branches. To top it off....new, fantastic packaging!
The flowers are small and sweet, these complement the stamps and dies you all ready have. The birds are plump and very cute. Color them to your needs, use them for LO's, cards, tags even mixed media......the sky is the limit!
You even get two sets of leaf types with dies to match....go and take a look for yourself.
This collection will be such fun, it can assist you to come even more out of the box and create....as die hard scrappers, we are into that!
I call this "Hanging Around"....because it's a door hanger. Have fun....


********
NO, not when you see this one! It certainly is a must have. May be you might want to think about investing in the total collection...
"I want it ALL"
Paper, birds, bird houses, flowers, leaves and branches. To top it off....new, fantastic packaging!
The flowers are small and sweet, these complement the stamps and dies you all ready have. The birds are plump and very cute. Color them to your needs, use them for LO's, cards, tags even mixed media......the sky is the limit!
You even get two sets of leaf types with dies to match....go and take a look for yourself.
This collection will be such fun, it can assist you to come even more out of the box and create....as die hard scrappers, we are into that!
I call this "Hanging Around"....because it's a door hanger. Have fun....
Heartfelt Creations Products and Products Sold On Our Website:
HCPP1 250 Birds and Blooms Collection Paper Pad
HCPC 3648 Home Sweet Home Cling Stamp Set
HCPC 3645 Leafy Branch Cling Stamp Set
HCPC 3644 Birds and Blooms Cling Stamp Set
HCD1 757 Leafy Branch die
HCD1 756 Birds and Blooms die
Crystal Lacquer
Paper Blossoms Tool Kit
Paper Blossoms Molding Mat
Stamp Mat Pad
Speed Ball Brayer
Zip Dry Glue
Double Dots
Hydra sponges
Other Products Used: Inks: Tim Holtz Distress Inks: Worn Lipstick, Peeled Paint, Walnut Stain, Peacock Feathers. Archival: Jet Black. Ranger: Water spritzer, Ink applicator. Other: Water color brush, card board box, gesso, white acrylic paint, paper to make a template.
The size of this project is 25 cm x 10.2 cm. For the preparation work: To make the door hanger template shape, starting from the bottom, measure 17.5 cm, 4.6 cm for the circle hole, 2.9 cm for the hanger hook. This will give you a length of 25 cm. Cut it two times from cardboard. Chose papers from the paper pad. Cut two shapes from the paper with a soft blue/green color, one for each side of the hanger. From the same paper, cut a piece 14.7 cm x 5 cm. Using the template cut the same shape, but 3mm smaller and just above the circle line from the pink colored paper with the green swirl on it.
Choose an oval with a boarder from the paper pad, fussy cut this out. Cut also a cardboard to fit the oval. Adhere them together. Using the HCPC 3648 cling stamp set, stamp the birdhouse image with Jet Black ink on the oval. Stamp the flower part of the image another three times on the off cuts from the pattern paper.
To make the buds and blooms use the HCDC 3644 cling stamp set and the matching HCD1 757 die. For the 6 smaller rose buds you will need 1 bloom each, for the 12 blooms you will need 2 blooms each.
To make the leaves use HCPC 3645 cling stamp set (the image with the four leaves) and the HCD1 754 die. Stamp and die cut it 8 times.
To create the twig, I choose the short fuller one. (Note: I first stamp all the images, color them with distress inks and then die cut or fussy cut them.)
Apply the crystal lacquer to the green swirl on the paper already attached to the hanger, also to all the stamped blooms. Put aside to air dry.
To make the blooms: you will need a water spritzer, Paper Blossoms Tool Kit and Paper Blossoms Molding Mat. First, turn the flowers with the not stamped side up and lightly mist all the die cut blooms. When almost dry, shape the blooms with the balling tool and mat. Flip over 12 of the blooms, stamped side up, press into their center with the balling tool. This will raise the petals. Put aside till all are air-dried. These blooms will stay hard when dry.
Now take the remaining 12 blooms, Paper Blossoms Tool Kit and Paper Blossoms Molding Mat. Ball in the center so the bloom petals curl into a ball. Apply glue to the inside petals and hold till the glue dries, thus keeping its shape. Apply the same balling method for the rose buds.
Putting it all together: Glue both cardboard door hanger shapes together. Using a sponge, apply gesso to both sides and when it has dried another layer of white paint. Ink all paper edges with Walnut Stain distress ink. Attach to the hanger shape: 1st the blue/green paper layer, 2nd - the pink paper layer, 3rd - the rectangle blue/green paper layer. Curl the edges up a little then glue these papers down. The 4th layer is the oval paper glued to the cardboard. The 5th layer is the stamped and colored image of the birdhouse and blooms. This is raised by cutting 2 pieces of cardboard, stack and wet glue to the back. Slide a little so you will not see it from the front of your work.
Once the glue is dry, you can start placing the embellishments you have already made. Tucking the blooms, twigs and leaves in and under the layers. Add the balled blooms. Wait till the glue is dry, then, add the crystal lacquer to the blooms. To finish, add a touch here and there of gesso on the blooms and the edges of the curled paper.
(A good tip: I dab my finger in a blob of gesso to do this. This lets me have more control of how much or little I use on the project.)
Heartfelt Creations Products and Products Sold On Our Website:
HCDP1 250 Birds and Blooms Collection Paper Pad
HCD1 757 Leafy Branch Die
HCD1 756 Birds and Blooms Die
HCPC 3649 Birds and Blooms Collage Cling Stamp Set
HCPC 3646 Fluffy Birds Cling Stamp Set
Other Products Used: Paper: SUP Whisper white card, White card stock. Inks: Ranger Tim Holtz: Broken China, Pumice Stone. SUP Marker Pens: Regal Rose, Soft Suede, Tempting Turquoise, Always Artichoke, Tangerine Tango, Basic Black. Spellbinder Die: Majestic Elements S5-160. Other: Diamond Dust Stickles, Water pen paintbrush, Heat gun, Wet Glue or Double Sided Tape.
This card size is 15.7cm x 12.5cm. Cut the card base with the white cardstock 15.7cm x 25cm. Make a fold at 12.5cm. Using the pale teal blue design paper from the paper pad, cut 12cm x 15.2cm. Chose a matching frame from the paper pad. Cut this to 13cm x 9.7cm. Die cut the SUP Winter White card with the largest size die from the Majestic Elements die set.

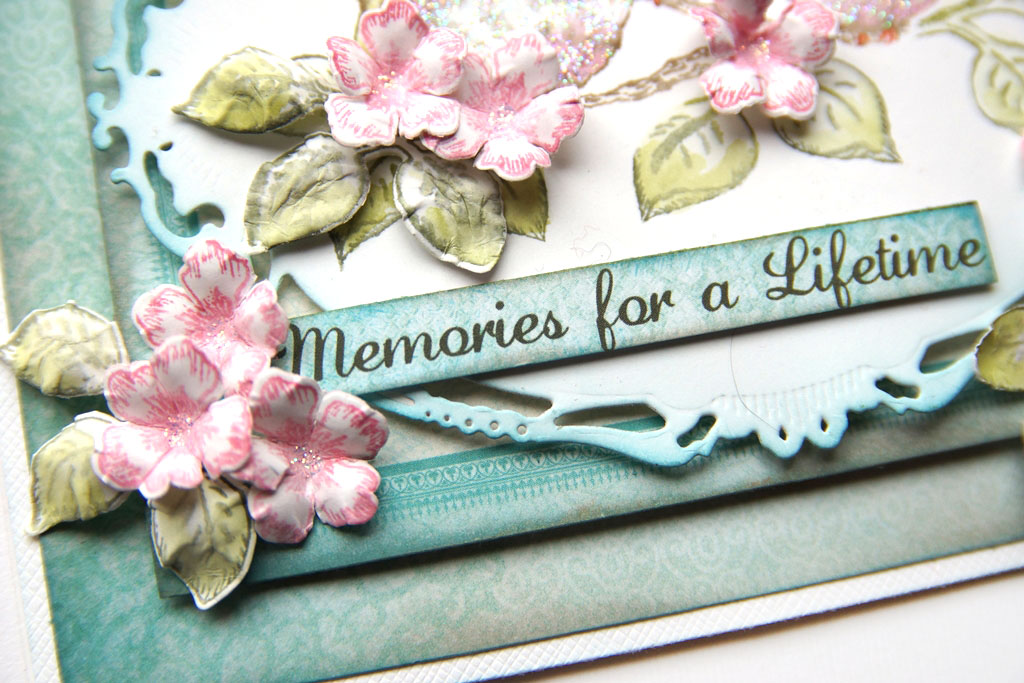
Find the design paper with the sentiment "Memories for a Lifetime", cut this out. Ink all the edges of the cut design papers and Whisper White card, first with Pumice Stone then Broken China inks.
To bring the image of the birds and branch on to the Whisper White Majestic Elements die cut, using the SUP markers draw on the image lines on the stamp being careful not to add any extra lines. Just before using the Stamp Positioner Kit to stamp the image in the correct position, breath on the inked image to make sure the ink is still moist. On a separate Whisper White card, do the same with the image of the bird on a twig from the Birds and Blooms Collage stamp, the leaves HCPC 3646 and flowers from the HCPC 3644 stamp sets. With the water brush and water, drag the color from the ink outlines into the image. Use the heat gun to dry and seal the ink. SUP inks are not permanent. When this is done you can die cut the stamped images with the matching dies, HCD1 756 and HCD1 757. Sorry, you will have to cut the bird on the twig by hand. You can now ball and shape the leaves and flowers using the Paper Blossoms Tool Kit and Mat.

The order of placement and gluing onto the White card stock base is as follows. Glue down with wet glue or double sided tape, the largest prepared design paper. Attach Double Dots to the back of the prepared design paper frame and stamped Whisper White Majestic Elements frame die cut. When placing the layers, make sure you have them aligned and centered. Attach the sentiment with Double Dots. Glue the flowers down with wet glue. Add the leaves by tucking them under the flowers. Add three flowers and leaves to the left of the sentiment. Place the hand cut bird on a branch with Double Dots on the right of the card. Place a single flower to the bottom left of the bird. Apply stickles to all the bird bodies and flower centers. When dry, use the Black marker pen to dot the eyes, the Tangerine Tango marker pen to high light the beaks and claws on the birds.

Find the design paper with the sentiment "Memories for a Lifetime", cut this out. Ink all the edges of the cut design papers and Whisper White card, first with Pumice Stone then Broken China inks.
To bring the image of the birds and branch on to the Whisper White Majestic Elements die cut, using the SUP markers draw on the image lines on the stamp being careful not to add any extra lines. Just before using the Stamp Positioner Kit to stamp the image in the correct position, breath on the inked image to make sure the ink is still moist. On a separate Whisper White card, do the same with the image of the bird on a twig from the Birds and Blooms Collage stamp, the leaves HCPC 3646 and flowers from the HCPC 3644 stamp sets. With the water brush and water, drag the color from the ink outlines into the image. Use the heat gun to dry and seal the ink. SUP inks are not permanent. When this is done you can die cut the stamped images with the matching dies, HCD1 756 and HCD1 757. Sorry, you will have to cut the bird on the twig by hand. You can now ball and shape the leaves and flowers using the Paper Blossoms Tool Kit and Mat.
The order of placement and gluing onto the White card stock base is as follows. Glue down with wet glue or double sided tape, the largest prepared design paper. Attach Double Dots to the back of the prepared design paper frame and stamped Whisper White Majestic Elements frame die cut. When placing the layers, make sure you have them aligned and centered. Attach the sentiment with Double Dots. Glue the flowers down with wet glue. Add the leaves by tucking them under the flowers. Add three flowers and leaves to the left of the sentiment. Place the hand cut bird on a branch with Double Dots on the right of the card. Place a single flower to the bottom left of the bird. Apply stickles to all the bird bodies and flower centers. When dry, use the Black marker pen to dot the eyes, the Tangerine Tango marker pen to high light the beaks and claws on the birds.
I hope you had fun taking a look at one of many examples from this collection you will find over at Heartfelt Creations this month.
Don't wait to order your sets on time as this will be a quick and best seller in my opinion.
I am leaving tomorrow to fly yonder.....30 glorious days...no cooking....cleaning.....
Being waited upon! Have to deal with that one!
Down side is no room for any craft gear in the baggage.....not if I want to bring some new toys back with me...seam binding ribbon on the top of the list. Got to wait for all the CHA goodies till I get back home......I am sure I will find something to bring home with me! LOL
You all have a great time crafting in the next month. I will be posting but it will be fitted in so it will be basic posts.
Inky hugs sussipoppins oxo
Absolutely gorgeous, love your flowers!!!!
ReplyDeleteBoth projects are just perfect Sussi! I love the door hanger and the little flower buds are darling. The birdies on your card are so precious. I never would have thought to cover them with Stickles. I LOVE it. Have a great time on your trip. When you come back....pictures please!!! Hugs, M
ReplyDeleteThanks for all the detail photos today! Love your 3D blossoms...very realistic. Beautiful work!
ReplyDeleteSusan, your door item is stunning, the fussy cutting, then to make such small blooms, just fantastic.
ReplyDeleteSusan, I love both of your projects. They are stunning. I love the shine on your flowers, and the glittery shine on your birds.
ReplyDeleteSusan, both of these projects are beautiful! Love the beautiful flowers on the door hanger!
ReplyDeleteHugs,
Tracey
Your projects are stunning. I absolutely love all of the beautiful detail you've incorporated in both and your flowers are amazing Susan :)
ReplyDeleteBeautiful projects Susan! I love the door hanger and your coloring on the card is gorgeous.
ReplyDeleteBoth projects are gorgeous Susan! Love the colors and your beautiful blooms! Hope you are enjoying your vacation! Blessings! Kathy
ReplyDeleteI'm amazed at the techniques used on both the hanger and the card! So much detail and artistry involved, I'm so impressed!! Thanks for all the close-up pictures, each one showed more of the time and talent involved here!! Fabulous work Ms. Sussi P!!
ReplyDeleteThak you all for your wonderful comments....I am taking lots of photos to share. oxo to you all
ReplyDeleteSusan, I love your projects this week. Those flowers are very beautiful, and love how shiny they are!
ReplyDelete