
Hello to you all on this Friday morning, it is my turn to show you step for step this week on how to make something with this so wonderful Poppy Collection. I had sooooooo many ideas on what to do, it was so hard to make a choice....so I decided to use the KISS solution....
"Keep It Simple Susan"
This is something you can make with most flowers...we like that...
I hope you will get all fired up...inspired....and a ready to go feeling after spending a little time at my place this Friday, have fun.....

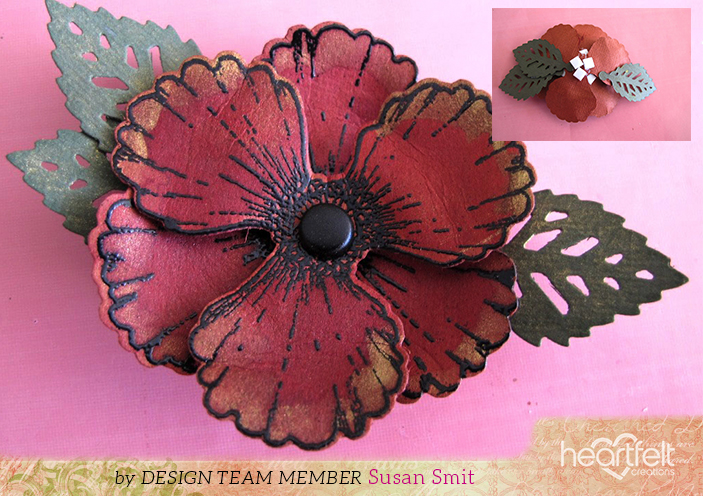
Step 1: Stamp the poppies using the versa-mark and black embossing powder. Stamp enough to make 5 X large, 1 X medium, 12 X small flowers. Each flower has 2 petal layers.

Step 2: Die cut the flowers. Die cut the leaves. 42 leaves are used in this project. Coloring with glimmer mist, make sure the mixture in the bottle is mixed well, so the sediment in the bottom of the bottle is totally mixed in the fluid. Pour a little of the color into a watercolor palette or small plate ready to paint onto the flower petals. See TIP #1.

Step 3: Do the same for the leaves using the Olive Vine glimmer mist

Step 4: When, the glimmer mist is dry on the poppy petals, using the TIP#1 paint the Olive vine to the petal edges.

Step 5: Make a whole in the center of the flower with a prick pen BEFORE you start shaping the petals for the placement of the brad later.
Step 6: Use the Deluxe Flower Shaping kit to shape the poppy petals. First ball with the balling tool so the petals curled down then curled the ends up again. Play around and have fun with a few extra cut petals. Balling and shaping till you get what you feel happy with. (The balling, breaks the paper fibers down which enables the shaping to take place. When you use water spritzer, a mister or wet color, the petals or leaves will dry hard and keep their new shape. Remember if you wet them again, the paper shaping will flatten. The balling and shaping will soften and relax.)


Step 7: Secure the petal layers together by adding a brad to each poppy flower top.
Step 8: Add double-sided 3d foam dots, to the center back of the top poppy petal. Secure this with the glue gun, so it will stay permanently in place. Remember you have used glimmer mist so the surface will not be porous. Again with the glue gun, adhere the two layers of poppy petals together as shown.
Step 9: To make, what I call “spring screws” cut very thin strips of card stock as shown. No more than 2mm wide x the length of the card stock. Using the quelling tool from the Delux flower Shaping kit, wind the card stock strip around the end point till the paper strip is used. Carefully remove the wound paper, holding one of the ends. This will keep the curl in a screw form, looking a bit like party slingers.

Step 10: Cut the polystyrene ball in half with a serrated edged knife. I used a not so best, bread knife. Paint the half ball with green Acrylic paint. If you do not have the right color green, make a mix of a little black with a green to get it right.

Step 11: Place the glass vase upside-down. Thus the vase foot becomes the top. This will become the “Bell jar” Adhere the painted half ball when dry, to the Bell jar top.
Step 12: Adhere the 5 large Poppy flowers around the base of the half green ball. The medium sized Poppy on the top. Add the leaves as shown in the photo. Look to tip #3 as to how to add the spring screws. This completes the top of the Bell jar.

Step 13: For the Bell jar bottom, make the Poppy flowers the same as the top using the smallest size of the stamp and die set. Place them in a line around the bottom of the glass. Place the leaves behind, under and next to the flowers as fillers. Use the same method as Tip #4 where needed. Curl the leaves on the under side up so they lay flat on the table.


Step 14: To make the center card: Cut with the red card stock 9 cm x 30.5 cm. Fold in ½ to form a card base. Cut Matting using the same card stock, cut twice at 8 cm x 14 cm. Using Water color paper cut twice at 7 cm x 13 cm.

Step 15: Take the stamp for the image from the Poppy Stems and Poppy Fillers stamp sets. Stamp one each on the watercolor paper. Use the “Tip” #1 for the coloring of the stamped image.

Step 16: Distress the matting. Use double sided tape to adhere all the papers together.
Adhere the papers to the card base, making the centerpiece card. Write a special message, place a photo on the inside of the card or leave it as is. Place in the Bell jar.
"TIP" #1
*Pour the glimmer mist color on to a water palette, china plate. I have been known to use a plastic rubbish bag in my WS. What is good about this, you can roll it up when you are done and use it again the next time you need it. Using a water coloring brush add color to your project, the same way as you would water colors. Keeping track of your colors, when dry add water then you are ready to go again.
*If you leave for the glimmer mist that is poured on to a palette for a while, the moisture will evaporate, thus the color will become deeper also, more of the metallic showing in your work. For the Olive Vine, I some times leave it over night so it becomes dry and a very intense in color. Then you can really see the gold. You can pick up the color with only the water on the brush or you could add a spray of water with a spritzer to get it flowing. Add more water as needed, depending on how intense or thick you want or need the glimmer mist to be. There are so many products on the market now…. but, we all still have the old faithful glimmer mists in our cupboards that need using up. This same technique can be used for all sorts of painting and enhancement of your cards, scrap or mixed media creations. It also makes a change from using paints or watercolors.
“TIP”#2
All the gluing and adhering in this project will be done with the glue gun. This will be quick and secure as to staying in place. You just need to watch your fingers as far as the heat goes, we don’t want any unwanted burns.
“TIP” #3
The reason why I make these to the length of the paper is so you can trim the spring screws to the length you want or needed for your project. Also because the screws are made with the card stock used in the project, there will be a lot going on but it will not fight with each other for attention. Thus not becoming too much or over done. I always place the glue on the largest end of the screw, then place between the flowers and leaves with the aid of tweezers. Thus using the screws as a filler.
“TIP” #4
Glue 2 leaves together at the side of the leaf, making sure one is a little higher than the other. This is so it looks natural and flatters the flowers more.
Products needed
Heartfelt Creations and Other Products sold on our Website:
Other Products:
Watercolor paper, Archival black ink, Acrylic stamp block, Paper distressing tool, Double-sided 3d foam tape, Acrylic paint, Black and Green
Old china plate, (to mix the paint)
Pigs hair paint brush, Glue Gun, Glass vase, Glimmer mist: Olive Vine, Red Velvet, brick, Watercolor palette, Watercolor brush
Black brads, large and small, Brick red and green card stock, Polystyrene ball, Bread knife/serrated edged knife, SUP black embossing powder, Versa-mark, Heat gun, Tweezers.
The complete project with close ups:


.......... more close ups of the other side


*********
Lots of close ups...some times we can not get enough of them. I hope you have fun giving this a go.You have the whole weekend to get it done....LOL....have fun making all those Poppies. This will make a wonderful gift for some one dear to the heart...or to spoil ones self....just.... because we deserve it.
We are having great sunny weather over here in Holland....I thought our summer was over last week. We can get in some multitasking in this weekend, out side shaping Poppies with our Deluxe Flower Shaping kit... and... getting all that vitamin D in...now that sure is a feel good fun experience...if you are not having those rays of sunshine...and if you are having that cold, wet, windy weather, snuggle up with hot chocolate, cookies and making these Poppies...that can also be a feel good thing to do on a Friday/weekend. It is a win win.
What ever your situation, have a scrappy inky time and remember, if you have any questions, leave a comment and I shall get back to you as soon as possible.
Till next Wednesday....inky hugs
Sussipoppins
Fantastic, project and so well done. thank you so very much for your detail tutorial. Gorgeous
ReplyDeleteGeweldig Susan dat is weer super wat mis ik jouw workshops waar ik zoveel leerde en waar we veel lol hadden. Dikke 💋
ReplyDelete