
Hi...welcome to my place!
If you have come from Heartfelt creations.....have you caught your breath yet?
WOW!!!!!!
WOW!!!!!!
This is my input for this fun days event, hope you have fun seeing how I put my book together....Sorry no film....but I do have lots of photos and a small tutorial of a double page for you.
Any questions and queries, let me know.
Heartfelt Creations Products and Products carried by Heartfelt Creations
3d flip fold album White
Pocket and Flip Fold insets A- White
Pocket and Flip Fold insets B-White
Pocket and Flip Fold insets C-White
Pocket and Flip Fold insets D-White
Fleur Boarders and Pocket die set
Regal Boarders and Pocket die set
Ornate Boarders and Pockets die set
Birds and Blooms cling stamp set
Birds and Blooms die set
Fluffy Birdies cling stamp set
Butterfly Medley cling stamp set
Botanical Wings die
Botanical Rose cling stamp set
All Glammed Up die set
Birds and Bloom paper pad
Scor-pal
Art Institute Glue
Gold Embossing Powder
Bottle cap super strong magnets
3d Crystal lacquer
Deluxe Flower Shaping kit
Tuxedo Black

Other Products:
Ranger: Heatgun, Disress tool, Water coloring brush, Interference red perfect pearls mist, Diamond, Fruit punch, Yellow, Turquoise stickles. Distressing tool,Distress Inks: Tattered rose, Aged mahogany, Forest moss, Antique linen, Faded jeans, Pinecone green. Other: Versa-mark, Swirl mask-Prima marketing, Old lace- Glimmer mist, White organza ribbon (5 mt), Pink thin satin ribbon (2 mt), Scor-tape or double sided tape, Small half pearls.
Card-stock 30 x 30 cm: Leap frog-Green x 15, Blossom-Pink x 7 . A4: White-for embellishments and flowers x 4 sheets.

Other: Versa-mark, Swirl mask-Primamarketing, Old lace-Glimmermist, White organza ribbon (5mt), Pink thin satin ribbon (2mt), Scor-tape or double sided tape, Small half pearls.
Card-stock 30 x 30 cm:Leap frog-Green x 15, Blossom-Pink x 7 . A4: White-for embellishments and flowers x 4
Instructions: This album measures 23 cm x 17.7 cm x 8 cm. The album has 5 pages with 2 cm gap between each page, this allows for the addition of flip folding pages and pockets. Which in turn, allows for numerous tags, inserts, photos and journalling to be added. Plus, this enables one to add 3d embellishments to enhance the pockets, flaps and to show case ones skills of embellishing and decorating. In addition to this album, there are 4 sets of pockets and flip-fold inserts of various shapes and sizes to chose from. Not only that...you get 3 color choices. This is a win win!
The album show cased here has white as the base color. Featuring green and pink card-stock and the Birds and Bloom paper pad. The album has no photos added to the pages or pockets. This enables one the option to give this album as a gift. The new, proud owner can chose their own photo theme and the type of photo. Color, sepia or black and white. There is plenty of room for journalling...and if not...one can make room by adding another tag to fit the pocket or flap. This new addition to the Heartfelt Creations product line is so fun. All the hard work has been taken out, the only hard thing here, is making choices as to what flip-fold insert or pocket to use. Not forgetting the new boarder and pocket dies, and of course, the paper pad one loves the most for the album.....have fun choosing...lol. This post will show lots of photos of the inside of this book. 2 tutorials. 1st on how the cover of the book was put together and a double page with the pink card stock and the boarder dies.
Here is a photo tutioral on how I put the cover together.

Taking the mask and glimmer mist, place and spray on the spine. and the linen part of the book front and back covers. Set aside to air dry.

When dry cut for the front and back cover, cut the green card stock to fit to the book.. Distress the edges then, adhere to the book.

Find the paper in the paper pad. Both sheets are used here. Fussy cut around the leaves. Measure the cover across to the linen, this is the measurement to cut as shown. Distress the edges.

Here you see the placement before the papers were adhered to the cover. Use wet glue so you can slide the papers to get them in the correct position.

This is what the cover looks like when the paper is glued down.

Be careful when gluing the folds of the spine. Gently easing into place. When the book is open, you will get a gap...this can not be avoided.

Now for the fun part! This was done once all the inside is completed. You don't want your book to get damaged while working on the inside! Once the flowers are on the out side the book, when opened, the book will not sit flat any more.

The ribbon is attached with the glue gun under the flowers. You can do this before the flowers are added or as I did after. The up side of doing this after, you can fit the placement to the flower arrangement. The other way, you have to fit the flower arrangement to the ribbon position. Up to you...lol
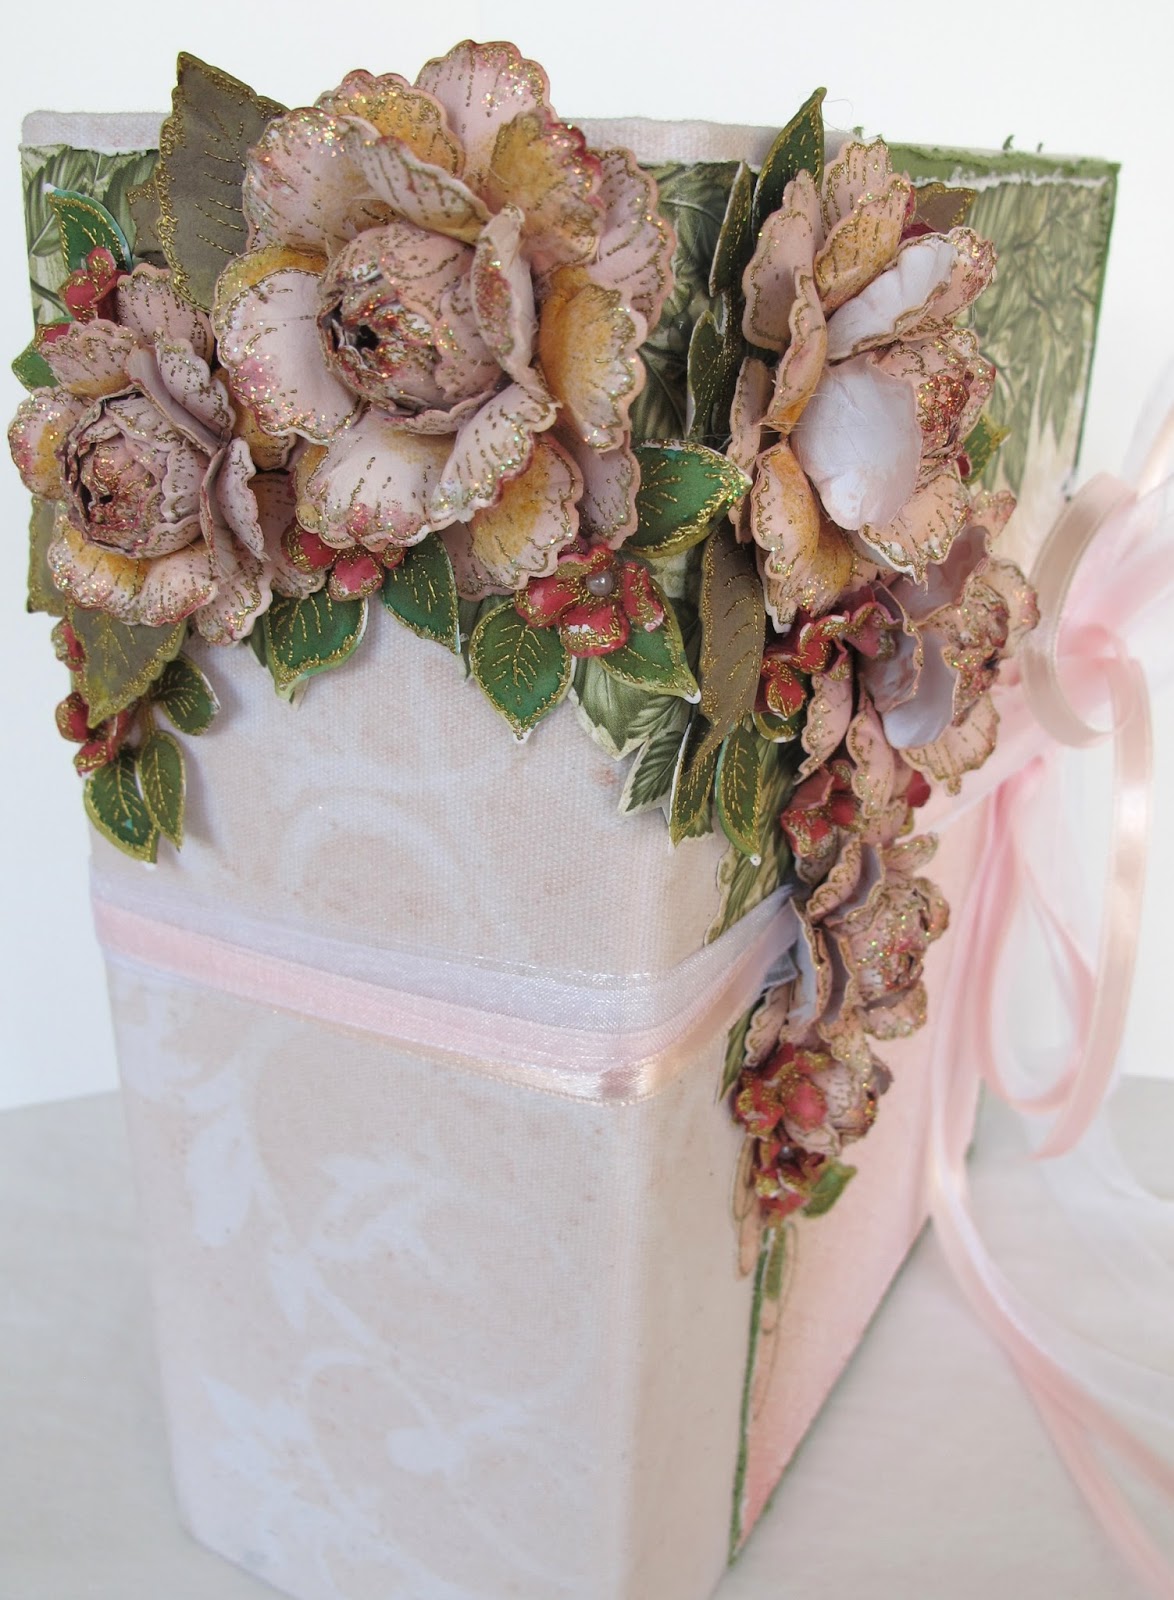
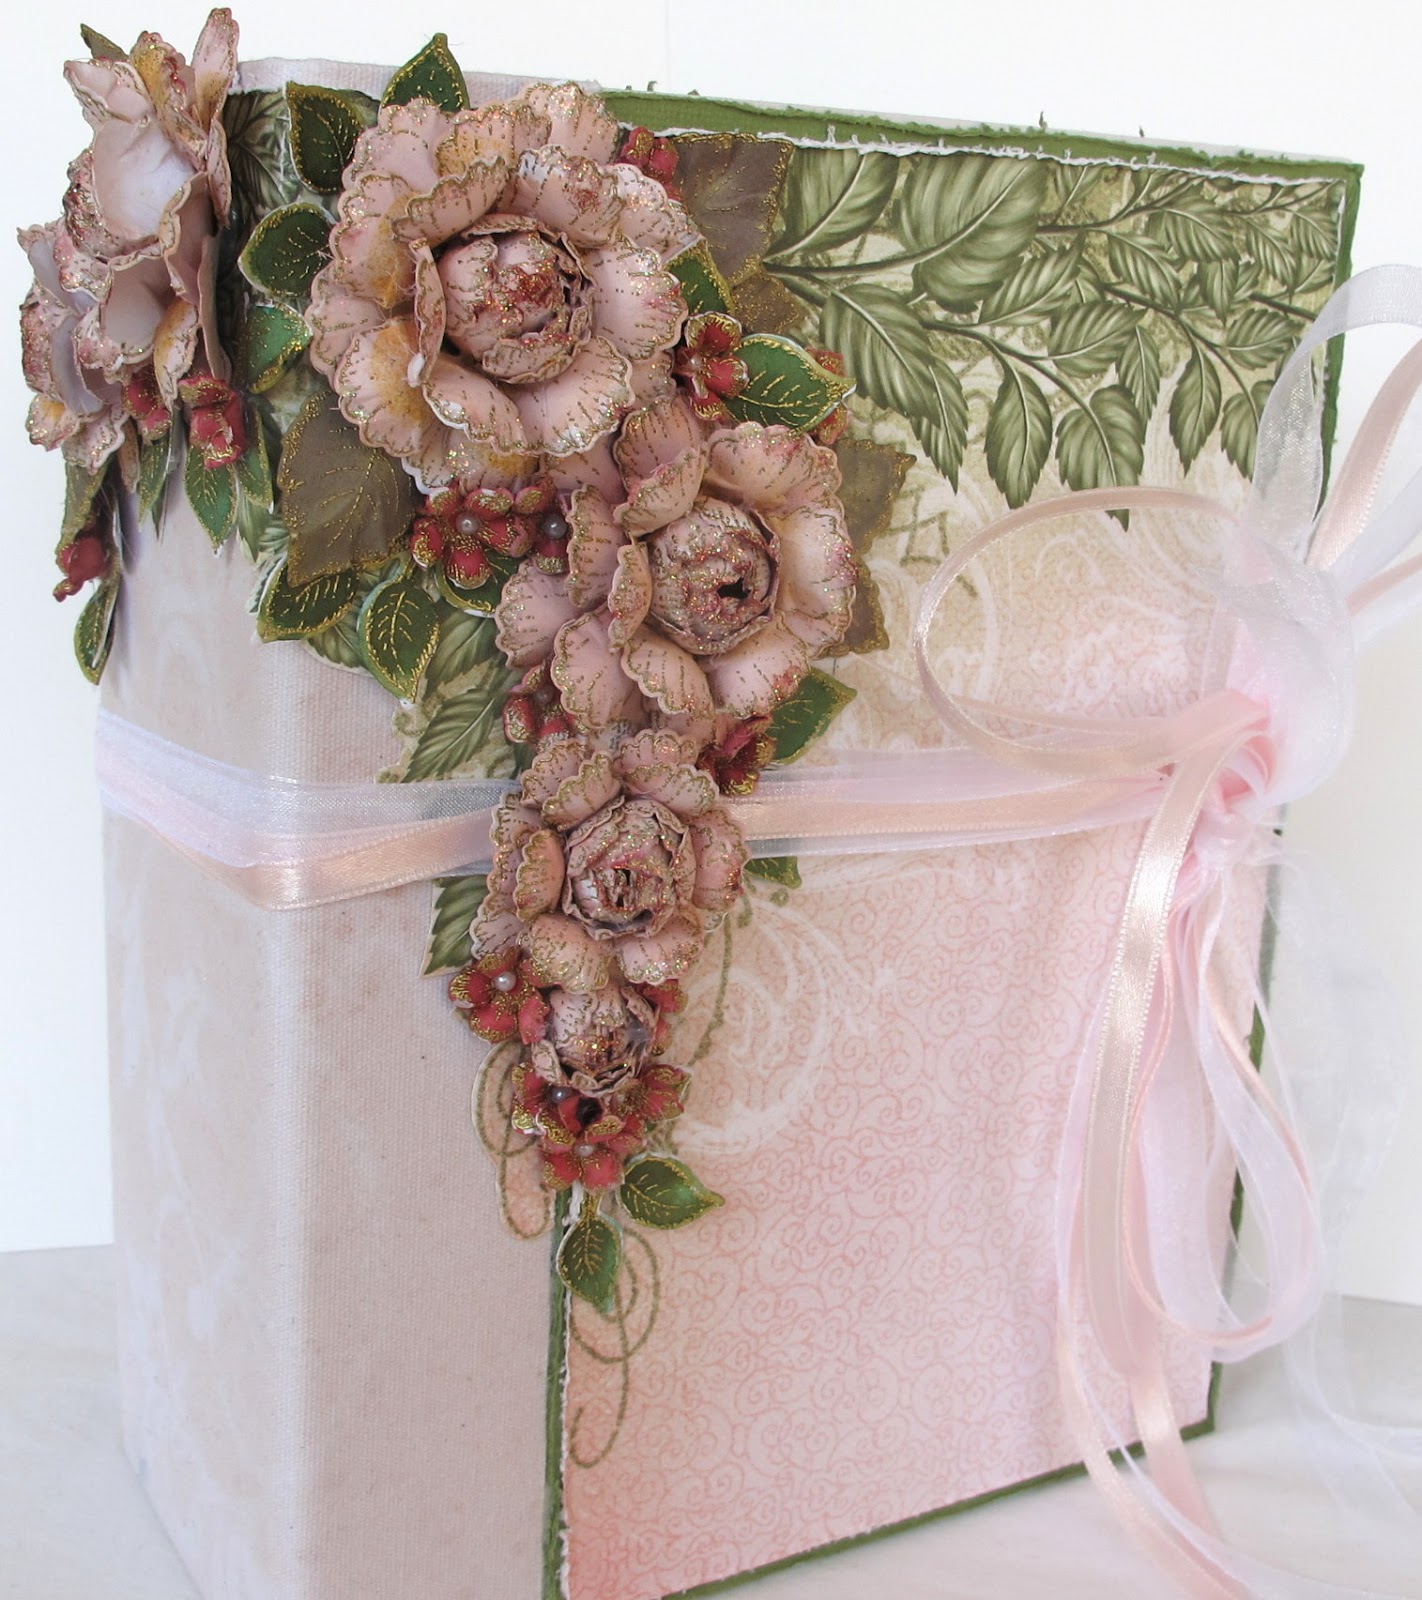
A side and front view of the completed book.

More views so you can see how I placed the flowers. First placing the large flowers, the leaves then the smaller flowers as fillers. Adding extra leaves as needed.

See how the paper design was used as a guide for the flower arrangement. It was a shame to cover most of the beautiful design up.

The ribbon is cut extra long to make a very luxurious bow. Cut 2 x the lengths of the organza and satin.

The pearls and stickles are added after the flowers are in their place. This makes it easier to adhere the pearls. You also see here a little extra ink is added to the rose bud and petal tips, this was added before the stickles. The stickler lifted the colour....take this into account...the colour will become darker once the stickler have been added. You can always add more later if it asks for more colour.

See how the ribbons are tucked under the flower. Adhere with the glue gun.

Here are all the close ups of the inside of the Album.
Here is a tip on how I used the flips and folds...at first it was so confusing as this was a first time for me....but by time you get these the packaging is all Heartfelt Creations and beautiful. Remember we got the proto types to work with...it is the inside that counts...right?....
I also wrote on the flip fold cards the set number so I could always find which set it belonged to.once all the packets are opened.

Now just a few....hahaha....photos of the pages.
Don't give up too soon.....at the end of the inside book photos there is a tutorial on how to put the pink double page together.
Don't give up too soon.....at the end of the inside book photos there is a tutorial on how to put the pink double page together.

Above, the inside cover


Sorry these photos are on side...I tried but could not get them to turn...this makes your visit that much more interesting....lol


A few photos of this double page.


Nearly there......


Remember there are no photos placed....hope you can figure it out.It does not help that a few of the photos are turned,,,,sorry.


A detailed photo tutorial of the pink page:
For all the pages and inside covers,I first cut the green card stock to size, prepared and adhered the design paper. This becomes a base, from there I built my page and added folders etc. When done, then I adhered the pages into the book...checking of course that the pages do not become too thick....
This photo shows the back inside placement.

Choosing a designed paper for the page front distressing all the edges, remember this will make the pages thicker, so take this into account.

A detailed photo tutorial of the pink page:
A photo of a double page completed, before it is adhered into the book. I shall show you how it was put together. with picture instructions.

How the boarder pocket is made.

Cut the fancy boarder pocket using the die x 2. You will be adhering these together to make a double layer. This will stand out more. You can see the cutting measurements.

Bring ink to the edges.

Adhere together the die cut pieces to the pocket base. Fold the flaps then adhere with a wet glue so you can slide it into place. If you use tape, that is OK, but you can not move it once placed.
Up to you.


It is not shown here, the smaller die pocket border was cut and placed to the bottom left edge of the page. It is shown in the completed page further down. Also shown here a few tag bases in the making
Below is the beginning of the left page top pocket. Cut as shown.

Sorry about the lighting.
Using the boarder dies cut as shown below.

Make as shown, see the measurements written on the card stock.
7.5 cm x 7 cm

cut the lace top x 2. adhere the layers to the base as shown.

Here is showing how to place the pocket on to the page base.

Now the bottom flap.

The tab fold is 1.1/2 cm -2cm.

Adhere together, Staple the ribbon to the flap so it will be secure.

Do this for both flaps.

Now to decorate and hide all the nasties.

Make double bows.

Stamp and die cut the flowers. A close up of the placement.

Now a lot of close ups for you to study so you know how and what...lol


Above you can see the crystal lacquer on the bird.

Make a band by using the boarder dies from the Dec collection, place a ribbon across the boarder. Place the bird, bow and flower cluster in the centre of the band. Adhere to the sides of the page, forming a band that you can slip tags, photos etc behind. These of course will settle in the pocket at the bottom of the page.

A few tags made, waiting for photos or journalling to be added.

You can have such a fun time using the boarder dies to make tags....before you know it....the day has gone!

Don't forget, once the photos and journalling are in...life then becomes very much more interesting!

Add stickler to the swirl pattern in the lace pockets. It does not show well here, but it does give the page a fantastic finish.

Well....that was a long post! Are you dizzy? One of these days I shall invest a bit of time in looking into making a film....For you better, but for me......I'm happy that I can do this!
Now get back to the fun over at Heartfelt Creations and see what the other gals have got up to for this weeks posting. Belive me, if you have not come from there it sure is worth going....a super great bargain too!
Till next week...back to the Wednesday, have a scrappy inky time.
Hugs and X's sussipoppins
Gorgeous album Susan & your gold embossing add the royal touch to the blooms... Wow you have done a lot of distressing... it looks amazing!!!
ReplyDeleteThanks for sharing the tutorial :)
The cover of this album is amazing! Loved how your wrapped the floral display onto the spine...haven't seen this done but a couple of times. You've done a splendid job! Lovely pages. I so enjoyed seeing that you chose to use some solid color...refreshing for the eyes. Too many designer papers soon begin to muddle together. The use of solids provides a nice base for your beautiful embellishments. Well done!
ReplyDeleteJust beautiful Sussi! Love your soft delicate color choices and your photo tutorial is great! Lots of inspiration!!! Hugs
ReplyDeleteBreathtaking! So gorgeous!
ReplyDeleteSusan, your buds on your flowers always amaze me. I love your double bow, love how you did the spine and wrapped it around the cover. Your die details are fabulous, and this is one amazing album!
ReplyDeleteMagical!
ReplyDeleteHi Susan. I absolutely love the album. Thanks for sharing.
ReplyDeleteSusan, this is a beautifully detailed album. I love those double bows and your flowers are stunning as always... your signature gold embossing just puts it over the top making it all so regal and grand!
ReplyDeleteHugs,
Tracey
I'm speachless, you're work is as always gorgious! ;)
ReplyDeleteHugs Gèraldine
What a beautiful creation!! Every page is stunning!!
ReplyDeleteBeautiful album
ReplyDeleteWow!! Awesome! Very beautiful! Thank you for shareing!
ReplyDeleteEach page is a study of art and reveals the inner beauty you possess. By gazing at the art, your expressions are made clearly to others. Thanks for sharing.
ReplyDelete