

You can get a printout of all the instructions and the product list HERE
Or you can scroll down to get the info at the bottom of the posting.
Inky hugs and have a scrappy happy crafting week.


Heartfelt
Creations Productsused for this project and Products sold on their website:
HCDP1-2735
Floral Frames paper collection
HCD2-7399 Flourish Companion Frame die
HCD2-7400 Classic Companion Boarder die
HCD2-7401
Classic Butterfly Companion die
HCD2-7402
Filigree Companion Frame die
HCPC-3975
Rectangular Floral Frame cling
HCD1-7386 Rectangular
Floral Frame die
HCPC-3976
Oval Floral Frame cling
HCD1-7387 Oval
Floral Frame die
HCPC-3976 Curvy Floral Frame cling
HCD1-7387 Curvy
Floral Frame cling
HCS1-457-2 Pastel Pearl-medium
Stamens
HCS1-457-3 Pastel Bead-medium Stamens
HCDA1-449
Daubers Pack of 6
HCPP1-475
Deluxe Flower Shaping Paper pack of 50
HCST1-401
Deluxe Flower Shaping Kit
159723 Designer Dries Clear Adhesive, 352954 Metal Tips For Adhesive, 359848 Spellbinders tool ‘N’ one, 409311 Color In Water Brush-fine, AM7454 Quickstick Craft Tool, RLH5100 Hydra Sponge, 173842 Scor-pal, RACP500 Ranger Archival Sepia Ink
OTHER
PRODUCTS USED:
Spectrum Noir Harmony inks: Topaz Green, Pink Tulip,
Chinese Red, Lemon Tonic.
Other:
Double side tape, Hot glue gun, Fussy cutting scissors, Misti stamping tool, Paper
trimmer, grey board, Pale gold organza ribbon, Gesso, Water spritzer, Cloth
(old T-shirt)
INSTRUCTIONS:
This mini accordion book measures 5 1/4“ x 7 1/4“
To make the
mini book base: Taking the grey board, cut this twice at 5 1/4“ x 7 1/4“. Taking the white card
stock, cut this four times at 5 1/4“ x 7
1/4“. Adhere in a sandwich
using the double sided tape and clear drying adhesive, the white card stock,
the grey board then the white card stock again. Do this twice so you have a
front and a back cover. For the accordion pages: using the white card stock cut
the five pages 6 3/4“ x 5 1/2“ and one at 6 3/4“ x 4
3/4 “ Make a fold along the 5 1/2“ length at 4 3 / 4 “. Adhere the
pages together using double sided tape and clear drying adhesive to make an
accordion, the last page does not have the fold. Adhere to the front and back
covers. Adhere the ribbon to the back of the book with the double sided tape.
Find the
design paper sheet 11 b as this will be used for all the pages of the book. For
the front and back cover die cut a shape using the outer die from the Flourish
Companion Frame die set. Cut two, one for the front and the other for the back.
Die cut also the smaller outer frame in the same set, once. From the white card
stock die cut the fancy thin frame using the inner die from both sizes, the
lager and the smaller. Cut also an extra smaller sized outer frame.
Adhere the
lager outer frames to the front and back of the book cover. Adhere the white
card stock thin frame to the front cover. Adhere the design paper small frame
to the white card stock frame then adhere the thin inner frame to this. Use
double sided foam dots to this, apply a little clear drying glue to the foam
dots then adhere to the front cover. Apply randomly a little Chinses red ink to
the white thin frames.
Each of the
book pages has a matting from the design paper sheet 11 b cut at 4 1/4“ x 6
1/4“ . Adhere this with the double sided tape.
The book is ready to decorate. All is die cut with the white card stock and
coloured with the harmony water inks and the water spritzer. All is adhered to
the book using the clear drying adhesive unless stated.
Page 1- Using the Classic Butterfly Companion
die, die cut the image. Using the fussy cutting scissors, cut away the card
stock below and above the butterfly. Use the Tonic Yellow and the Topaz Green
inks a seen in the project photo. Adhere in place,
leaving the fold out butterfly free.
Page 2- Using the Classic Companion Boarder
die, die cut the image. Apply adhesive to the three straight edges to form a
pocket, adhere to the edge of each page where the matting begins.
Page 3- Using the
Classic Butterfly Companion die, die cut the image. Bring colour to the die
cut using the Chinese Red, Topaz Green and the Lemon Tonic water inks. Use the
water spritz to blend the inks. Adhere in place, leaving the fold out butterfly
free.
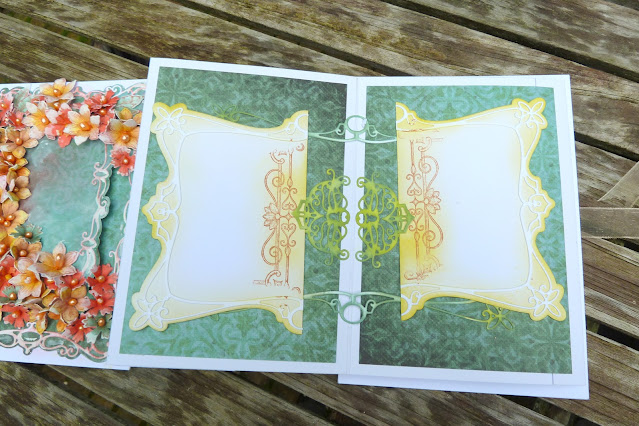
Page 4- Using the Filigree Companion Frame die,
die cut the outer frame once and the thin matching frame twice. Cut also two
corner pieces. Cut in half the outer frame and colour the edges with the Lemon
Tonic ink, using the sepia ink and the Rectangular Floral Frame stamp, stamp without
a stamping block or stamping tool at the straight edge. ( this is so the
stamping will not be clear and softer at the edges. Use a cloth to wipe away
excess ink. Do the same on both sides. Adhere the thin frame to this and cut to
fit.
Colour one of the thin frames with the Topaz
ink, Adhere to the page by using the Lemon Tonic. Color the die cut corners
with the Topaz Green and the Lemon Tonic inks, adhere to the book at the fold
line but leaving the fold parts free for the cards to slip into.
Page 5. Using the Classic Companion Boarder die, die cut this
with out using the insert part of the die. Make a fold along the long straight
edge of the card stock about 1 1/2" Ink all the edges with the Lemon Tonic ink
and spray with the water spritzer. Adhere at the book fold using double sided
tape and adhesive. Using the sepia ink and the stamp from the Curvy Floral
Frame cling set ( use only the part that has two flowers. ) Stamp three images
on the page flaps. Make the 3 D flowers by stamping onto a sheet of white card
stock, colouring with Pink Tulip and
Lemon Tonic inks, die cutting and shaping. ( these flowers can be made
at the same time as the flowers are made for the front cover. ) Adhere to the
page using the hot glue gun.
The card inserts are cut from the white card
stock stamped with the sepia ink with out a stamping block or stamping tool so
the image will be softer and random. Wipe excess unwanted ink away from the
stamp by using a cloth before applying the inked stamp to the card. Each card
is stamped differently and using parts of all the Floral Frame stamps. Apply
different inks to the images using the daubers and water spritzing to blend the
colours. Adding extra water spritz to get the ink to run. Leave to dry
naturally and when still a little damp, put some weight on them with a few
books to enable them to dry flat.
To make the flowers: Make the flowers by taking
the white card stock and sepia ink to stamp the flower petals from the
collection stamp sets.
From the Rectangular Floral Frame set, the
stamen stamp is used ( x4, coloured with Chinese Red inks ) The corn flower
shape ( x21, coloured with the Chinese Red and the Tropical Green inks ) The
large flower ( x8, coloured with the Pink Tulip and the Lemon Tonic inks) the
leaves ( x5 and coloured with the Tonic Green ink )
From the Curvy Floral Frame set, the flowers
( x4 Large size coloured with the
Chinese Red ink and x4 Large size coloured with the Lemon Tonic and Chinese
Red inks ) .The leaves ( x5, coloured with the Topaz ink )
The stamens used for the flower centers are
pastel yellow / orange and the pale yellow Pastel Bead. The stamens are adhered
with the hot glue gun once the flowers are shaped with the shaping tools. When
all the flowers and leaves are made, arrange and adhere in place on the front
cover and to page 5 if not already done.
Add gesso to the flowers and book pages by
adding it with you finger tip so you can blend the gesso as you go. Add a
little at a time, when the gesso is dry add more if you want it to be more
muted. Remember, less is more, for this time.
Tip:
1. It is easier to clean any gesso accidents as
soon as you can as when it is dry it is much harder to clean up.
2. If extra flowers and leaves are made they
will always be used. To have to start all over again to make flowers because
there is one or two that are needed is not much fun. If there are left overs,
they can always be used in other projects.
No comments:
Post a Comment