
...from HEARTFELT CREATIONS. The FLORAL FRAMES collection....
Lets have some crafting fun!


Heartfelt Creations Products and Products sold on their website:
HCDP1-2735 Floral Frames paper collection, HCPC-3975 Rectangular Floral Frame cling, HCD1-7386 Rectangular Floral Frame die, HCPC-3976 Oval Floral Frame cling, HCD1-7387 Oval Floral Frame die, HCPC-3976 Curvy Floral Frame cling, HCD1-7387 Curvy Floral Frame cling, HCS1-457-2 Pastel Pearl-medium Stamens, HCDA1-449 Daubers Pack of 6, HCPP1-475 Deluxe Flower Shaping Paper pack of 50, HCST1-401 Deluxe Flower Shaping Kit
159723 Designer Dries Clear Adhesive, 352954 Metal Tips For Adhesive, 359848 Spellbinders tool ‘N’ one, 409311 Color In Water Brush-fi, 85Glitter Glitter Ultrafine Heat it Tool, AM7454 Quickstik, 173842 Scor-pal, RACP500 Ranger Archival Sepia Ink
OTHER PRODUCTS USED: Inks: Spectrum Noir Harmony - Topaz Green, Pink Tulip. Other: Misti stamping tool, Fussy cutting scissors, Ruler, Hot glue gun, Double sided tape.
INSTRUCTIONS
This card measure 6 “ x 6 “ when completed.
Make a tent fold card measuring 6 “ x 6 “. Taking the sheet number 6 a from the Floral Frames paper pad collection. Trim this a little smaller than the card front and adhere in place using the double sided tape or clear drying adhesive.
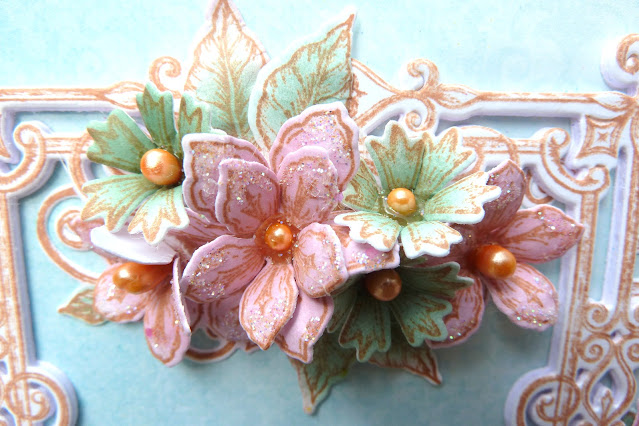
Taking the stamp and matching die for the frame from the Rectangular Floral Frame set. Using the sepia ink, stamp the frame three times. Taking the matching dies, die cut the stamped frames and die cut eight extra from the white card stock.
To make the main frame: Taking one of the stamped frames and cut diagonally at the flower end of the frame on both sides ( it is cut diagonally so you won’t see the join so much later ). Put the flower image of the frame aside for another project. Taking a second frame do the same but at the other end. Making sure the cuts will be able to fit together when joined later. The frame on the card measures just over the 5 “ in length. It can be made longer if wanted. Using the eight die cut frames, cut these to fit the two stamped cut frames, you should have four layers for each. Adhere the stacks together then adhere the stacked frames to the center of the card front, butting the joins together so the joins in the frame are not seen too much.
To make the frame sides: Trim the remaining two stamped frame images to 1 1 / 4 “ from the frame end with the flower image on it so to fits the card front when both sides are adhered next to the main card frame. Adhere to the card front sides as seen in the project photo.
Taking the Oval Floral Frame cling stamp, matching die, white card stock, the sepia ink then stamp the image twice ( you will only be needing the smaller flower cluster from the stamping. Color with the Topaz Green and Pink Tulip inks. Die cut this then trim away any unwanted image so you have only the smaller flower cluster. If you have stamped the whole image, set the unwanted part aside for another project. Adhere the two images to both the bottom and top of the inside of the frame so it will show when the 3 d flowers are adhered in place.
For the sentiment: Using the sepia ink, the white card stock and the matching sentiment stamp and die from the Oval Floral Frame set. Stamp once and die cut, die cut four extra shapes from the card stock. Stack and adhere together. Using the Topaz Green to bring colour to the sentiment. Adhere this into the centre of the frame.
To make the flowers: The flowers used from the Rectangular Floral Frame sets are the corn flower shape x 10, the leaves x19 and coloured with the Topaz Green ink. The flowers using the Curvy Floral Frame sets, x7 both sizes and the small size only x 5. These are coloured with the Pink Tulip ink. Bring shape to the flowers and leaves by using the deluxe flower shaping kit. The pale yellow / orange pearl stamens are used for the flower centers. The hot glue gun is also used to adhere together and in place. Cluster and adhere in place as seen in the project photo.
To finish the card, using the Designer Dries Clear Adhesive with the metal tip on it, apply this to the pink flower tips and sentiment. Sprinkle the glitter over the adhesive and put aside for the adhesive to dry. When dry tap away any excess glitter.

I hope you had fun visiting today...till next time, have a happy scrappy day.
Inky hugs...
No comments:
Post a Comment